Advertisement
Quick Links
Advertisement

Subscribe to Our Youtube Channel
Related Manuals for VEIKOUS PG0202-03

Summary of Contents for VEIKOUS PG0202-03
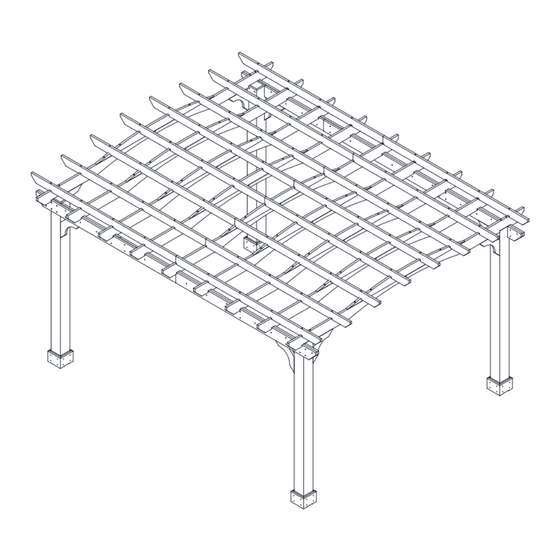
- Page 1 Wood Pergola Scan for Installation Video Instruction Manual...
- Page 2 1-858-324-1911 (Mon - Fri, 10:00 am to 7:00 pm EST) you can also e-mail customerservice@veikous.com or visit www.veikous.com Please prefer email contact. Due to busy lines, there may be a wait for calls to be answered.
-
Page 4: Parts Identification
Parts Identification... - Page 7 STEP1-1 REPEAT TIMES 50MM Place an L-shaped Bracket (J) at the bottom of the Post ( ), noting that the top and bottom of the Post are different. Place the L-shaped Bracket (J) flush at the bottom, and then fasten it to the Post with three Screws (G) through the pre-drilled holes.Turn the Post around.
- Page 8 STEP1-2 lnstall the rest six Brackets(J) on the other three Posts( )as shown. #Totally four Posts( ), eight L-shaped Bracket (J) and twenty-four Screws(G). <2>...
- Page 9 STEP2 REPEAT TIMES Connect the two long Header Boards( & ) and three short Header Boards(one and two ) together with twenty Screws(B) as shown. <3>...
- Page 10 STEP3 Keep the assembled Header at an angle of 90 and push it against the Post. Fasten it to the Post with sixteen Screws(A) and twelve Screws(B) through all pre-drilled holes. (Four Screws(A) and three Screws(B) per Post.) <4>...
- Page 11 STEP4-1 REPEAT TIMES 90MM 50MM 90MM 50MM 90MM 50MM 90MM Fasten the Top Rafter Board( ) to the two Bottom Rafter Boards( ) with four Screws(G) and four Screws(E).Then install the rest Rafter Boards. Finally you will get seven assembled Inner Rafters. <5>...
- Page 12 STEP4-2 REPEAT TIMES 90MM 50MM 90MM 50MM 90MM 50MM 90MM Next,fasten the Top Rafter Board( ) to the two Bottom Rafter Boards( ) with four Screws(G) and four Screws(E).(Totally two Outside Rafters Assembled.) <6>...
- Page 13 STEP5 C X8 Lift the two Outer Rafts into the notches of the Headers. Place the Rafters so that the marks on the Rafters are flush with the outside of the Headers. Connect the Rafters to the Headers on both sides with eight Screws (C) through the pre-drilled holes.
- Page 14 STEP6-1 C X2 Now install the inner Rafter and lift it into the notches of the Headers. Connect the Rafter to the Header with two Screws (C) through pre-drilled holes. (One Screw on each side of the Rafter). <8>...
- Page 15 STEP6-2 C X12 Now install all remaining six Inside Rafters as shown in previous step. <9>...
- Page 16 STEP7 G x2 F x2 Locate the Brace(⑩).Make it flush with the outside of the Header and outside of the Post. Fasten it with four Screws(Two Screw(G) and Two Screws(F)) through pre-drilled holes as shown. (Two into Header and Two into Post) <10>...
- Page 17 STEP8-1 D x8 Locate the Stringer ( ). Put it on the top of the Rafters. Pay attention to the direction of the Stringer. Position the Stringer firmly into the notches. Fasten each Rafter with eight Screws (D) through the pre-drilling holes. <11>...
- Page 18 STEP8-2 D x56 Install all remaining Stringers as shown in the previous step. <12>...
- Page 19 STEP9 Locate the Part(I).Place it on the top of the Stringers( ). Fasten it with two Screws(H) through pre-drilled hole.Then install all remaining Parts as shown.( Totally sixteen Screws(H)) <13>...
- Page 20 STEP10 Locate the Post Skirt Pieces( & ).Place the four Post Skirt Pieces against the post on the side. Fasten the Post Skirt Pieces together with sixteen Screws(G) through pre-drilled holes at each Post.Repeat this step on the second Post. <14>...
- Page 21 STEP11 <15>...
- Page 22 Enjoy your products! lf you have any problem, please E-mail us at customerservice@veikous.com.
Need help?
Do you have a question about the PG0202-03 and is the answer not in the manual?
Questions and answers