Table of Contents
Advertisement
Available languages
Available languages
Quick Links
Advertisement
Chapters
Table of Contents

Subscribe to Our Youtube Channel
Related Manuals for Arenti Petcam1T

Summary of Contents for Arenti Petcam1T
- Page 1 PETCAM�T(F) QUICK GUIDE Smart Pet Treat Dispenser Camera...
-
Page 3: Table Of Contents
Quick start guide �. Packing list �. Product configuration �. Product description �. Specification �. Directions for use �. Legal notice �. Packing list Camera X� Power adaptor X� Type C cable X� Brush X� Quick guide X�... -
Page 4: Product Description
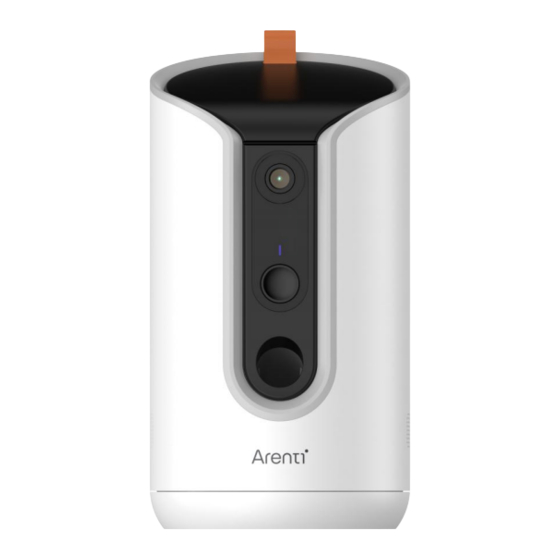
�. Product description Food barrel · Volume: �.�L SD card · The recommended food diameter is: �.�cm ~�.�cm (food with a lot of powder is not supported as it is easy to get stuck) Food ejection port Speaker Pan: �°~���°... - Page 5 Lens Microphone Status light · Blinking red light: wait for net connection (slow) connecting the network (fast) · Solid blue light on: camera is working correctly · Solid red light on: camera is malfunctional Feeding & Reset · Press to release food...
-
Page 6: Directions For Use
�. Directions for use �. Add food Open the lid; add pet food into the food barrel, and the height of the food should not exceed the MAX line; put back the lid. * The capacity of food barrel is �.�L. - Page 7 �. Release food on schedule (by App) Download the App "Arenti" and add the device. Set up the feeding plan in the APP, and then the food will be automatically released regularly and quantitatively. �. Clean up Open the silicone plug of the cleaning hole, and then use the provided small brush to clean up.
-
Page 8: Product Configuration
�. Product configuration Scan QR code to download and install the Arenti APP. Also, you can search "Arenti" on App Store (iOS) or Google Play (Android). Registration Open the App. If you are a new user, tap to create a new account and follow the prompts to complete account setup. - Page 9 Pairing Step � Open APP home page, Click "+" or "Add" and select icon according to actual camera. Note: When pairing, please put the camera and mobile phone close to the router. If camera is not in the red slow blinking after ��...
- Page 10 Step � Reset the camera and press “Next” on App. Step � Select the WiFi network and input the password, and press "Next". Make sure that your phone has connected to a fluent and steady Wi-Fi already. Note: The number of bits in the SSID and passwords of the router...
- Page 11 �. Camera is in pairing mode. �. Check your WiFi for network activity. If there doesn't work please or you have any other problems, please contact support@arenti.com to get help. Notice If you have multiple cameras, please follow steps again to add devices one by one.
- Page 12 Pairing via QR code on device (exclusively for PETCAM�F) Open APP home page, click "+" >> "Scan Code", then scan the QR code pasted on the device casing with the APP of your phone, and add the camera to the APP.
- Page 13 Settings �. Live viewing& settings In the live viewing interface, press " "to enter setting interfaces and set up the device common functions. �. Treat tossing Rotate the PTZ to find a suitable angle, press and release the food bowl icon on the App to throw the food once.
- Page 14 �. Recording & playing sound In the live viewing interface, press "One-press Calling" to play the sound to amuse the pet. You can also press "Voice Setting" in the live to select sound.In the Voice Setting interface, you can press"...
-
Page 15: Specification
�. Specification PETCAM�T PETCAM�F Product name ���� x ���� ���� x ���� Resolution ���° Angle of view Up to ��m IR Distance -��°C to ��°C Working temp Micro SD card (up to ���GB) Local storage �.�L Capacity Recommended food �.�~�.�cm... - Page 16 Expulsión de alimentos �. Lista de embalaje �. Configuración del producto �. Descripción del producto �. Especificación �. Instrucciones de uso �. Aviso legal �. Lista de embalaje Adaptador de Cable tipo C X� Cámara X� corriente X� Cepillo X�...
-
Page 17: Expulsión De Alimentos
�. Descripción del producto Tapa Barril alimentario - Volumen: �.�L Tarjeta SD - El diámetro recomendado de los alimentos es: �.�cm ~�.�cm (no se admiten alimentos con mucho polvo ya que es fácil que se atasquen) Expulsión de alimentos... - Page 18 Lente Micrófono Luz de estado - Luz roja parpadeante: esperando conexión a la red (lento) conexión a la red (rápida) - Luz azul fija encendida: la cámara funciona correctamente - Luz roja fija encendida: la cámara no funciona correctamente Alimentación...
-
Page 19: Instrucciones De Uso
�. Instrucciones de uso �. Añadir comida Abra la tapa; añada comida para mascotas en el barril de comida, y la altura de la comida no debe exceder la línea MAX; vuelva a poner la tapa. * La capacidad del comedero es de �,�L. - Page 20 �. Liberar alimentos en el horario previsto (por App) Descargue la App "Arenti" y añada el dispositivo. Configure el plan de alimentación en la APP y, a continu- ación, la comida se liberará automáti- camente de forma regular y cuantita- tiva.
-
Page 21: Configuración Del Producto
�. Configuración del producto Escanee el código QR para descargar e instalar la APP Arenti. También puede buscar "Arenti" en App Store (iOS) o Google Play (Android). Registrarse Abra la aplicación. Si es un usuario nuevo, pulse para crear una nueva y siga las instrucciones para completar la configuración de la cuenta. - Page 22 Emparejamiento Paso � Abra la página de inicio de la APP, haga clic en "+" o "Add" y seleccione según la cámara actual. Nota: Durante el emparejamiento, coloque la cámara y el teléfono móvil cerca del router. Si la cámara no está en el parpadeo lento rojo después de ��...
- Page 23 Paso � Reinicia la cámara y pulsa "Siguiente" en App. Paso � Seleccione la red WiFi e introduzca la contraseña, y pulse "Siguiente". Asegúrese de que su teléfono se ha conectado a una Wi-Fi fluida y estable. Nota: El número de bits en el SSID y las contraseñas del router...
- Page 24 �. La cámara está en modo de emparejamiento. �. Comprueba la actividad de la red WiFi. Si no funciona o tienes cualquier otro problema, ponte en contacto con support@arenti.com para obtener ayuda. Aviso Si tiene varias cámaras, siga los pasos de nuevo para añadir los dispositivos uno a uno.
- Page 25 Emparejamiento mediante código QR en el disp- ositivo (exclusivamente para PETCAM�F) Abra la página de inicio de la APP, haga clic en "+" >> "Escanear código", luego escanee el código QR pegado en la carcasa del dispositivo con la APP de su teléfono, y añada la cámara a la APP.
- Page 26 Ajustes �. Visualización en directo& ajustes En la interfaz de visualización en directo, pulse " "para entrar en las interfaces de configuración y configurar las funciones comunes del dispositivo. �. Lanzamiento de golosinas Gira la PTZ para encontrar un ángulo adecuado, pulsa y suelta el i cono del icono del cuenco de comida en la App para lanzar la comida una vez.
- Page 27 �. Grabación y reproducción de sonido En la interfaz de visualización en directo, pulse "One-press Calling" para r eproducir el sonido para divertir a la mascota. También puede pulsar " Ajuste de voz" para seleccionar el sonido. En la interfaz de configuración de voz, puede pulsar.
-
Page 28: Especificación
�. Especificación Nombre del producto PETCAM�T PETCAM�F Resolución ���� x ���� ���� x ���� Ángulo de visión ���° Distancia IR Hasta �� m Temperatura de trabajo De -��°C a ��°C Almacenamiento local Tarjeta Micro SD (hasta ��� GB) Capacidad �.�L... - Page 29 Korte handleiding �. Paklijst �. Productconfiguratie �. Productbeschrijving �. Specificatie �. Gebruiksaanwijzing �. Wettelijke kennisgeving �. Paklijst Camera X� Stroomadapter X� Type C-kabel X� Borstel X� Korte handleiding X�...
- Page 30 �. Productbeschrijving Deksel Voedselvat - Volume: �,�L SD-kaart - De aanbevolen voedseldiameter is: �,� cm ~ �,� cm (voedsel met veel poeder wordt niet ondersteund omdat het gemakkelijk vast komt te zitten). Uitwerpen van voedsel poort Spreker Pan: �°~���°...
- Page 31 Lens Microfoon Statuslampje - Knippert rood lampje: wachten op netwerkverbinding (langzaam) verbinding maken met het netwerk (snel) - Brandt continu blauw: camera werkt correct - Rood licht aan: camera werkt niet goed Voeden en resetten - Indrukken om voedsel vrij te geven...
- Page 32 �. Aanwijzingen voor gebruik �. Voedsel toevoegen Open het deksel; voeg dierenvoeding toe aan de voederton en de hoogte van de voeding mag de MAX-lijn niet overschrijden; doe het deksel terug. * De capaciteit van het voedservat is �,� liter.
- Page 33 �. Voedsel vrijgeven op schema (via App) Download de app "Arenti" en voeg het apparaat toe. Stel het voedingsschema in de APP in en het voer wordt automatisch regelmatig en kwantitatief afgegeven. �. Schoonmaken Open de siliconendop van de...
- Page 34 �. Productconfiguratie Scan de QR-code om de Arenti APP te downloaden en te installeren. Ook, je kunt "Arenti" zoeken in App Store (iOS) of Google Play (Android). Registratie Open de app. Als u een nieuwe gebruiker bent, tikt u op om een nieuw account aan te maken en volg de aanwijzingen om de accountinstelling te voltooien.
- Page 35 Koppelen Stap � Open de startpagina van APP, klik op "+" of "Toevoegen" en selecteer pictogram volgens de huidige camera. Opmerking: Plaats tijdens het koppelen de camera en mobiele telefoon dicht bij de router. Als de camera niet langzaam rood knippert na ��...
- Page 36 Stap � Reset de camera en druk op "Volgende" op App. Stap � Selecteer het WiFi-netwerk en voer het wachtwoord in, en Druk op "Volgende". Zorg ervoor dat uw telefoon al verbonden is met een loeiend en stabiel Wi-Fi-netwerk.
- Page 37 �. De camera staat in de koppelstand. �. Controleer je WiFi op netwerkactiviteit. Als dit niet werkt of als je andere problemen hebt, neem dan contact op met support@arenti.com voor hulp. Kennisgeving Als je meerdere camera's hebt, volg dan opnieuw de stappen om apparaten één voor één toe te voegen.
- Page 38 Koppelen via QR-code op apparaat (exclusief voor PETCAM�F) Open de startpagina van APP, klik op "+" >> "Scan Code", scan vervolgens de QR-code die op de behuizing van het apparaat is geplakt met de APP van je telefoon en voeg de camera toe aan de APP.
- Page 39 Instellingen �. Liveweergave& instellingen Druk in de interface voor liveweergave op " "om de instellings interfaces te openen en de algemene functies van het apparaat in te stellen. �. Behandelen Draai de PTZ om een geschikte hoek te vinden en druk op het...
- Page 40 �. Geluid opnemen en afspelen Druk in de live-weergave-interface op "One-press Calling" om een het geluid af te spelen om het huisdier te vermaken. U kunt ook op " " drukken in de live-weergave om een geluid te selecteren. om geluiden op te nemen die je leuk vindt.
- Page 41 �. Specificatie Naam product PETCAM�T PETCAM�F Resolutie ���� x ���� ���� x ���� Beeldhoek ���° IR-afstand Tot ��m Werktemperatuur -��°C tot ��°C Lokale opslag Micro SD-kaart (tot ��� GB) Capaciteit �.�L Aanbevolen voedseldi- �,�~�,�cm ameter Voedingsafstand Horizontaal �,�~�,�m Voedingsrichting Pan: �°~���°...
- Page 42 Schnellstart-Anleitung �. Packliste �. Konfiguration des Produkts �. Beschreibung des Produkts �. Spezifikation �. Gebrauchsanweisung �. Rechtlicher Hinweis �. Packliste Kamera X� Netzadapter X� Typ-C-Kabel X� Bürste X� Schnellanleitung X�...
- Page 43 �. Beschreibung des Produkts Deckel Fass für Lebensmittel - Volumen: �.�L SD-Karte - Der empfohlene Futterdurchmesser ist: �,�cm ~�,�cm (Futter mit viel Pulver wird nicht unterstützt, da es leicht stecken bleibt) Auswurf von Lebensmitteln Anschluss Sprecher Schwenken: �°~���° Stromversorgung Saugnapf - DC �V/�A...
- Page 44 Objektiv Mikrofon Statusleuchte - Blinkendes rotes Licht: Warten auf Netzverbindung (langsam) Verbindung mit dem Netz (schnell) - Blaues Dauerlicht leuchtet: Die Kamera arbeitet korrekt - Rotes Dauerlicht leuchtet: Kamera ist nicht funktionsfähig Füttern & Zurücksetzen - Drücken, um Nahrung freizugeben...
- Page 45 �. Gebrauchsanweisung �. Futter einfüllen Öffnen Sie den Deckel; geben Sie Tierfutter in die Futtertonne, wobei die Höhe des Futters die MAX-Linie nicht überschreiten sollte; schließen Sie den Deckel wieder. * Das Fassungsvermögen der Futtertonne beträgt �,� l. * Der empfohlene Futterdurch- messer beträgt �,�...
- Page 46 �. Essen nach Zeitplan freigeben (per App) Laden Sie die App "Arenti" herunter und fügen Sie das Gerät hinzu. Richten Sie den Fütterungsplan in der APP ein, und dann wird das Futter automatisch regelmäßig und mengenmäßig freigegeben. �. Reinigen Öffnen Sie den Silikonstopfen der...
- Page 47 �. Produktkonfiguration Scannen Sie den QR-Code, um die Arenti APP herunterzuladen und zu installieren. Außerdem, können Sie "Arenti" im App Store (iOS) oder bei Google Play (Android). Anmeldung Öffnen Sie die App. Wenn Sie ein neuer Benutzer sind, tippen. Sie auf , um ein neues Konto zu erstellen.
- Page 48 Paarung Schritt � Öffnen Sie die APP-Startseite, klicken Sie auf "+" oder "Hinzufügen" und wählen Sie Symbol entsprechend der aktuellen Kamera. Hinweis: Legen Sie die Kamera und das Mobiltelefon beim Pairing bitte in die Nähe des Routers. Wenn die Kamera nach �� Sekunden nach dem Einschalten nicht langsam rot blinkt, halten Sie die Reset-Taste �...
- Page 49 Schritt � Setzen Sie die Kamera zurück und drücken Sie auf "Weiter" in der App. Schritt � Wählen Sie das WiFi-Netzwerk aus, geben Sie das Passwort ein, und drücken Sie "Weiter". Vergewissern Sie sich, dass Ihr Telefon bereits eine Verbindung zu einem fließenden und stabilen Wi-Fi verbunden ist.
- Page 50 �. Die Kamera befindet sich im Kopplungsmodus. �. Überprüfen Sie Ihr WiFi auf Netzwerkaktivität. Wenn es nicht funktioniert oder Sie andere Probleme haben, wenden Sie sich bitte an support@arenti.com, um Hilfe zu erhalten. Hinweis Wenn Sie mehrere Kameras haben, befolgen Sie bitte die Schritte erneut, um Geräte nacheinander hinzuzufügen.
- Page 51 Kopplung über QR-Code am Gerät (exklusiv für PETCAM�F) Öffnen Sie die APP-Startseite, klicken Sie auf "+" >> "Code scannen", scannen Sie dann den QR-Code, der sich auf dem Gehäuse des Geräts befindet, mit der APP Ihres Telefons, und fügen Sie die Kamera zur APP hinzu.
- Page 52 Einstellungen �. Live-Ansicht & Einstellungen Drücken Sie in der Live-Ansicht die Taste " ", um die Einstellun -gsschnittstellen aufzurufen und die allgemeinen Funktionen des Geräts einzurichten. �. Behandeln Sie das Werfen Drehen Sie die PTZ, um einen geeigneten Winkel zu finden, drück...
- Page 53 �. Aufnahme und Wiedergabe von Ton Drücken Sie in der Live-Ansichtsschnittstelle auf "One-press Cal -ling", um den Ton abzuspielen, um das Haustier zu unterhalten. Sie können auch auf "Spracheinstellung" drücken. drücken, um einen Ton auszuwählen. in der Schnittstelle für die Spracheinste -llung können Sie auf"...
- Page 54 �. Spezifikation PETCAM�T PETCAM�F Name des Produkts ���� x ���� ���� x ���� Auflösung ���° Blickwinkel Bis zu ��m IR-Abstand -��°C bis ��°C Arbeitstemperatur Micro SD-Karte (bis zu ��� GB) Lokaler Speicher �.�L Kapazität Empfohlener �,�~�,�cm Futterdurchmesser Fütterungsabstand Horizontal �,�~�,�m Fütterungsrichtung...
- Page 55 Guide de démarrage rapide �. Liste de colisage �. Configuration du produit �. Description du produit �. Spécification �. Mode d'emploi �. Avis juridique �. Liste de colisage Caméra X� Adaptateur Câble de type C X� électrique X� Brosse X�...
- Page 56 �. Description du produit Couvercle Baril alimentaire - Volume : �,�L Carte SD - Le diamètre recommandé pour les aliments est de �,� cm à �,� cm (les aliments contenant beaucoup de poudre ne sont pas pris en charge car ils se coincent facilement).
- Page 57 Lentille Microphone Voyant d'état - Voyant rouge clignotant : attente de la connexion au réseau (lente) connexion au réseau (rapide) - Lumière bleue fixe allumée : la caméra fonctionne correcte -ment - Lumière rouge fixe allumée : l'appareil photo ne fonctionne pas correctement Alimentation et réinitialisation...
- Page 58 �. Mode d'emploi �. Ajouter de la nourriture Ouvrez le couvercle ; ajoutez de la nourriture pour animaux dans le baril ; la hauteur de la nourriture ne doit pas dépasser la ligne MAX ; remettez le couvercle en place.
- Page 59 �. Libérer les aliments à l'heure prévue (par l'application) Téléchargez l'application "Arenti" et ajoutez l'appareil. Définissez le plan d'alimentation dans l'applica- tion et la nourriture sera automa- tiquement distribuée de manière régulière et quantitative. �. Nettoyage Ouvrez le bouchon en silicone de l'orifice de nettoyage, puis utilisez...
- Page 60 �. Configuration du produit Scannez le code QR pour télécharger et installer l'application Arenti. En outre, vous pouvez rechercher "Arenti" sur l'App Store (iOS) ou Google Play (Android). Inscription Ouvrez l'application. Si vous êtes un nouvel utilisateur, appuyez sur pour créer un nouveau compte et suivez les instructions pour terminer la configuration du compte.
- Page 61 Couplage Étape � Ouvrez la page d'accueil de l'APP, cliquez sur "+" ou " Ajouter" et sélectionnez l'icône de l'appareil photo en fonction de votre appareil. en fonction de l'appareil photo actuel. Remarque : lors du couplage, veuillez placer la caméra et le téléphone portable à...
- Page 62 Étape � Réinitialiser l'appareil photo et appuyer sur "Suivant" dans l'application. Étape � Sélectionnez le réseau WiFi et entrez le mot de passe, puis appuyez sur "Suivant". Appuyez sur "Suivant". Assurez- vous que votre téléphone s'est déjà connecté à un Wi-Fi fluide et stable.
- Page 63 �. L'appareil photo est en mode d'appairage. �. Vérifiez l'activité de votre réseau WiFi. Si cela ne fonctionne pas ou si vous avez d'autres problèmes, veuillez contacter support@arenti.com pour obtenir de l'aide. Avis Si vous avez plusieurs caméras, veuillez suivre à nouveau les étapes pour pour ajouter les appareils un par un.
- Page 64 Kopplung über QR-Code am Gerät (exklusiv für PETCAM�F) Ouvrez la page d'accueil de l'APP, cliquez sur "+" >> "Scanner le code", puis scannez le code QR collé sur le boîtier de l'appareil avec l'APP de votre téléphone, et ajoutez l'appareil photo à...
- Page 65 Paramètres �. Visualisation en direct& réglages Dans l'interface de visualisation en direct, appuyez sur " "pour accéder aux interfaces de réglage et configurer les fonctions com -munes de l'appareil. �. Lancer de friandises Faites pivoter le PTZ pour trouver un angle approprié, puis app uyez et relâchez l'icône du bol alimentaire sur l'application pour...
- Page 66 �. Enregistrer et jouer du son Dans l'interface de visualisation en direct, appuyez sur "One-press Calling" pour jouer un son afin d'amuser l'animal. Vous pouvez égale -ment appuyer sur "Voice Setting" dans l'interface de visualisation en direct pour sélectionner un son. Dans l'interface Voice Setting, vous pouvez appuyer sur "...
- Page 67 �. Specification �. Avis juridique Soutien www.arenti.com Symboles Direct current (DC) Ne jetez pas les piles ou les produits hors d'usage avec les ordures ménagères. Les substances dangereuses qu'ils sont susceptibles de contenir peuvent nuire à la santé ou à...
- Page 68 Guida rapida �. Elenco degli imballaggi �. Configurazione del prodotto �. Descrizione del prodotto �. Specifiche �. Istruzioni per l'uso �. Nota legale �. Elenco degli imballaggi Adattatore di Cavo di tipo C X� Fotocamera X� alimentazione X� Spazzola X�...
- Page 69 �. Descrizione del prodotto Coperchio Barile per alimenti - Volume: �,�L SD card - Il diametro consigliato per gli alimenti è: �,� cm ~ �,� cm (gli alimenti con molta polvere non sono supportati perché è facile che si incastrino).
- Page 70 Lente Microfono Spia di stato - Luce rossa lampeggiante: attesa della connessione alla rete (lenta) connessione alla rete (veloce) - Luce blu fissa accesa: la telecamera funziona corretta -mente - Luce rossa fissa accesa: la telecamera è malfunzionante Alimentazione e reset...
- Page 71 �. Istruzioni per l'uso �. Aggiungere il cibo Aprire il coperchio; aggiungere il cibo per animali domestici nel barattolo e l'altezza del cibo non deve superare la linea MAX; rimettere il coperchio. * La capacità del barile di cibo è...
- Page 72 �. Rilascio del cibo in orario (tramite App) Scaricare l'app "Arenti" e aggiun- gere il dispositivo. Impostare il piano di alimentazione nell'APP, quindi il cibo verrà rilasciato automaticamente in modo regolare e quantitativo. �. Pulizia Aprire il tappo in silicone del foro di pulizia e utilizzare la spazzolina in dotazione per pulire.
- Page 73 �. Configurazione del prodotto Scansionate il codice QR per scaricare e installare l'APP Arenti. Inoltre, è possibile cercare "Arenti" su App Store (iOS) o Google Play (Android). Registrazione Aprire l'app. Se si è un nuovo utente, toccare per creare un nuovo account e seguire le istruzioni per completare la configurazione...
- Page 74 Abbinamento Fase � Aprire la pagina iniziale dell'APP, fare clic su "+" o "Aggiungi" e selezionare l'icona della telecamera in base alla fotocamera attuale. Nota: durante l'associazione, posizionare la telecamera e il telefono cellulare vicino al router. Se la telecamera non lampeggia lentam- ente in rosso dopo ��...
- Page 75 Fase � Reimpostare la fotocamera e premere "Avanti" su App. Fase � Selezionare la rete WiFi e inserire la password, quindi pre mere "Avanti". Assicurarsi che il telefono sia già collegato a una rete Wi-Fi fluente e stabile. Nota: Il numero di bit dell'SSID e delle password del router non deve superare le ��...
- Page 76 �. La fotocamera è in modalità di accoppiamento. �. Verificare l'attività della rete WiFi. Se non funziona o se si riscontrano altri problemi, contattare support@arenti.com per ottenere assistenza. Avviso Se si dispone di più telecamere, seguire di nuovo i passaggi per aggiungere i dispositivi uno alla volta.
- Page 77 Accoppiamento tramite codice QR sul dispositivo (in esclusiva per PETCAM�F) Aprire la pagina iniziale dell'APP, fare clic su "+" >> "Scan Code", quindi scansionare il codice QR incollato sull'involucro del dispositivo con l'APP del telefono e aggiungere la fotocamera all'APP.
- Page 78 Impostazioni �. Visualizzazione dal vivo& impostazioni Nell'interfaccia di visualizzazione dal vivo, premere " "per acce -dere alle interfacce di impostazione e impostare le funzioni com -uni del dispositivo. �. Lancio dei trattamenti Ruotare il PTZ per trovare un'angolazione adeguata, premere e rilasciare l'icona della ciotola del cibo sull'App per lanciare il cibo una volta.
- Page 79 �. Registrazione e riproduzione del suono Nell'interfaccia di visualizzazione in tempo reale, premere "One-press Calling" per riprodurre il suono per far divertire l'animale domestico. È anche possibile premere "Impostazione voce" per selezionare il suono. Nell'interfaccia di impostazione della voce, è possibile premere"...
- Page 80 �. Specifiche Nome del prodotto PETCAM�T PETCAM�F Risoluzione ���� x ���� ���� x ���� Angolo di campo ���° Distanza IR Fino a �� m Temperatura di lavoro Da -��°C a ��°C Memoria locale Scheda Micro SD (fino a ��� GB) Capacità...
- Page 81 FCC Statement This equipment has been tested and found to comply with the limits for a Class B digital device, pursuant to part �� of the FCC Rules. These limits are designed to provide reasonable protection against harmful interference in a residential installation. This equipment generates,...
- Page 82 Safety Information Power Adapter Safety: �.The power plug is intended to serve as a disconnect device.Do not drop or cause an impact to the power adapter. �.If the power cable is damaged (for example, the cord is exposed or broken), or the plug loosens,stop using it at once.
Need help?
Do you have a question about the Petcam1T and is the answer not in the manual?
Questions and answers