Table of Contents
Advertisement
Quick Links
Advertisement
Table of Contents

Related Manuals for Taga Harmony HTR-1000CD v.3

Summary of Contents for Taga Harmony HTR-1000CD v.3
- Page 1 HTR-1000CD v.3 HYBRID STEREO CD-RECEIVER Instruction Manual Edition 07-2023...
- Page 3 Introduction Thank you for purchasing this TAGA Harmony hybrid CD-Receiver. TAGA Harmony HTR-1000CD v.3 is a high-fidelity, stereo hybrid FM/DAB+ receiver with a built-in CD player. Key features: • Compact size and sleek aluminum front panel design is suitable for most interiors.
-
Page 4: Table Of Contents
Contents Safety Instructions Remote controller Front and Rear Panel Hooking Up Speaker Cables Hooking Up the CD-Receiver Operation ECO-Power/Standby and Automatic Standby features Setting the Clock INPUT selection Sound Control Headphone Connection Dimmer DAB Radio Operation FM Radio Operation CD Player Operation Play from a USB Flash Drive Play via Bluetooth ®... -
Page 5: Safety Instructions
Safety Instructions IMPORTANT READ THIS SECTION CAREFULLY BEFORE PROCEEDING! WARNING: TO REDUCE THE RISK OF FIRE OR ELECTRIC SHOCK, DO NOT EXPOSE THIS PRODUCT TO RAIN OR MOISTURE. DO NOT REMOVE COVER (OR BACK). NO USER-SERVICEABLE PARTS INSIDE. REFER SERVICING TO QUALIFIED SERVICE PERSONNEL. The triangle containing a lightning symbol is intended to alert the user to the presence of uninsulated dangerous voltages within the product’s enclosure that may be of sufficient magnitude to constitute a risk of electric shock to persons. - Page 6 Safety Instructions 1. Read Instructions - All the safety and operating instructions 13. Overloading - Do not overload wall outlets, extension cords or should be read before the product is operated. integral convenience receptacles as this can result in a risk of fire 2.
- Page 7 Batteries- Safety Instructions IMPORTANT READ THIS SECTION CAREFULLY BEFORE PROCEEDING! Make sure to insert the battery aligning the correct polarity - the positive and negative ends should be facing in the correct direction as marked on equipment. Incorrect fitting may cause leakage or, in extreme cases, fire or even an explosion.
- Page 8 Batteries- Safety Instructions Remember that small button cell batteries such as used in some hearing aids, toys, games and other appliances, may be easily swallowed by young children and this is dangerous. Keep loose button cells away from young children. Make sure appliance battery compartments are securely closed.
-
Page 9: Remote Controller
Remote Controller • Always use AAA bateries and do not use the rechargeable batteries. • If the batteries run out, remove the old batteries and replace them with new ones within several minutes. • If the batteries are placed incorrectly, thay can cause explosion. •... - Page 10 Remote Controller Note! The remote controller is working with other TAGA Harmony models and some buttons or features are not available (N/A) for this CD-Receiver. 1. Standby Button ( ) 2. Bluetooth function Button ( ) ® 3. DAB / Tuner function Button (DAB/FM) 4.
-
Page 11: Front And Rear Panel
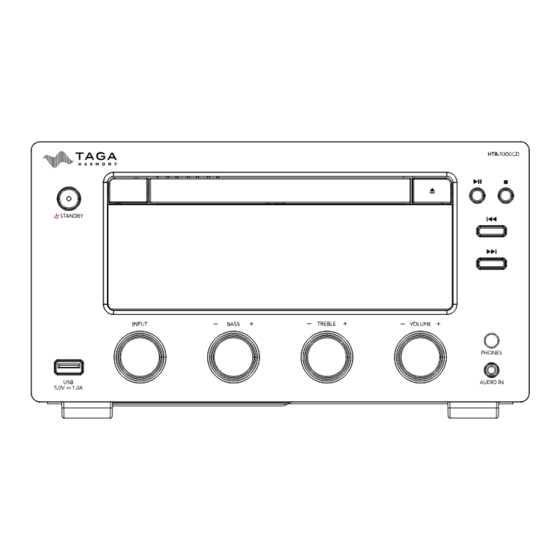
Front and Rear Panel Front Panel: Standby Button ( ) ECO Power Standby Mode Indicator Disc Tray Remote Controller Sensor Open/Close Button ( ) Play/Pause Button ( Stop Button Previous Button ( Search Backward Button ( Tuning Backward Button ( Next Button ( Search Forward Button ( Tuning Forward Button (... - Page 12 Front and Rear Panel Rear Panel: 19. Analog Stereo RCA Input - AUX IN 20. Digital Input - OPTICAL IN 21. Subwoofer RCA Output - SUB OUT 22. Speaker Connectors: Right and Left Channel Output - SPEAKERS OUT 23. DAB/FM Antenna Socket - DAB / FM 24.
-
Page 13: Hooking Up Speaker Cables
Hooking Up Speaker Cables The Speaker Connectors can accommodate up to 10AWG speaker cables as well as most of popular plugs (banana etc.). It is recommended to leave about 150 cm (5 feet) of extra cable at the amplifier end to facilitate positioning and installation of the amplifier. -
Page 14: Hooking Up The Cd-Receiver
Hooking up the CD-Receiver Active Subwoofer Network streamer etc. RCA-RCA RCA-RCA subwoofer interconnect interconnect Digital-to-Analog Converter etc. Digital optical cable Speaker cables DAB/FM Antenna Right speaker Left speaker Headphones USB Flash Drive 3.5 mm mini jack - mini jack Smartphone, interconnect tablet, etc. - Page 15 Hooking up the CD-Receiver Note! Make sure that the Power Cable is disconnected from the CD-Receiver and the wall outlet. Note! Make sure that external equipment which will be connected to the CD-Receiver is turned off. Connecting DAB/FM Antenna Note! The central pin of the connector in the supplied indoor DAB/FM antenna may be secured with a plastic cap - remove it before...
- Page 16 Hooking up the CD-Receiver Connecting Speakers Using speaker cables connect your speakers to the SPEAKERS OUT connectors. Check “Hooking Up Speaker Cables” for more details. Only speakers within the range of impedance 4 - 8ohm may be connected to this CD-Receiver. Connecting speakers outside this range may damage this CD-Receiver and / or speakers.
- Page 17 Hooking up the CD-Receiver External audio equipment connection options: Signal Input / Output Input / Output Connection cable HTR-1000CD v.3 external equipment Analog AUX IN input Output – RCA sockets RCA-RCA interconnect (1 pair supplied) Outputs: 3.5 mm mini jack - mini jack 3.5 mm (1/8’) socket...
-
Page 18: Operation
• Press the Standby or select any input on the remote controller to switch the CD-Receiver on. [TAGA HARMONY] will be displayed. • [PREHEAT] will be displayed and a countdown of 10 seconds will start for preheating of the CD-Receiver. -
Page 19: Setting The Clock
Operation Automatic Standby Mode To save energy, if there is no audio signal on active input (source) for approximately 15 minutes, the CD-Receiver will automatically switch to the Normal Standby mode, and then after some time to the ECO Power Standby mode. Note! In some cases this feature may not be activated. -
Page 20: Sound Control
Operation A multi-functional button on the remote controller ( ) - repeatedly press the but- DAB/FM ton until the required input is selected. The selected input will be indicated on the Display. Make sure the audio source is properly connected to the CD-Receiver and configured. Note! In the Standby mode, selecting an audio input (source) on the remote controller, will switch the CD-Receiver on. - Page 21 Operation TREBLE regulation: You can adjust treble output of the CD-Receiver in the range from -05 to +05. The default is 0. Front panel Turn the knob counterclockwise (-) to decrease the amount of high frequencies. Turn the knob clockwise (+) to increase the amount of high frequencies. Remote controller Press the BASS/TREBLE button to select this regulation.
-
Page 22: Headphone Connection
Operation LOUDNESS: The LOUDNESS function boosts low and high frequencies - it is intended only to be used at low listening levels. The function is controlled by the LOUD button. LOUDNESS ON - [ ] will be displayed. To disengage the function, press the button until [OFF] is displayed. Note! The LOUDNESS function disengages the settings of the BASS / TREBLE regulation or the currently selected sound control function (P-EQ or S-BASS). -
Page 23: Dab Radio Operation
Operation DAB Radio Operation Note! • Make sure that you have correctly connected and fully extended the antenna. • You can program up to 30 DAB radio stations. • National letters containing diacritical marks may not be displayed correctly. Tuning in to a Station 1. -
Page 24: Fm Radio Operation
Operation DAB Information Display Depending on the DAB radio station you are tuning to, some information may be unavailable. Repeatedly press the INFO button to display the following information. • Station Name When an DAB station is received, the name of that station will be displayed. •... - Page 25 Operation Tuning in to a Station 1. Use the INPUT knob/button or press the DAB/FM button on the remote controller to select the TUNER input. [TUNER ] will be displayed. 2. Select a station using one of the following methods: •...
-
Page 26: Cd Player Operation
Operation Repeatedly press the INFO button to display the following information. • Station Name When an RDS station is received, the name of that station will be displayed. • PTY (Program Type) Describes the style or genre of the program that is being broadcast. •... - Page 27 Operation use the number buttons. To select track number 12, directly press 1, 2 buttons etc. Press and hold the l◄◄ / ►►l buttons on the front panel or ►► / ◄◄ buttons on the remote controller to search for the position that you intend to start playing. Release to resume normal play.
- Page 28 Operation CD MP3/WMA CD Information The following information is displayed: • During playing - the current file number and its elapsed playing time. Repeatedly press the INFO button to display the title, artist and album name (if they are available). •...
-
Page 29: Play From A Usb Flash Drive
Play from a USB Flash Drive Maximum supported USB flash drive capacity is 64GB. Not all USB flash drives may be compatible and supported. Playback Memory The CD-Receiver stores the last position played on the USB Flash Drive and the play- back will be continued from that point. - Page 30 Play from a USB Flash Drive Access a folder • During playing, press the ALB+/- buttons to select a folder. • In the Stop mode, press the ALB+/- buttons to select a folder and press the l◄◄ / ►►l buttons on the front panel or ►l / l◄ buttons on the remote controller to select a file - the playback will start automatically.
- Page 31 Play from a USB Flash Drive Supported File Formats The CD-Receiver can only play files in AAC-LC, APE, FLAC, MP3, WAV, WMA formats. Note! Depending on the sampling rate (kHz), bitrate (kbps) and other parameters, some files in listed formats may not be played - for more information check product page on www.TagaHarmony.com.
-
Page 32: Play Via Bluetooth
® 4. After a short time “HTR-1000CD v.3” will appear on the screen of your audio source. 5. Select “Pair” on your audio source device to connect with the CD-Receiver. After connection is successful [PAIRED] will be displayed for a while, and [BT ] stops blinking. - Page 33 CD-Receiver or it may even require to repeat the pairing procedure each time the Bluetooth connection is lost. ® Note! If your Bluetooth audio source is not able to find the “HTR-1000CD v.3” device ® or connect to it then switch off, clear the pairing history and repeat the pairing procedu-...
-
Page 34: Setting The Sleep Timer
Setting the Sleep Timer When the CD-Receiver is turned on, repeatedly press the TIMER/SLEEP button to select a set period of time (in minutes): 120, 90, 60, 45, 30, 15. When the Sleep Timer is activated, [SLEEP] will be displayed. Note! When the Sleep Timer is activated, press the TIMER/SLEEP button to display the remaining time (it will be automatically displayed around 60 seconds before the Sleep Timer is engaged). -
Page 35: Additional Information
Additional Information Break-In Your TAGA Harmony CD-Receiver sounds great immediately after it is taken out of the carton but as all hybrid devices, this CD-Receiver requires a “break-in” period to reach its full sonic capabi- lities. During the “break-in” period it is recommended to operate the CD-Receiver at moderate volume levels. - Page 36 Additional Information Power transformer – Power filters and conditioners It is a normal phenomenon that the device’s power transformer may generate a certain amount of audible noise. Very loud operation of the power transformer may be caused by low quality of power supply (voltage surges etc.).
-
Page 37: Kit Content
1 EA RCA-RCA interconnect 1 PAIR Instruction Manual 1 EA Specifications We strongly advise to contact a professional installer or dealer in order to install TAGA Harmony products. We recommend using high quality TAGA Harmony cables and other installation accessories. - Page 38 Specifications Vacuum tubes 2 x ECC83 PSVANE Classic Series Power output / impedance 2 x 90W RMS 4ohm Compatible CD formats CD-Audio, CD-R/RW (audio files MP3, WMA) Tuner: FM (87.5 - 108MHz) RDS DAB+ (174.928 - 239.200 MHz) Radio section Preset: 20 FM / 30 DAB+ DAB/FM antenna impedance: 75ohm Bluetooth...
- Page 39 RF Radiation Exposure Statement This equipment complies with radiation exposure limits set forth for an uncontrolled environment. This equipment should be installed and operated with a minimum distance of 20cm between the radiator and any part of your body. EU declaration of conformity Your product is marked with the symbol shown on the left.
- Page 40 Notes...
Need help?
Do you have a question about the HTR-1000CD v.3 and is the answer not in the manual?
Questions and answers