
Related Manuals for Boyo Vision VTC700AI-4

Summary of Contents for Boyo Vision VTC700AI-4
- Page 1 VTC700AI-4 7" AI AHD Monitor & Cameras System (4 Channel) Please read all instructions carefully before using, and keep the manual for future reference.
-
Page 2: Table Of Contents
Contents System Accessories ........................1 Installations ..........................2 Wiring ............................4 Monitor Buttons ..........................5 Remote Control Buttons ......................5 Setting, Configuration and Calibration ..................6 7. Menu ............................7 7.1 Time .............................7 7.2 Display ..........................7 7.3 BSD Smart Drive........................8 7.3-1 Blind Zone Warning Calibration .................8 7.3-2 BSD Setting .......................10 7.4 Video Playback ........................10 7.5 System Setting ........................11 Specification... -
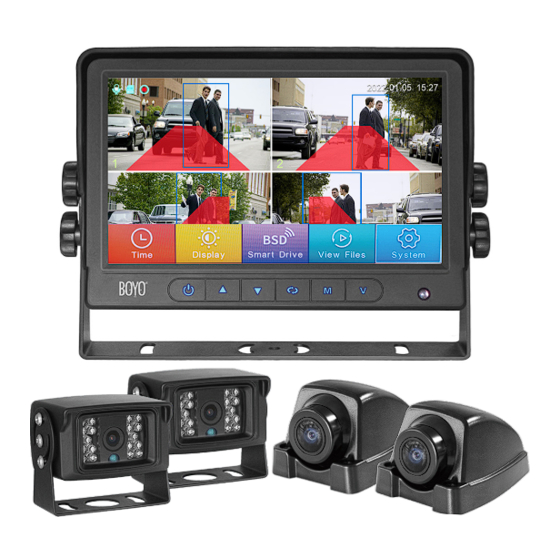
Page 3: System Accessories
System Accessories Product Features: 7" AI monitor to detect vehicles and pedestrians 4 Cameras included for front view, rear view, left-side and right-side views Warning Beeps when an object is detected in an alarm zone Built-in DVR 1 x 65ft video extension and 3 x 33ft video extension included Monitor X 1 Adapter cable X 1 65ft... -
Page 4: Installations
Installations Positioning the monitor and cameras. The cameras should point toward the blind spots or not easily viewable positions. The monitor should be placed where it is clearly visible from the driver without any objects obstructing the view. At the same time. the monitor must not block driver's view of the road or surroundings. - Page 5 Monitor Installation a. Install the monitor bracket using the 3 self-tapping screws. Screw in the center. Adjust the angle. Tighten all screws. b. Install the monitor using 2 bolts on each sided. Do not tighten bolts. c. Adjust the monitor angle. Tighten all bolts.
-
Page 6: Wiring
Wiring Black (GND 12V-) Red (ACC 12V+) Brown(CH1 TRIG) Green(CH2 TRIG) Blue(CH3 TRIG) Gray(CH4 TRIG) Yellow(Battery 12-24V) Connect to reverse trigger (e.g. backup light) Connect to left trigger (e.g. the left turn signal) Connect to right trigger (e.g. right turn signal) The role of the trigger is to display specific camera. -
Page 7: Monitor Buttons
Monitor Buttons Operation: The system is operated using the buttons on the monitor or using a remote control SD Card Slot Power switch Channel switch Up button / Increase Down button / OK button / Start or Menu Button the volume Decrease the volume stop recording Remote Control Buttons... -
Page 8: Setting, Configuration And Calibration
Setting, Configuration and Calibration When a menu button is pressed, the menu bar appears at the bottom of the screen. 2022-01-05 15:27 Time icon Recording icon: red dot flashing in recording status Recording icon: Recording status is on SD card icon: SD memory card working status Red Trapezoidal area: Blind zone alarm area Green rectangular area: Traffic detected Blue rectangle area: Pedestrian detected... -
Page 9: Menu
Menu Press Menu button to enter and you will see five menu icons on screen: Time, Display, BSD Smart Drive, View Files and System setting. 7.1 Time To get to the Time setting, using up, down and OK button to choose your settings, and press Menu button to back to main interface. -
Page 10: Bsd Smart Drive
7.3 BSD Smart Drive Calibrate: Blind zone alarm range setting Turn on/off the blind spot alarm Setting: Alarm tone on/off, sensitivity setting(high, mid, low) 7.3-1 Blind Zone Warning Calibration(left, right, front, back) The red point is the current adjustment angle,choosing remove the position of red spot, choosing to toggle next setting corner, after setting, click save and exit. - Page 11 Left blind spot alarm calibration Right blind spotalarm calibration Front & back blind spot alarm calibration...
-
Page 12: Bsd Setting
7.3-2 BSD Setting Single Alarm Sound on / off Four Alarm Sound on / off Alarm Sensity: Low/Medium/High selection 7.4 Video Playback Click the main menu video playback button to enter the playback menu, choose and view the video file, and swipe up and down in the video file to browse all the single-screen video files. -
Page 13: System Setting
7.5 System Setting Keytone ON/ OFF Button touch sound Record mute ON/ OFF Audio recording Loop record 1/2 minutes 1 or 2 min. video clips Backlight High/ Mid/ Low Screen brightness Video watermark ON/ OFF Watermarks can be used for authentication Volume setting 0/1/2/3/4 Voice prompt volume... -
Page 14: Specification
Specification Monitor Specification Camera Specification Screen type Video Signal 7“ IPS TFT LCD Aspect Ratio 16:9 Resolution 1288(H)*728(V) Active Pixels 1280(V) x RGB x 720(H) Pixel Size 2.8um*2.8um Resolution (RGB) 1024 x 600 Optical format 1/2.9 inch Waterproof IP69K Brightness 500cd/m²... - Page 15 WARRANTYINFORMATION This one year limited warranty is given to the end-user or the retail purchaser (referred to this warranty as "Original Purchaser”) that it will be free from defects in materialand workmanship for a period of one year from the date of the purchase of the new product (excluding accessory items such as power cords,cradle,memory card,adaptor,and cables).
Need help?
Do you have a question about the VTC700AI-4 and is the answer not in the manual?
Questions and answers