Advertisement
Quick Links
Advertisement

Related Manuals for Braun MultiServe KF 9050BK


Summary of Contents for Braun MultiServe KF 9050BK
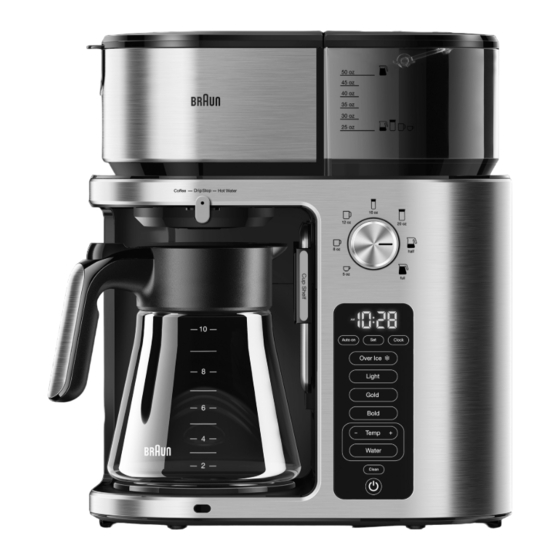
- Page 1 User Manual of Product 1: Braun KF9050BK Multiserve Drip Coffee, Silver/Black...
- Page 2 MultiServe Coffee maker Instructions Type KF 901AN, KF 901BN KF 9050 Register your product KF 9070 KF 9150 www.braunhousehold.com KF 9170 KF 9072...
-
Page 3: Important Safeguards
3. To protect against the risk of electric shock, do not put cord, plugs or appliances in water or other liquids. 4. The use of attachments/accessories not sold or recommended by Braun may cause fire, electrical shock or risk of injuries to persons. -
Page 4: Importantes Mesures De Protection
3. Pour éviter tout risque de choc électrique, n’immergez jamais le cordon d’alimentation, les fiches ou les accessoires dans l’eau ou dans tout autre liquide. 4. L’utilisation d’accessoires non vendus ni recommandés par Braun peuvent provoquer des incendies, des chocs électri- ques ou des blessures. -
Page 5: Cuidados Importantes
3. Para protegerse del riesgo de sufrir descargas eléctricas, no ponga los cables, enchufes ni aparatos en agua ni otros líquidos. 4. El uso de accesorios o aditamentos no vendidos o recomendados por Braun puede provocar incendios, descargas eléctricas o riesgo de lesiones a las personas. - Page 6 Por favor no depositar el producto en los desechos domésticos al final de su vida útil. La licuadora podrá depositarse en los correspondientes puntos de recogida que existan en su país. © Copyright 2021 All rights reserved De’Longhi Braun Household GmbH Carl-Ulrich-Straße 4 63263 Neu-Isenburg/Germany...
- Page 8 Gold tone permanent filter Filtre permanent doré Filtro permanente dorado Water reservoir cover Couvercle du réservoir à eau Tapa del depósito de agua Reservoir cover and shower head Charcoal water filter Couvercle du réservoir et tête d’écoulement Filtre à charbon pour eau Tapa del depósito y cabeza de goteo Filtro de carbón para el agua Filter basket...
- Page 9 EN Control Panel FR Panneau de commande ES Panel de control Display shows the following options: L’écran affiche les options suivantes: La pantalla muestra las siguientes opciones: • Time of the day • Heure • Hora • Temperature (F/C)* • Température (F/C)* –...
- Page 10 Clock EN Before first use FR Avant la première utilisa- ES Antes del primer uso Over Ice tion Please read instructions carefully Lea completamente las instruccio- and completely before using the nes con atención antes de utilizar el Veuillez lire attentivement l’intégral- appliance.
- Page 11 Braun website, or by de rechange sont disponibles dans les pueden adquirirse en tiendas, en el sitio calling Customer Service. magasins, sur le site internet de Braun Web de Braun o llamando a Atención al ou en appelant le service après-vente. cliente.
- Page 12 EN Switching On/Off FR Allumer/éteindre ES Encender/Apagar • To switch on the coffee maker press • Pour allumer la cafetière appuyez sur • Para encender la cafetera pulse el bo- the On/Off button (H). The green indi- le bouton marche/arrêt (H). La lumière tón de encendido/apagado (H).
- Page 13 6. Press and hold SET to scroll through 6. Enfoncez et maintenez le bouton SET 6. Mantenga pulsado SET para de- the minutes. Release it once the splazarse por los minutos. Suelte el pour faire défiler les minutes. Relâ- desired minutes is displayed. chez-le une fois les minutes souhai- botón una vez que se muestren los tées affichées.
- Page 14 Hot surface indicator: after the unit Indicateur de surface chaude: une Indicador de superficie caliente: is turned off, the light will remain fois l’appareil éteint, la lumière después de apagar la unidad, la luz on until the keep warm plate has reste allumée jusqu’à...
- Page 15 Cafeteras Domésti- par la SCA . cas Certificadas por la SCA. The Braun coffee maker has met these SCA requirements when using the “Gold” La cafetière Braun répond aux exigences La cafetera Braun ha cumplido estos setting.
- Page 16 7. Select the beverage size (F). 7. Sélectionnez la taille de boisson (F). 7. Seleccione el tamaño de la bebida (F). 8. Select your brew mode to start the 8. Sélectionnez votre mode de prépa- 8. Seleccione el modo de preparación Clock brew cycle.
- Page 17 ón correspondiente de la tabla siguiente. Braun recommendation 1 small 1 big 2 big 3 big 4 small 5 small 10 small Recommandation de Braun 1 petite 1 grande 2 grandes 3 grandes 4 petites 5 petites 10 petites Recomendación de Braun 1 pequeño...
- Page 18 We recom- tasses à préparer. Nous recomman- ro de tazas que desea preparar. mend using the Braun coffee measu- dons l’utilisation de la cuillère de do- Recomendamos el uso del cacito de ring scoop. Refer to the indications sage de café...
- Page 19 9. Select the brew mode to start the 9. Sélectionnez le mode de préparation 9. Seleccione el modo de preparación brewing cycle. It is recommended pour commencer le cycle de prépa- para iniciar el ciclo de preparación. Se to use the Bold mode for an intense ration.
- Page 20 EN Dispensing hot water FR Verser de l’eau chaude ES Dispensar agua caliente (certain models only) (certains modèles uniquement) (solo algunos modelos) 1. Fill fresh, cold water in the water 1. Versez de l’eau fraiche et froide dans le 1. Rellence con agua fresca y fría el el reservoir.
- Page 21 Braun (puede adquirirse scaling Solution (can be purchased in lution de détartrage Braun (disponible en tiendas, en el sitio web de Braun o stores, through the Braun website, or by dans les magasins, sur le site internet de llamando a Atención al cliente).
- Page 22 CLEAN starts flashing and the count- CLEAN se met à clignoter et une minute- CLEAN empiece a parpadear y aparece el temporizador de cuenta atrás desde down timer starting from “23” appears in rie à partir de “23” s’affiche sur l’écran. the display.
- Page 23 Dishwasher safe Lavable au lave-vaisselle Apto para el lavavajillas • Never immerse the unit in water or • N’immergez jamais l’appareil dans • Nunca sumerja la unidad en agua u other liquids. l’eau ou un autre liquide. otros líquidos. • To clean base, simply wipe with a •...
- Page 24 If the message remains, replace the water tank and turn the unit off and on to reset the sensor and clear the message. If this does not resolve, contact Braun Customer Service. Display shows E21 while brewing. Ensure you have enough water in the tank for Ensure the water tank is full or has enough the beverage size you have selected.
- Page 25 Remove the carafe. Unplug the appliance, wait for 5 minutes and plug in again. Perform a decalcification. If the error persists contact an authorised Braun customer service. Display shows E12 Remove the carafe. Unplug the appliance, wait for 5 minutes, plug in again and retry. If the error occurs again contact an authorised Braun customer service.
- Page 26 Si esto no lo resuelve, póngase en contacto con el servicio de atención al cliente de Braun. La pantalla muestra un número no prece- La unidad está en modo de descalcificación.
- Page 27 Braun. La pantalla muestra E12 Retira la jarra. Desenchufe el aparato, espere 5 minutos, vuelva a enchufarlo, e inténtelo de nuevo. Si vuelve a ocurrir el error, póngase en contacto con el servicio de Atención al cliente autorizado de Braun.
Need help?
Do you have a question about the MultiServe KF 9050BK and is the answer not in the manual?
Questions and answers