Table of Contents
Advertisement
Quick Links
ReachCam
USER GUIDE
1. Charge Your Solar Panel:
Premium & Mega Solar Panels:
1. Charge for 8-10 hours with power adapter or USB
connector via 5V IN Port.
2. Then connect Solar Panel to Camera via 12V OUT Port.
Power Adapter
Standard Solar Panels:
1. Charge for 8-10 hours with power adapter or USB
connector via 12V IN Port.
2. Then connect Solar Panel to Camera via 12V OUT Port.
USB Connector
2. Create Account | Activate Camera
Quick Setup:
Manual Setup:
1.
Load batteries into camera
1.
by unlatching the door
2.
latch and pressing the
battery tray button.
2.
Scan the camera QR Code
3.
found on the inside of the
Camera enclosure door
with your smartphone
camera app.
4.
3.
Click the link that appears
in your camera app to
5.
register your account and
automatically add your
camera.
4.
Enter your billing details.
(EXAMPLE ONLY)
If your camera does not have a QR code, you
must follow the Manual Setup process.
What You'll Need:
•
Camera
•
Smart Phone/Computer
•
Credit Card
•
IMEI and SIM (Preinstalled) numbers
•
SD Memory Card
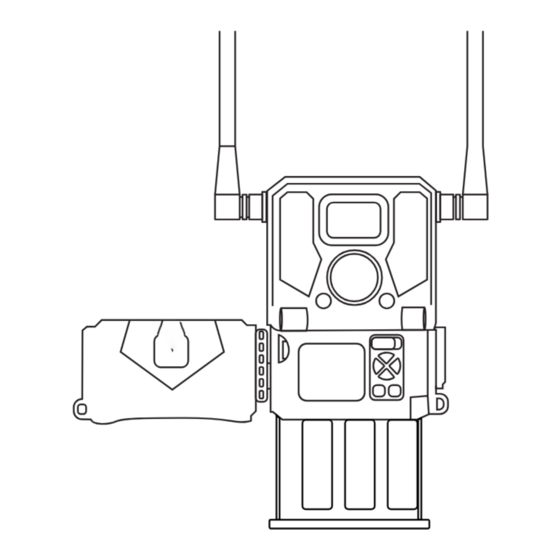
3: Test & Deploy
Steps:
Unlatch, Open Camera.
1. Attach Antenna(s).
Locate IMEI/SIM Numbers
2. Insert SD Card and
next to the QR code inside
AA Batteries.
of camera door.
3. Send a test photo
Register: Type app.
and set Toggle
barnowl.tech in your web
switch to "ON".
browser or scan the QR
code found on the box.
4. Deploy.
Type in the IMEI/SIM
numbers.
IMEI and SIM
Enter your Billing Details.
number located
below QR Code.
SIM Number, IMEI Number,
and QR Activation Code
Premium & Mega Solar Panels:
5V DC IN : Power Source
12V DC OUT : To Camera
TEST BUTTON
CHARGE INDICATOR
OUT 12V : Connect Solar Panel to Camera
SIM is preinstalled here
Battery Tray
SIM NUMBER
Battery Tray
Standard Panels:
12V DC IN : Power Source
TEST BUTTON
OUT 12V : Connect Solar Panel to Camera
Test Photo: Steps
We recommend taking a Test Photo to make
sure your camera is transmitting before
leaving your site.
1. Set Toggle Switch to "Setup".
2. Wait for "4G init OK" message to
appear.
Toggle Switch
3. Single press the physical "Left Arrow"
button to send a Test Photo.
"UploadThumbnail" and then "UploadThumbnail
Success" will display on screen. This confirms that
your camera is receiving signal and transmitting
directly to your Barn Owl HQ Account
Input SD Card
(label facing you)
4. Set Toggle Switch to the "ON" position.
Your camera is ready to transmit and
64 GB
camera settings can be updated in your
Button: Open
Barn Owl HQ account by typing app.
Battery Tray
barnowl.tech in your web browser.
Note:
When camera is switched ON, the camera display will
shut off.
64 GB
SIM
12V DC OUT : To Camera
CHARGE INDICATOR
.
SIM
Advertisement
Table of Contents

Subscribe to Our Youtube Channel
Related Manuals for Barn Owl ReachCam

Summary of Contents for Barn Owl ReachCam
- Page 1 Enter your Billing Details. number located your camera is receiving signal and transmitting register your account and below QR Code. directly to your Barn Owl HQ Account automatically add your Input SD Card (label facing you) camera. 4. Set Toggle Switch to the “ON” position.
- Page 2 Barn Owl Care - The camera will trigger between 8am and 4pm. For a small monthly fee per camera, Barn Owl will provide a lifetime warranty for theft and accidental damage. For more information on Barn Owl Care, please see the Pro Tip: Billing tab under Main Menu >...
Need help?
Do you have a question about the ReachCam and is the answer not in the manual?
Questions and answers
How do I reset the camera manually to default settings