Advertisement
Quick Links
Consumer Cellular.com
© 2023 Consumer Cellular, Inc. Consumer Cellular and the Consumer Cellular logo are trademarks of
Consumer Cellular,Inc. The Bluetooth wordmark and logos are registered trademarks owned by the
Bluetooth SIG,Inc. and any use of such marks is under license. Other trademarks and trade names are
the property of their respective owners.
Advertisement

Related Manuals for IRIS Flip


Summary of Contents for IRIS Flip
- Page 1 Consumer Cellular.com © 2023 Consumer Cellular, Inc. Consumer Cellular and the Consumer Cellular logo are trademarks of Consumer Cellular,Inc. The Bluetooth wordmark and logos are registered trademarks owned by the Bluetooth SIG,Inc. and any use of such marks is under license. Other trademarks and trade names are the property of their respective owners.
- Page 2 QUICK START GUIDE...
- Page 3 This guide will help you get the most out of your new phone. You’ll find instructions to help you begin using your device. If you need more assistance, feel free to contact us by using the contact information listed below. We’re always happy to help you! Need More Information? Visit our website at Consumer Cellular.com/Help Call us at (888) 835-6047...
-
Page 4: What's In The Box
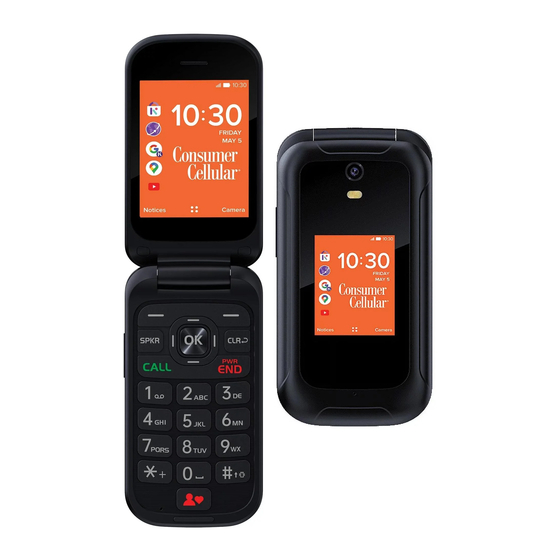
WHAT’S IN THE BOX Your IRIS Flip contains the following items: • IRIS Flip • USB-C data cable • USB-C wall charger • Documentation... - Page 5 GETTING TO KNOW YOUR PHOHE Earpiece External display Internal display Flashlight Camera Scroll Key Right Left Selection Selection Back Key Speaker Volume Key Call Key Power/End Back Cover Headset Connector Speaker Microphone Favorite Contacts...
-
Page 6: Getting Started
The Setup Wizard built into your phone will guide you through the initial setup process. Activate the eSIM (electronic SIM) Your IRIS Flip comes with an eSIM and no physical SIM is needed to activate your service. To activate your eSIM, turn on your phone and follow these steps: 1.Select your language and select the keyboard. - Page 7 IMPORTANT: You must be connected to WiFi with internet connection to activate the eSIM. 3.Add an eSIM You can add the eSIM by Download directly or Scan QR code. Please start with Download directly. EID: 89049032000001000000158611 105469...
- Page 8 3.1 Add eSIM through Download directly. Select Download directly, your phone will start download- ing eSIM from SM-DP+, the download maybe take one minute or so depending on the Wi-Fi network condition. The eSIM will be enabled once eSIM download is finished, then device will reboot automatically.
- Page 9 NOTE: Your setup may be di erent than the instructions in this Quick Start Guide because of software updates or if you choose di erent options. If the steps are di erent, just follow your phone's on-screen instructions for setup. Open the back cover 1.Put your fingernail in the small slot at the bottom of the phone, lift and remove the cover.
- Page 10 2.If the battery is in the phone, lift it out.
- Page 11 Installing a memory Card (Not Included) . Insert the SD card in the direction shown. 2. Put back the battery. 3. Put back the back cover. NOTE: Use a microSD memory card (up to 32 GB).
- Page 12 Charging the Phone Your phone’s battery should have enough power for the phone to through initial startup and make calls. You should fully charge the battery as soon as possible. Important! Use only approved chargers and USB cables.
- Page 13 Use the phone keys • To open the apps list, press the navigation key. • To open an app or select a feature, press the scroll key right, left, up, or down to scroll to the app or feature, and press the scroll key to select OK button.
- Page 14 • To type in a special character or punctuation mark, press * button and choose the special character or punctuation mark. • To switch between lower & upper case, press # button and choose the case you want. • To type in a number, press and hold that number key for 2 seconds.
- Page 15 Connect to the internet 1. Press down on the navigation key to open the menu and select Internet. 2. Select to search the Internet. 3. Write a web address, and select Go. 4. Use the scroll key to move the mouse cursor in the browser.
- Page 16 Make a call Learn how to make a call with your new phone. 1. Type in the phone number. To type in the + character, used for international calls, and press * button twice. 2. Press CALL. 3. To end the call, press END.
- Page 17 CONTACTS Add a contact 1. Press the navigation key right from the home screen to open Contacts. 2. Select New. 3. Enter the contact details. 4. Select SAVE. 5. Press to add your favorite contacts. Transfer contacts from your old phone To add contacts from your Gmail or Outlook account or your memory card to your new phone, select Contacts >...
- Page 18 Call a contact You can call a contact directly from the contacts list. . Press the scroll key, and select Contacts . 2. Scroll to a contact and press CALL. Write and send messages 1. Press the navigation key down from the home screen, and select Messages >...
- Page 19 Add an email account When you use the Email app for the first time, you will be asked to set up your email account. 1. Press the scroll key and select E-mail. 2. Select Next and then type in your name and email address.
- Page 20 Take a photo 1. To switch on the camera, press down on the navigation key to open the menu, and select Camera. 2. To take a photo, press the scroll key. To view the photo right after taking it, select Preview. To view the photo later, on the home screen, press the scroll key, and select Gallery.
- Page 21 Change the ringtone 1. Press down on the navigation key to open the menu, and select Settings. 2. Scroll right to Personalization and select Sound > Tones > Ringtones. 3. Scroll to a ringtone and press the scroll key. Change the look of your home screen You can change the background of your home screen.
- Page 22 Use the accessibility mode With the accessibility mode, the text on the phone display is bigger and the alerts louder, you can also using the TTY mode or HAC function. When you want to read bigger text on the display: 1.
- Page 23 • Do not disassemble or open crush, bend or deform, punc- ture or shred. • Do not modify or remanufacture, attempt to insert foreign objects into the battery, immerse or expose to water or other liquids, expose to fire, explosion or other hazard. •...
- Page 24 • Avoid dropping the phone or battery. If the phone or battery is dropped, especially on a hard surface, and the user suspects damage, take it to a service center for inspection. • Improper battery use may result in a fire, explosion or other hazard.
- Page 25 This is because the phone is designed to operate at multi- ple power levels so as to use only the power required to reach the network. In general, the closer you are to a wire- less base station antenna, the lower the power output. The exposure standard for wireless devices employing a unit of measurement is known as the Specific Absorption Rate, or SAR.
- Page 26 For this device, the highest reported SAR value for usage against the head is ******* W/kg, and for usage near the body is ******* W/kg. While there may be di erences between the SAR levels of various phones and at various positions, they all meet the government requirements.
- Page 27 This device complies with part 15 of the FCC rules. Operation is subject to the following two conditions:(1) this device may not cause harmful interference, and (2) this device must accept any interference received, including interference that may cause undesired operation. NOTE: The manufacturer is not responsible for any radio or TV interference caused by unauthorized modifications or changes to this equipment.
- Page 28 which can be determined by turning the equipment o and on, the user is encouraged to try to correct the interference by one or more of the following measures: - Reorient or relocate the receiving antenna. - Increase the separation between the equipment and receiver.
Need help?
Do you have a question about the Flip and is the answer not in the manual?
Questions and answers
where is the scroll key
The scroll key on the IRIS Flip surrounds the “OK” button in the center of the keypad.
This answer is automatically generated