Advertisement
Introduction
 It is important that you read and observe the following information and warnings. Improper installation or operation can cause personal injury.

Read this instruction manual, the instruction manual of the STIHL Smart Connector and for your STIHL power tool thoroughly before use and periodically thereafter.
For further information, or if you do not understand any of the instructions in this manual, please go to www.stihlusa.com or contact your authorized STIHL servicing dealer.
Additional assistance can be found on the STIHL connected App and inside the STIHL connected Portal.
SAVE THESE INSTRUCTIONS!
Guide to Using this Manual
Signal Words
This manual contains safety information that requires your special attention. Such information is introduced with the following symbols and signal words:

Indicates a hazardous situation that, if not avoided, will result in death or serious injury.

Indicates a hazardous situation that, if not avoided, could result in death or serious injury.
NOTICE
Indicates a risk of property damage, including damage to the unit or its individual components.
Symbols in Text
The following symbol is included to assist you with the use of the manual:
 Refers to a designated chapter or sub-chapter in this instruction manual.
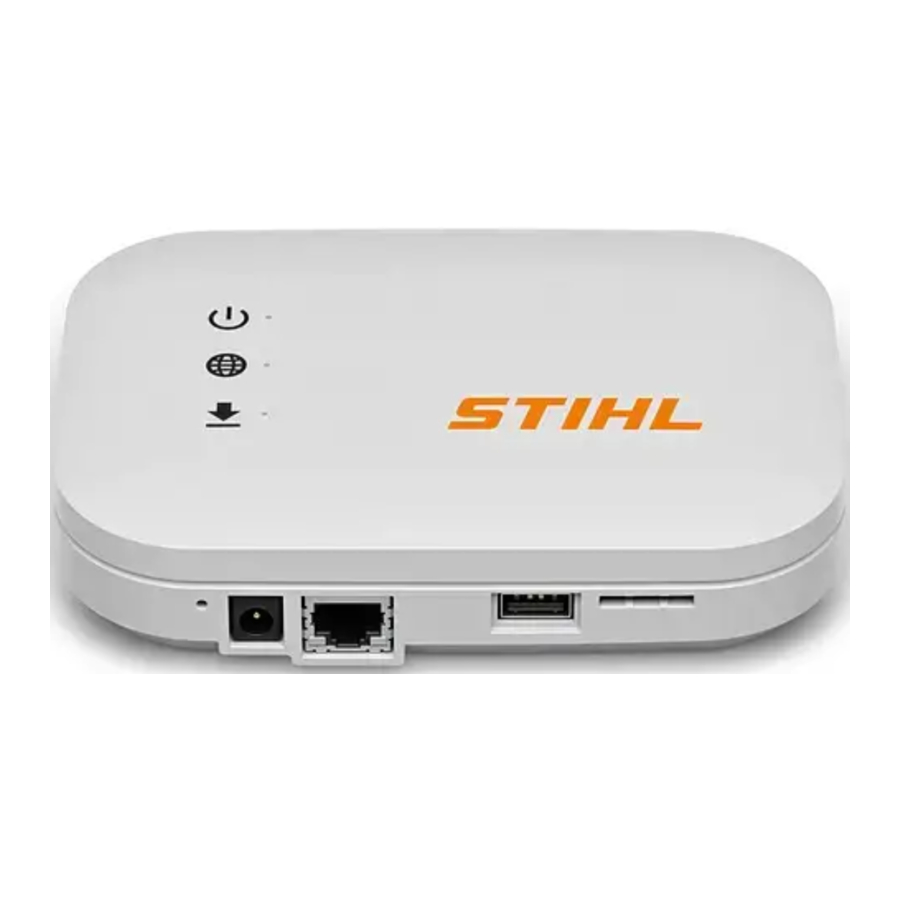
Main Parts
STIHL connected Hub, STIHL connected mobile Hub

- LEDs
Indicate the operating status of the STIHL connected Hub. - Reset-Button
Can be used to reset the STIHL connected Hub. 3 Main Parts - Socket
Socket for connecting the power supply to the STIHL connected Hub. - LAN Port
Port for connecting an Ethernet cable to the STIHL connected Hub. - USB Port
The USB port is currently deactivated and offers options for future add-ons. - Slot for SIM Card
Slot for inserting a SIM card. Only usable with the STIHL connected mobile Hub. - Power Supply Cord
Connects the power supply to the STIHL connected Hub's socket. - Power Plug Adapter
Electrical contacts of the power supply. - Power Supply
Connects the power supply cord to an electrical outlet. - Serial Number
Serial number of the STIHL connected Hub. - QR-Code
Code for scanning. Contains the access data for the access point created by the STIHL connected Hub. - Access Data for Access Point
Name of the access point (SSID) and password (PW).
# Rating Plate
Contains electrical information, the product's serial number and wireless network access data.
STIHL connected Hub Status
LEDs show the status of the STIHL connected Hub.
Operating Status
![]()
- LED flashes white: the STIHL connected Hub is starting up.
- LED glows white: the STIHL connected Hub is ready for setup.
- LED glows green: the STIHL connected Hub has been set up and is ready for use.
- LED glows red: there is a malfunction.
- LED flashes red: the STIHL connected Hub is resetting.
Connection Status
![]()
- LED glows white: the access point is active. The STIHL connected Hub is ready for setup.
- LED glows yellow: the STIHL connected Hub is connected with the Internet. But there is no connection to the STIHL Cloud.
- LED glows red: connection with the Internet cannot be established.
- LED glows green: the STIHL connected Hub is connected with the Internet and with the STIHL Cloud.
Update
![]()
- LED flashes green: ongoing data transfer for an update of the STIHL connected Hub or the connected STIHL products.
Maintenance, Repair and Storage
Warnings and Instructions
- There are no user-authorized repairs for the STIHL connected Hub. To reduce the risk of fire, electric shock or other personal injury and property damage:
- Do not attempt to repair, open or disassemble the STIHL connected Hub. There are no user serviceable parts inside.
- Keep the STIHL connected Hub free of foreign matter.
- Clean the STIHL connected Hub's polymer components with a dry cloth or soft, dry brush. Do not use detergents or solvents. They may damage the polymer components.
- Never spray with a pressure washer or otherwise spray with water or other liquids.
- To reduce the risk of electric shock:
- Unplug the power supply from the electrical outlet before inspecting, cleaning or storing the STIHL connected Hub.
- Regularly check the STIHL connected Hub and ensure that the insulation of the power supply cord and plug are in good condition and show no signs of aging (brittleness), wear or damage.
- Replace the power supply cord or plug when it is damaged.
Setting up the STIHL connected Hub
Preparing the STIHL connected Hub for
The STIHL connected Hub connects to the Internet over your LAN, wireless network, or cellular data plan1 (STIHL connected mobile Hub).
1 The STIHL connected mobile Hub requires a permanent connection to the Internet while it is running, resulting in the continuous transmission of data. Check with your cellular data provider for data pricing and availability.
Network-related requirements:
- Static IP addresses are not supported. IP addresses must be assigned dynamically by the router.
- Wireless network connections must be password protected. Open networks are not supported.
- SIM cards (for the STIHL connected mobile Hub) must be password protected.
Before setting up the STIHL connected Hub, the user must be registered in the STIHL connected Portal and have the personal access data and serial number from the rating plate of the STIHL connected Hub.
Setting up the STIHL connected Hub
Before you can use the STIHL connected Hub, it must be properly configured.
This symbol ![]() refers to the illustrations inside the packaging.
refers to the illustrations inside the packaging.
Preparing the STIHL connected Hub ![]() 1
1
- If you wish to use mobile Internet access (only available with the STIHL connected mobile Hub): Insert a SIM card in the designated sim card slot.
- If you wish to use your LAN to access the Internet: Connect an Ethernet cable from the network to the LAN socket.
Connecting the STIHL connected Hub to the power supply ![]() 2
2
- Connect the power supply cord and power plug adapter to the power supply. Ensure the power plug adapter matches your local electrical outlet.
- Plug the power supply cord into the socket of the STIHL connected Hub.
- Insert the power supply / power plug adapter into a properly installed electrical outlet.
The "Operating Status" LED will initially flash white while the STIHL connected Hub prepares the access point. As soon as the "Operating Status" and "Connection Status" LEDs both glow white, the STIHL connected Hub is ready for setup.
Connecting to the access point of the STIHL connected Hub ![]() 3
3
- Scan the QR-Code on the STIHL connected Hub rating plate with a smartphone. The connection to the STIHL connected Hub will be established automatically.
- Alternatively, connect manually to the STIHL connected Hub using the access data on the rating plate.
- If the configuration page does not open automatically inside the Internet browser: Navigate to the configuration page http://stihl.connectedbox: 80 in your browser.
Setting up Internet access via the configuration page ![]() 4
4
- Follow the instructions on the configuration page to set up Internet access.
As soon as the STIHL connected Hub connects to the Internet, the system checks for software updates and the STIHL connected Hub will restart.
Reconnect to the STIHL connected Hub ![]() 5
5
As soon as the "Operating Status" and "Connection Status" LEDs glow white again:
- Scan the QR-Code again.
- Alternatively, connect manually to the STIHL connected Hub using the access data on the rating plate.
- If the configuration page does not open automatically inside the Internet browser: Navigate to the configuration page http://stihl.connectedbox: 80 in your browser.
Enter the STIHL connected user account ![]() 6
6
- Follow the instructions on the configuration page to enter the STIHL connected user account.
- Finish the setup of the STIHL connected Hub. The configuration of the STIHL connected Hub is finished as soon as the "Operating Status" and "Connection Status" LEDs glow green.
Adding the STIHL connected Hub to the STIHL connected Portal ![]() 7
7
- Navigate to the STIHL connected Portal at https://connect.stihl.com, log in with your personal access data and add the STIHL connected Hub.
Changing the Settings
The configuration of the STIHL connected Hub can be changed after the initial setup. It's possible to change the wireless network or Internet access settings, for example.
- Press the reset button.
As soon as the "Operating Status" and "Connection Status" LEDs glow white, the STIHL connected Hub is ready for setup. - Scan the QR-Code on the rating plate with a smartphone. The connection to the STIHL connected Hub will be established automatically.
- Alternatively, connect manually to the STIHL connected Hub using the access data on the rating plate.
- If the configuration page does not open automatically inside the Internet browser: Navigate to the configuration page http://stihl.connectedbox: 80 in your browser.
- Adjust the settings and confirm the desired changes to complete.
The STIHL connected Hub will return to operating mode.
Mounting the STIHL connected Hub
Mounting the STIHL connected Hub to a wall
To reduce the risk of electric shock and other personal injury or property damage when mounting the STIHL connected Hub, ensure that no electrical cables, pipes or other service lines run behind the wall where the STIHL connected Hub is to be mounted,
 "IMPORTANT SAFETY INSTRUCTIONS".
To reduce the risk of eye injury, always wear close-fitting protective eyewear when mounting the STIHL connected Hub.
To reduce the risk of fire and electric shock, install the STIHL connected Hub at least one (1) foot off the ground and ensure that there is no risk that it may be immersed in water or other liquids. Always install the STIHL connected Hub on a stable surface.
Do not mount the STIHL connected Hub on a combustible surface or in a location where combustible gases, liquids, vapors, dusts or other materials and substances are present,
"IMPORTANT SAFETY INSTRUCTIONS".
To mount the STIHL connected Hub to a wall:
- Disconnect the STIHL connected Hub from the electrical outlet.
- Select a mounting location near the compatible STIHL products, within 5 ft. (1.5 m) of an electrical outlet that also receives a strong signal from your wireless network or mobile Internet connection or is in reach of an Ethernet connection.
- Always install the STIHL connected Hub at least one foot off the ground and never in any location where it could be immersed in water or other liquids.
- Mount the STIHL connected Hub to a wall by using two screws.
- Use appropriate screw-in wall anchors or other similar mounting devices if an appropriate wall stud is not available.
- Mount to a wall with the following dimensions:
- Distance off the ground = min. 1 ft. (30 cm)
- Distance between all sides of the STIHL connected Hub to other objects and surfaces = min. 4 in. (100 mm)
- Distance of the bare holes = 4 in. (100 mm)
- Diameter of the screw head = 0.25 in. (6.5 mm)
- Diameter of the screw shaft = 0.12 in. (3 mm)
- Distance of the screw head bottom to the wall = 0.08 in. (2 mm)
- Before mounting the STIHL connected Hub, check that the screws are securely mounted in the wall.
Installing the STIHL connected Hub to a top hat rail
- Fasten the STIHL connected Hub to a top hat rail with 1.4 in. (35 mm) width and 0.06 in. (1.5 mm) material strength.
Installing the STIHL connected Hub in a vehicle
- Fasten the STIHL connected Hub to a top hat rail with 1.4 in. (35 mm) width and 0.06 in. (1.5 mm) material strength.
- Follow all mounting instructions and precautions recommended by the vehicle manufacturer.
- Make sure the line voltage and frequency of the socket in the vehicle are compatible with the data on the rating plate of the STIHL connected Hub.
Troubleshooting Guide
Resetting the STIHL connected Hub
- Press and hold the reset-button for about 5 seconds. The "Operating Status" LED will flash red and all settings will be reset. The STIHL connected Hub will then restart.
Specifications
STIHL connected Hub, STIHL connected mobile Hub
Specifications
- Input voltage: 5 V d.c.
- Rated power: 10 W
- IP protection rating: IP21 (protection against solid foreign matter with a diameter ≥ 4.9 in. (12.5 mm); protection against dripping water)
- Ambient temperature range for use and storage: - 4°F to 140°F (- 20°C to + 60°C)
Bluetooth®
- Data transmission protocol: Bluetooth® 5.0
- Frequency band: ISM band 2.4 GHz
- Radiated maximum transmission power: 100 mW
- Bluetooth® signal range: maximum 33 ft. (10 m). The signal range may vary depending on ambient conditions. The Bluetooth® range may be limited when the signal is transmitted through metallic barriers (e.g., walls, shelving units, etc.) or near strong electromagnetic fields.
- Collection of STIHL connected data in the range: continuous
- Transmission of the data via the Internet connection to the STIHL connected Portal: every 5 minutes
Wireless Network / Access Point
- Network standard: IEEE 802.11b/g/n
- Frequency band: 2.4 GHz
- Radiated maximum transmission power: 100 mW
Mobile Internet Access (STIHL connected mobile Hub)
- Format of the SIM card: Mini-SIM
- Frequency bands:
- LTE-FDD: B2, B4, B5, B12, B13, B25, B26, B66
- LTE-TDD: B41
- Radiated maximum transmission power: 0.25 W
- Estimated monthly data volume: see FAQs under https://support.stihl.com/
Bluetooth® Trademark
The Bluetooth® word mark and logos are registered trademarks owned by Bluetooth SIG, Inc. These word mark/logos are used by STIHL under license.
The STIHL connected Hub and STIHL connected mobile Hub are equipped with a Bluetooth® and a wireless network interface. The STIHL connected mobile Hub is additionally equipped with a cellular data interface. Local operating restrictions (in aircraft or hospitals, for example) must be observed.
QR-Code Trademark
The word mark "QR-Code" is a registered trademark of DENSO WAVE INCORPORATED.
Power Supply
- Mains voltage: 100 V to 240 V
- Frequency: 50/60 Hz
- Output voltage: 5 V d.c.
- Rated power: 10 W
- Permissible ambient temperature range during use and storage: - 4°F to 140°F (- 20°C to + 60°C)
Symbols on the STIHL connected Hub
| Symbol | Explanation |
| V | Volt |
| W | Watt |
| d.c. | Direct current |
Engineering Improvements
STIHL's philosophy is to continually improve all of its products. As a result, engineering changes and improvements are made from time to time. Therefore, some changes, modifications and improvements may not be covered in this manual. If the operating characteristics or the appearance of your unit differs from those described in this manual, please contact your STIHL dealer or the STIHL distributor for your area for assistance.
Replacement Parts and Equipment
Genuine STIHL Replacement Parts
STIHL recommends the use of genuine STIHL replacement parts. Genuine STIHL parts can be identified by the STIHL part number, the  logo and, in some cases, by the STIHL parts symbol
  . The symbol may appear alone on small parts.
Limited Warranty
This product is sold subject to the STIHL Incorporated Limited Warranty Policy, available at www.stihlusa.com/warranty.html.
It can also be obtained from your authorized STIHL dealer or by calling 1-800-GO-STIHL (1-800-467-8445).
IMPORTANT SAFETY INSTRUCTIONS
Intended Use
- The STIHL connected Hub and STIHL connected mobile Hub are designed to automatically collect STIHL connected data from compatible STIHL products using Bluetooth® technology. The data is uploaded to the STIHL connected Portal over the user's Internet connection.
- Improper or unauthorized use of the STIHL connected Hub could result in personal injury or property damage.
- Use the STIHL connected Hub and power supply only as described in this manual.
- Never use a STIHL connected Hub that has been modified or altered from its original design.
- The power supply is designed for use with the STIHL connected Hub and STIHL connected mobile Hub only.
STIHL connected Hub
- To reduce the risk of fire, electric shock and other personal injury or property damage:
- Before using the STIHL connected Hub, read this instruction manual and all instructions and warnings on the STIHL connected Hub and power supply.
- For use only indoors or in an enclosed, dry area.
- Keep the STIHL connected Hub dry. Protect it from rain, water, liquids and damp conditions.
- If mounting or operating the STIHL connected Hub in a vehicle, ensure that the area is enclosed, dry and free of combustible vapors.
- Do not handle the STIHL connected Hub, including power supply and power supply cord, with wet hands.
- Never use a damaged STIHL connected Hub, power supply or power supply cord.
- Operate the STIHL connected Hub only indoors, in dry rooms and within an ambient temperature range of - 4°F to 140°F (- 20°C to + 60°C).
- Keep the STIHL connected Hub out of the reach of children.
- Always plug the power supply into a properly installed electrical outlet / power source matching the voltage and electrical frequency stated on the power supply.
- Do not operate a STIHL connected Hub or power supply that has received a sharp or heavy blow, has been dropped or is otherwise damaged in any way.
- Do not attempt to repair, open or disassemble the STIHL connected Hub or power supply. There are no user-serviceable parts inside.
- If the wrong power supply is used, the STIHL connected Hub may be destroyed by overvoltage.
- Use only the original power supply included with the STIHL connected Hub, or an identical replacement authorized by STIHL.
- To reduce the risk of electric shock or fire from a short circuit:
- Never bridge the contacts with wires or other metallic objects.
- Do not insert any objects into the STIHL connected Hub's cooling slots or other openings.
- The STIHL connected Hub heats up during operation. To reduce the risk of fire:
- Do not cover it.
- The STIHL connected Hub can produce sparks which may ignite combustible gases, liquids, vapors, dusts or other combustible materials. To reduce the risk of fire and explosion:
- Do not operate in a location where combustible gases, liquids, vapors, dusts or other combustible materials are present.
- Using a damaged power supply cord or plug may result in fire, electric shock and other personal injury or property damage. To reduce these risks:
- Check the STIHL connected Hub's power supply cord and power supply regularly for damage. If damaged, immediately disconnect the plug from the electrical outlet.
- Never jerk the power supply cord to disconnect it from the electrical outlet. To unplug, grasp the plug, not the power supply cord.
- Do not use the power supply cord for carrying or hanging up the STIHL connected Hub.
- Make sure the power supply cord is located or marked so that it will not be stepped on, tripped over, come in contact with sharp objects or moving parts, or otherwise be subjected to damage or stress.
- To reduce the risk of electric shock and other personal injury or property damage when mounting the STIHL connected Hub:
- Ensure that no electrical cables, pipes or other service lines run behind the wall where the STIHL connected Hub is to be mounted.
- Mount the STIHL connected Hub only as described in this manual.
- If the STIHL connected Hub is mounted in a vehicle, observe the mounting guidelines of the vehicle manufacturer.

Documents / Resources
References
Download manual
Here you can download full pdf version of manual, it may contain additional safety instructions, warranty information, FCC rules, etc.
Advertisement

Need help?
Do you have a question about the Connected Hub and is the answer not in the manual?
Questions and answers