Table of Contents
Advertisement
Quick Links
Advertisement
Table of Contents

Summary of Contents for Rimage RX400
- Page 1 USB Recording and Printing System User Guide Document version: 1.7, May 2023...
-
Page 2: Table Of Contents
Table of Contents 1 Safety Instructions............................4 1.1 Designated Use............................4 1.2 Installation, Commissioning, and Operation...................4 1.3 Operational Safety..........................5 1.4 Safety Conventions..........................6 2 RX400 Device Description..........................7 2.1 Unpacking..............................7 2.2 Box Contents............................8 2.3 Device Controls............................10 3 Installation..............................12 3.1 Installation Conditions........................12 3.2 Installation Instructions........................13 4 General setup for use..........................14... - Page 3 5.4 Manual Assignment Mode.........................36 5.5 Multi Session Production........................36 5.6 Label Reprinting..........................36 5.7 Importing from Media........................38 5.8 Read Medium settings........................39 5.8.1 USB Medium..........................39 5.8.2 (CD/DVD) Drive (Optional. Only if Drive is build in).............40 5.9 Power Off..............................40 5.10 Replace Printer Label Roll.......................40 6 Troubleshooting............................41 6.1 Touchscreen remains dark.........................41 6.2 Error message when producing an USB Stick................41...
-
Page 4: Safety Instructions
Safety Instructions Designated Use • The RX400 is a copying device for removable media and storage de- vices. It is intended for commercial use in closed dry rooms. The RX400 User Guide must be read and understood before operating •... -
Page 5: Operational Safety
Operational Safety • The RX400 is designed to meet state-of-the-art safety require- ments. It is tested at the factory and shipped in a condition which it is safe to operate. Relevant regulations and European Standards have been followed. The manufacturer reserves the right to modify technical data with- •... -
Page 6: Safety Conventions
© 2023, X-Net Technologies GmbH I Linz I Austria I http://www.x-net.at RX400 User Guide V1.7 Page 6/46... -
Page 7: Rx400 Device Description
Note: Please keep the packaging material. It ensures optimal protection of your RX400 during storage, transport or return. RX400 User Guide V1.7 © 2023, X-Net Technologies GmbH I Linz I Austria I http://www.x-net.at... -
Page 8: Box Contents
The scope of delivery includes the box content shown in Figure 2 (example im- ages). The Accessory kit (Number 3) contains all the required accessories for the RX400 USB Recording and Printing System. See Figure 3, Figure 2: Box contents ©... - Page 9 8. Two drive cage keys for external SSD 9. Cable holder with screw 7. Screen cleaning cloth for touchscreen Figure 3: Accessory kit content RX400 User Guide V1.7 © 2023, X-Net Technologies GmbH I Linz I Austria I http://www.x-net.at Page 9/46...
-
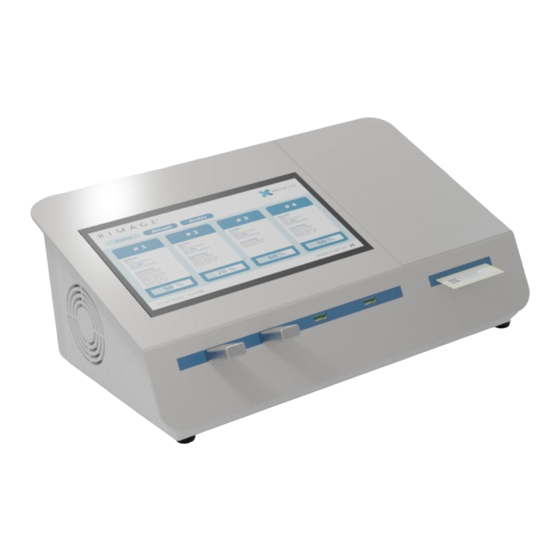
Page 10: Device Controls
Device Controls Figure 4 shows the location and naming of the RX400 controls and labels: 1. Disc drive 2. Touchscreen 3. Printer compartment lid 4. Fan ventilation slots 5. USB slots: from left to right: slot 1, 2, 3, 4 6. - Page 11 à la norme IEC/EN/UL 62368-1 ou SELV/LPS conformément à la norme IEC/EN/UL 60950-1 avec une puissance de sortie de 24 V, max. 90W RX400 User Guide V1.7 © 2023, X-Net Technologies GmbH I Linz I Austria I http://www.x-net.at Page 11/46...
-
Page 12: Installation
CD/DVD. • If the RX400 Med is to be connected to a local network, prepare the network cable before installing the device. © 2023, X-Net Technologies GmbH I Linz I Austria I http://www.x-net.at RX400 User Guide V1.7... -
Page 13: Installation Instructions
The device must be placed on a stable, flat surface. Make sure that the ventilation slots for the fan on the left side remain free. 2. Connect the network cable to network socket of the RX400. 3. Make sure the device is switched off. -
Page 14: General Setup For Use
PIN and the net- work settings. 4.2.1 Setup Wizard Step 1: Select the user interface language (see Figure 6) © 2023, X-Net Technologies GmbH I Linz I Austria I http://www.x-net.at RX400 User Guide V1.7 Page 14/46... - Page 15 Step 2: Insert a four-digit PIN for the administrator account. The setup wizard will automatically go to step 3 when four digits are entered. Figure 7: Setup Admin PIN RX400 User Guide V1.7 © 2023, X-Net Technologies GmbH I Linz I Austria I http://www.x-net.at Page 15/46...
-
Page 16: How To Unlock The Screen
How to unlock the Screen 4.2.2 Step 1: Select user account (see Figure 9) Note: at the first startup only the administrator profile is available. © 2023, X-Net Technologies GmbH I Linz I Austria I http://www.x-net.at RX400 User Guide V1.7 Page 16/46... - Page 17 Figure 9: Select User Account Step 2: Enter the PIN code of the selected user. Figure 10: Enter PIN RX400 User Guide V1.7 © 2023, X-Net Technologies GmbH I Linz I Austria I http://www.x-net.at Page 17/46...
-
Page 18: How To Lock The Screen
Do not use the administrator account for normal operation! After the first startup create an operator account for USB Stick production (see 5.1 User Management for further details). © 2023, X-Net Technologies GmbH I Linz I Austria I http://www.x-net.at RX400 User Guide V1.7 Page 18/46... -
Page 19: License Management
License Management The RX400 requires a license in order to activate features and functional- ity. If your RX400 is not licensed on delivery you will have to activate it with license codes you can source from your distributor. Following licenses can be activated based on the purchase from your dis- tributor: 1. -
Page 20: Operation
Operation User Management The RX400 is delivered with one user account named administrator. Any number of additional users can be added via the user management. Two types of user accounts are available: 1. Operator 2. Administrator Operator accounts have access to all functions needed to produce USB Sticks. - Page 21 Figure 14: Add User 4. Insert the username. Figure 15: Add Username 5. Select the role. RX400 User Guide V1.7 © 2023, X-Net Technologies GmbH I Linz I Austria I http://www.x-net.at Page 21/46...
- Page 22 The new user will have to set the PIN the first time s/he logs in. Note: Note that the remote access symbol is grayed out, since the password for remote access is not set. © 2023, X-Net Technologies GmbH I Linz I Austria I http://www.x-net.at RX400 User Guide V1.7 Page 22/46...
-
Page 23: User Interface
Figure 18: Lock screen 5.2.2 Home Screen After unlocking the RX400, the Home Screen is shown: Figure 19: Home screen RX400 User Guide V1.7 © 2023, X-Net Technologies GmbH I Linz I Austria I http://www.x-net.at... - Page 24 (see figure 20). Tap this button to open the Job Select list (see Fig- ure 28). Figure 20: Home screen with running tickets © 2023, X-Net Technologies GmbH I Linz I Austria I http://www.x-net.at RX400 User Guide V1.7 Page 24/46...
-
Page 25: Side Menu
See Figure 21. Figure 22: Administrator Side Menu When logged in as an Administrator, additional op- tions for Settings and Users are available. See Figure RX400 User Guide V1.7 © 2023, X-Net Technologies GmbH I Linz I Austria I http://www.x-net.at Page 25/46... -
Page 26: Finished Tickets
Open the side menu and select Finished Tickets. Figure 23: Side Menu Tap on the line of any ticket to view its details. Figure 24: Job Details RX400 User Guide V1.7 © 2023, X-Net Technologies GmbH I Linz I Austria I http://www.x-net.at Page 27/46... - Page 27 Figure 25: Ticket Tap Figure 26: Data Tap © 2023, X-Net Technologies GmbH I Linz I Austria I http://www.x-net.at RX400 User Guide V1.7 Page 28/46...
-
Page 28: Job Select List
Figure 27: Jobs Tap 5.2.5 Job Select List Figure 28: Job Select List RX400 User Guide V1.7 © 2023, X-Net Technologies GmbH I Linz I Austria I http://www.x-net.at Page 29/46... - Page 29 5. Change the Value Field to the parameter name that is set in the Ticket 6. Check the checkbox to activate to be shown in job selection Figure 30: Card and job selection settings © 2023, X-Net Technologies GmbH I Linz I Austria I http://www.x-net.at RX400 User Guide V1.7 Page 30/46...
-
Page 30: Usb Stick Production
Stick. Tickets (production orders) are sent to the device over the network connection. Basic operation is as follows: 1. Insert an USB Stick. The RX400 detects the type of USB Stick in- serted on slot 1. RX400 User Guide V1.7 ©... - Page 31 Figure 32: Detecting USB Stick 2. A Rimage BaseLine Pro Stick has been detected in slot 1. Figure 33: USB Stick detected 3. After verification of the USB Stick, data is copied to it. A progress bar is shown. © 2023, X-Net Technologies GmbH I Linz I Austria I http://www.x-net.at RX400 User Guide V1.7...
-
Page 32: Data Validation On Multi Study Stick
7. Wait for the label to be printed. It is output at the label outlet, see Figure 4, page 10 , number ⑤. 8. Peel off the label and attach it to the USB Stick. The RX400 can be set up in one of two production modes: • Auto Assignment Mode •... - Page 33 Tap the Add Data button to add the ticket data as a new session to the Multi-Session Stick. Figure 36: Data validation dialog © 2023, X-Net Technologies GmbH I Linz I Austria I http://www.x-net.at RX400 User Guide V1.7 Page 34/46...
- Page 34 When the job production was canceled the following error message is shown. Figure 37: Data validation dialog RX400 User Guide V1.7 © 2023, X-Net Technologies GmbH I Linz I Austria I http://www.x-net.at Page 35/46...
-
Page 35: Manual Assignment Mode
Otherwise it will start after insertion of an USB stick. Multi Session Production Using an RX400 with Medical License, Multi Session USB Sticks can be written more then once. To do that each new production job has to match the meta- data from the most recent writing job and patient name, birth date of a pa- tient and patient ID are compared. - Page 36 The PrintLabel dialog opens. Tap on Print to reprint the label. Figure 39: Print label RX400 User Guide V1.7 © 2023, X-Net Technologies GmbH I Linz I Austria I http://www.x-net.at Page 37/46...
-
Page 37: Importing From Media
4. Select the read icon from the top right of the corresponding slot. 5. Select Start 6. Put your medium in the corresponding slot 7. Access your data by accessing the RX400 samba share (Linux: smb:// <RX400_ip>/, Windows: \\<RX400_ip>) © 2023, X-Net Technologies GmbH I Linz I Austria I http://www.x-net.at RX400 User Guide V1.7... -
Page 38: Read Medium Settings
Caution: By allowing generic (unlicensed) USB Sticks you accept the increased risk of security threats to your infrastructure. Rimage is not responsible for any damage caused by generic USB Sticks. RX400 User Guide V1.7 © 2023, X-Net Technologies GmbH I Linz I Austria I http://www.x-net.at... -
Page 39: Cd/Dvd) Drive (Optional. Only If Drive Is Build In)
CD/DVDs. Power Off Note: • To avoid data loss or corruption, shut down the RX400 according to the following procedure before unpowering. • To avoid corrupting data written to USB Sticks, wait until all USB Sticks in production are finished before shutting down the device. -
Page 40: Troubleshooting
2. Be sure to insert the USB Stick completely into the socket 3. The USB Stick must have good contact and sit firmly in the USB socket. If it sits loose please contact your sales partner or Rimage. 4. Do not touch the USB Stick during the production process. If the production process fails because of movement or removal of the USB Stick while writing, you can try to write the USB Stick again. -
Page 41: Bios - Battery
Note: Under no circumstances open the RX400 to carry out repairs yourself. Doing so voids any warranty. BIOS – Battery If the system time is incorrect or the system no longer boots up correctly, it is possible that the BIOS battery is faulty and needs to be replaced. The battery may only be replaced by the Rimage Service Team. -
Page 42: Decommissioning
Decommissioning Warning: The RX400 is subject to the WEEE and the RoHS directive of the EU. It is classified as electronic equipment and as such it must be returned to a respective treatment property after decommissioning. Do not dump it together with residual waste! In order to decommission the RX400: 1. -
Page 43: Technical Specification
Operating Temp 0ºC ~ 40ºC Weight 8.7 kg / 19.2 lbs Dimensions 170 × 444 × 258 mm, height × width × depth 6.7" × 17.5" × 10.2" Protection Class , low voltage power supply Protection Code IP20 © 2023, X-Net Technologies GmbH I Linz I Austria I http://www.x-net.at RX400 User Guide V1.7 Page 44/46... -
Page 44: Contact
Contact Rimage Europe GmbH Technical Support Wernher-von-Braun Straße 9 63303 Dreieich-Offenthal, Germany Web: https://support.rimage.com Tel: +49 (0)6074 852114 Email: support@rimage.de RX400 User Guide V1.7 © 2023, X-Net Technologies GmbH I Linz I Austria I http://www.x-net.at Page 45/46... -
Page 45: Data Protection And Security Indications
2. Whenever the external SSD drive is replaced, be sure to have the data on the previous disk destroyed securely. 3. Network access to the RX400 must be secured and restricted to trusted parties. © 2023, X-Net Technologies GmbH I Linz I Austria I http://www.x-net.at RX400 User Guide V1.7...
Need help?
Do you have a question about the RX400 and is the answer not in the manual?
Questions and answers