Table of Contents
Advertisement
Quick Links
Advertisement
Table of Contents

Summary of Contents for PARCOL 1-6940 Series
- Page 1 MAN0038E / rev.6 INSTRUCTION MANUAL - USE - MAINTENANCE for LIMITATIONS OF USE see PARCOL document "NTG 76/550E" (Residual hazards with regard to essential safety requirements of Annex I of European Pressure Equipment Directive no 97/23/CE) 1-6940 and 1-4640 SERIES...
-
Page 2: Table Of Contents
Summary SAFEGUARDS ......................................3 INSTRUCTION MANUAL - USE - MAINTENANCE ..........................4 FOREWORD .......................................4 INSTALLATION ..................................4 VALVE DISASSEMBLY AND REASSEMBLY ..........................4 NUMBERING SYSTEM..................................5 DISASSEMBLY ..................................6 VALVE TYPE 1-6941 / 1-4641 DISASSEMBLY ........................6 REPLACING OF PTFE RING ON THE PLUG ........................6 VALVE TYPE 1-6942 / 1-4642 DISASSEMBLY ........................7 VALVE TYPE 1-6943 /1-4643 DISASSEMBLY ........................8 VALVE TYPE 1-6948 / 1-4648 DISASSEMBLY ........................9 STEM AND PLUG REPLACEMENT ...........................10... -
Page 3: Safeguards
SAFEGUARDS GENERAL NOTICES LIFTING AND HANDLING Beside the rules here below listed the plant man- When lifting use eyebolts, if any, otherwise sling the ager must meet the regulation in force concerning valve body. safety and health of workers in jobsites. WARNING DANGER Valve-actuator assembly can be lifted by means of Qualified staff only must be used to operate on the... -
Page 4: Instruction Manual - Use - Maintenance
In case of doubt it is better to remove the trim from valve body before beginning to weld. The face-to face dimensions of PARCOL valves are according to IEC 534-3-1 standard, table 1. Valves with threaded connections should be installed with unions to allow their removal. -
Page 5: Numbering System
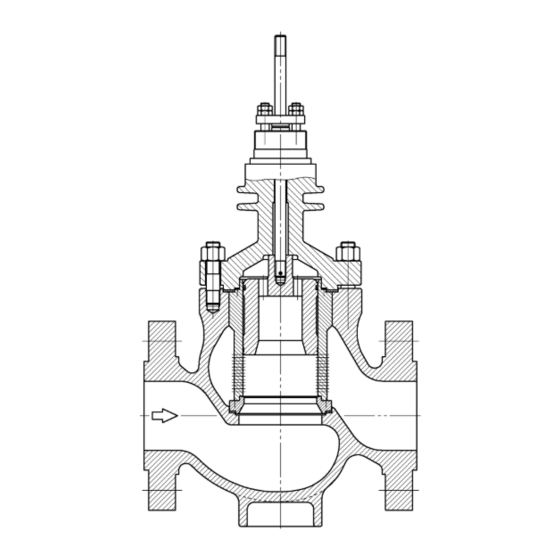
NUMBERING SYSTEM TRIM TYPE CONTOURED PLUG CONTOURED PLUG INTEGRAL WITH STEM MULTIHOLES CAGE MULTIHOLES CAGE - PLUG WITH PILOT BODY TYPE STRAIGHT ANGLE - 5 - MAN0038E / rev.6... -
Page 6: Disassembly
DN > 2”: Unscrew screws (54) and remove can be damaged. It is recommended to 3.2.2. replace it with PARCOL original spares. the plug post (53). 3.1.4. The cage (9) must be drawn out from the 3.2.3. -
Page 7: Valve Type 1-6942 / 1-4642 Disassembly
3.3.8. Lift out the seat (6) using the suitable gasket can be damaged. It is recommended threaded holes to replace it with PARCOL original spares. 3.3.9. Remove gasket (14). 3.3.4. Extract the plug (5) integral with stem. -
Page 8: Valve Type 1-6943 /1-4643 Disassembly
“Packing for Control Valves” manual gasket can be damaged. It is recommended MAN0002E. to replace it with PARCOL original spares. 3.4.8. Lift out the seat (6) using the suitable 3.4.4. Remove the plug (5) acting on the stem (7). -
Page 9: Valve Type 1-6948 / 1-4648 Disassembly
Remove gasket (14). times problems can occur and the gasket can be damaged. It is recommended to replace it with PARCOL original spares. 3.5.4. Extract the cage (9) together with the plug (5) acting on the stem (7). Should the cage removal get difficulties because of scales or build-ups. -
Page 10: Stem And Plug Replacement
STEM AND PLUG REPLACEMENT 3.5.13. Remove drill burrs. 3.5.14. Put some grease on the new pin and slip it Even if stem and plug are normally supplied as- into the hole. sembled, nevertheless the connecting procedure of the two parts should be known, when screw 3.5.15. - Page 11 Nut material VALVE SA 194 Gr.4 Stud Stud. SA 194 Gr.8 RATING (mm) Wrench SA 194 Gr. 2H (in.) Type TIGHTENING TORQUE 150-300 0.4÷0.7 (Nm) 0.5÷0.8 0.6÷0.9 1500 07÷1.0 2500 0.8÷1.1 3/4-1 Table 7 1.1/2 1200 1200 M36x3 1650 1200 1200 M36x3 1650...
-
Page 12: Valve Type 1-6941 / 1-4641 Assembly
VALVE TYPE 1-6941 / 1-4641 ASSEMBLY VALVE TYPE 1-6943 / 1-4643 ASSEMBLY 4.4.1. Put the seat gasket (14) into the body. 4.6.1. Metallic seal (fig.10,11,12,13,14,19,20) Always use original spare gaskets as they 4.6.1.1. Put the seat gasket (14) into the body. have calibrated thickness for the correct Always use original spare gaskets as application. -
Page 13: Valve Type 1-6948 / 1-4648 Assembly
4.6.2.4. Version without adapter (fig.15,16) 4.7.6. For the mounting of the piloted plug see Parcol “Pilot Operated Balanced Plugs” Measure the “X” quote as shown on 4.6.2.4.1. manual MAN0051E. figure 15 (or figure 16 for balanced version) verifying that is within the 4.7.7. - Page 14 Metallic seal version Figure 11 Figure 12 Figure 10 Figure 14 Figure 13 - 14 - MAN0038E / rev.6...
- Page 15 1-6943 series with soft seal Figure 15 - not balanced Figure 16 - balanced Figure 17 - not balanced with spacer Figure 18 - balanced with spacer Item Part name 8, 14 GASKET GASKET (if any) SEAL RING Table 8 - 15 - MAN0038E / rev.6...
- Page 16 HT version (only for metallic seal) Figure 19 Figure 20 Figure 21 Item Part name 8, 14 GASKET BELLEVILLE WASHER Table 9 Check dimension “X” for 1-6943 series Port (in.) Without adapter 1.8÷2.2 2.0÷2.4 2.3÷2.7 2.9÷3.3 3.3÷3.7 3.8÷4.2 4.1÷4.5 (mm) With adapter 1.8÷2.3 2.0÷2.5...
-
Page 17: Setting Valves With Pneumatic Diaphragm Actuator
VALVES WITH “AIR-TO-OPEN” ACTION 1-X-292 5. SETTING VALVES WITH PNEUMATIC DIAPHRAGM ACTUATOR 5.2.1. Acting on the pressure regulator increase the pressure on the diaphragm until the plug Valves are factory set and supplied complete with begins to move. test certificate. It is however suggested to further check the setting before putting the valve in service. -
Page 18: Balanced Plugs
6. BALANCED PLUGS 6.4.1.2. Measure from the top of the cage to the ring nut (dimension A) as shown in figure Clean thoroughly the seating surfaces of gaskets before start mounting it. 6.4.1.3. Repeat the measure mounting the c-ring seal with the opening top side (dimension B) as shown in figure 25. - Page 19 Figure 26 Figure 27 Figure 28 Figure 29 Item Part name SEAL RING ENERGIZER SEAL RING SEAL RING ROD SEAL SEAL RING SEAL RING PLUG FLANGE BOLT RING NUT WASHER Figure 30 Table 13 - 19 - MAN0038E / rev.6...
- Page 20 PARCOL S.p.A. Via Isonzo, 2 – 20010 CANEGRATE (MI) – ITALY Telephone: +39 0331 413 111 – Fax: +39 0331 404 215 – E-mail: sales@parcol.com http://www.parcol.com...
Need help?
Do you have a question about the 1-6940 Series and is the answer not in the manual?
Questions and answers