
Related Manuals for Valor SD-906W


Summary of Contents for Valor SD-906W
- Page 1 USER MANUAL MOBILE MULTIMEDIA SYSTEM WITH 7" WIDE TOUCH SCREEN LCD MONITOR Model: SD-906W...
-
Page 2: Table Of Contents
Table of Contents DVD Region Management........ Safety Information Installation Main Unit Display- Monitor Closed Main Unit Oisplay- Monitor Open Remote Control General Operation... -
Page 3: Safety Information
Safety Information Please read all instructions carefully before installing or operating. Due to its technical nature, it is highly recommended that your unit is installed by a professional installer or an authorized dealer. This product is only for use in vehicles with 12VDC negative ground only. Safety Notes: The DVD video display of the in-dash unit will not operate while the vehicle is moving. -
Page 4: Installation
Installation Please read the manual before installation. Before You Start • Disconnect negative battery terminal. Consult a qualified technician for instructions. • Avoid installing the unit where it would be subject to high temperatures, such as from direct sunlight, or where it would be subject to dust, dirt or excessive vibration. Getting Started •... - Page 5 Installation Wiring Diagram --:B::..::.::...lue_ ® Rear White/Black @---------, ® White @)-----' ® Groen Black 11l-_:::.:;Bla:.::;ck::...--er,VlI Stri~ Green with White L---...:.P~in~k Gray/Black L.---@ Gray -'-@@ <:reen/BIack (-) VlaIet ® ®...
- Page 6 Installation Wiring Diagram - Components 1. Media Device connecting cable 2. Bluetooth Microphone 3. Radio Antenna 4 Car Phone (Brown) 5. Dimmer (Orange) 6. Rear Zone Audio Out LlR & Rear Monitor 1 Red: Rear Zone Out R White: Rear Zone Out L * Yellow: Rear Monitor 7.
- Page 7 Installation Wiring Diagram - Optional AN Connections DVD Player Game Console Overhead Monitor •• Rear View Camera Headrest Monitor Front Amplifier Sub Amp lifier Center Channel Amplifier Rear Amplifier The diagram above illustrates the connection capabilities of the unit. Two separate AudioNideo inputs allow the connection of a DVD player or game console.
-
Page 8: Main Unit Display Monitor Closed
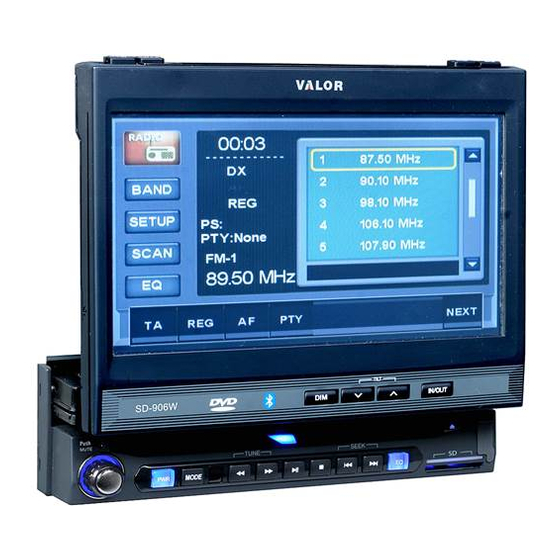
Main Unit Display Monitor Closed Band AS / PS (Auto Store/Preset Scan) Secondary LCD DISP (Display) Open / Close Monitor Eject USB Port ® SO Card ® Monitor Notes: This model incorporates a motorized moving monitor. Before final installation, make sure the monitor will not obstruct the dash, shifter or any other controls. -
Page 9: Main Unit Oisplay- Monitor Open
Main Unit Display Monitor Open @ - - - - DIM - Press to change brightness level of LCD backlight. TILT DOWN- Press ... to decrease the monitor view angle. TILT UP- Press Ato increase the monitor view angle. INIOUT - Press to move the monitor forward and backward. Safety Notes: The DVD video display of the in-dash unit will not operate while the vehicle is moving. -
Page 10: Remote Control
Remote Control ® Display ® Eject Next Chapter Previous Chapter Enter / Play Fast Forward Fast Reverse Mode ® Power Mute Direction Key [Down] Zoom / Call Picture ® Stop / Band / Hang up Number Key Subtitle Audio Select ®... -
Page 11: General Operation
General Operation POWER On/Off Press and hold POWER for more than 2 seconds to turn the unit off. Monitor OPEN/CLOSE Monitor IN/OUT With the monitor open, pressing TILT .. to increase view angle of the Monitor TILT Position monitor, and pressing TIL TT to decrease view angle of the monitor. The monitor angle can be adjusted in 6 different positions. - Page 12 General Operation Monitor Angle Position (Left/Right) Mode Optional Mode Selection Volumn Mute Dimmer Display To adjust the monitor positon Left/Right: • Make sure the monitor is in the "OUT" position.Press IN/OUT • Grasp both side of the monitor near the bottom and gently pull on side until the mechanism is fully extended.
- Page 13 General Operation With the monitor closed: Clock Set 1. Press DISP button(4) to display the clock. 2. Press and hold DISP button(4)until a confirmation beep is heard, then release. 3. Press .. or T to adjust the hours and ... or to adjust the minutes.
-
Page 14: Main Setup Menu
Main Setup Menu 1. Press MAIN SETUP in the mode selection display. Enter/Exit 2. Press Main Setup Menu There is three available sUbjects of setup to select., which are General, ASP, Video. Once enter the MAIN SETUP menu, it will be displayed as General screen. General Press the Syetem Time menu bar on screen to open Clock Adjustment display. - Page 15 Main Setup Menu Use Default Settings Bass Cent Freq Bass Q Value Bass DC Gain TREB Cent Freq LOUD Cent Freq Power On Volume Fixed Volume 3.Press at up-left, dwon-Ieft, down-right and up-right corner on screen as displayed below. Press Use Default Settings menu bar on screen to choose YES/NO.
-
Page 16: Video Operation
VIDEO Operation VIDEO At the bottom part of the screen of MAIN SETUP menu, there are three available items: General, ASP, Video. Press Video item to display audio setup menu. Press <II , Display Mode display aspect of 16:9 or 4:3. Press <II , Video Input PAL and NTSC. -
Page 17: Radio Operation
Radio Operation When you turn on the unit at first, radio mode will displays on screen Radio automatically. Band Press BAND button(1) on the remote control or BAND on screen, the current band will change among AM band and FM3 bands in display. Automatic Press SCAN in display to start scanning broadcasting stations in the current band. - Page 18 Radio Operation Press EO button to enter the Audio Adjust screen. EO has 5 basic different audio effects, which are User, Classical, Rock, Jazz and Pops. The user can adjust the FAD(Fade), BAL(Balance) and LOUD(Loudness) by pressing ... , - If you select User, the Bass and Treble bars are activated. The user can select from -7 to 7 levels of Bass and Treble effect.
-
Page 19: Rbos Operation
RBDS Operation TA lets you receive traffic announcements automatically, no matter what source (Traffic you are listening to at the moment. TA can be activated for both a TP station or an enhanced other networks TP station. Announcement) - To turn TA off/on, touch TA in screen. - When recieving Traffic Announcement, if the volume is low than 16, it will be changed to 16. - Page 20 RBDS Operation You can select volume between 0-39. TA Volume Select "On", when you drive to different place, clock can adjust automatically. Clock Tune Seek I Alarm. TA Option Long I Short. TA Retune...
-
Page 21: Co Player Operation
CD Player Operation CD Mode Disc Insert/Eject Place CD, label side up, into the disc slot. After inserting the disc, playback starts automatically and the CD mode's playback display shows. To stop the playback and eject the disc, press Eject button. Play/Pause and press again to play again.Track list will be displayed at right side of screen. - Page 22 CD Player Operation Repeat Play Press REPEAT button(39) in remote contral or NEXT, REPEAT on screen to repeat the current track. "Repeat Single" will be displayed shortly on screen. Press again to repeat the full contents of disc. "Repeat All" will displayed. Press third time to go back normal play. "Off' will displayed.
-
Page 23: Mp3Iwma Player Operation
MP31 WMA Player Operation Mp3/WMA Player Move Folder You can play MP3IWMA files stored in disc/SO card/USB. Functions as play, pause, stop, track selection, fast forward/reverse, repeat play, intro scan, random play, etc. are the same for MP3IWMA and CD operation. Please see the CD player operation section for the instruction about these functions. -
Page 24: Dvo Player Operation
DVD Player Operation DVD Player Enter DVD Root Menu Display / Hide DVD Menu Bars in Screen Press INFO in screen or DISP button(4) in the remote control to display Display DVD DVD information as track, audio, subtitle, etc. on screen. Information Section A·B Repeat Play... - Page 25 DVD Player Operation Go to Title Menu Selecting Angle Selecting Subtitle Repeat Play Zoom GOTO (Direct Access) Press TITLE button(40) in remote control or NEXT, MENU on screen to go to DVD title's starting menu. Press ANGLE button(38) in remote control or NEXT, repeatedly to view multiple picture angles recorded in disc in sequence.
- Page 26 DVD Player Operation 1. When playing DVD/CD, press SETUP button(29) in remote control DVD SETUP 2. After set up, to go back to DVD playback, press SETUP button(29) The Set Rating PWD and Parental Control is concering with the DISC Set Rating PWD setup of the DVD.
- Page 27 DVD Player Operation Parental Control AUDIO ADJUSTMENT You can set parental control to keep children from harmful video. 1. Press Parental Control menu bar in DVD setup display. 2. Number keypad will be displayed for entering password before setting. 3. Press ... , by Parental Control to set one control grade among a.Adult /7.NC-17 / 6.R / 5.PG-R / 4.PG-13 / 3.PG / 2.G / Kid Safe.
- Page 28 DVD Player Operation Some discs support 5.1-channel Dolby Digital surround sound. When this Dolby 5.1CH kind of disc is inserted the unit. you can adjust the 5.1-channel audio effect on your preference. 1. It should be selected "Off' of Prologic II and Downmix in DVD setup menu for enjoying 5.1 CH sound effect.
- Page 29 DVD Player Operation Disc Language Setup After language setup at DVD setup mode, when playing disc, the selected language After entering DVD setup mode. press Speaker display on screen to show Speaker speaker setup menu. Speaker Volume Setup Test Tones Bass Manage 2.
- Page 30 DVD Player Operation Speaker Channel Gain Front Left Channel Gain: Press ... , ~by FL CH Gain menu bar in screen to adjust the front left speaker's volume effect. Front Right Channel Gain / Center Gain / Rear Left Channel Gain / Rear Right Channel Gain / Subwoofer Gain: 1.
- Page 31 DVD Player Operation • Here are some tips for OSD(On Screen Display). It is convenient for operation.We can divide the screen into several areas as below. Touch A area, launcher MENU will appear. Tounch B area, SETUP MENU will be showned(26). Touch C area, DVD Menu will be showned(Page24 and 25).
-
Page 32: Jepg Operation
JPEG Operation Slide Show Operation 1. When JPEG mode is played, slide show will be operated automatically. 3. Press - button(35) in remote control or - 4. Press 5. Press 1. Press ZOOM button(34) in remote control or Zoom In/Out 2. -
Page 33: Usb/So Card Operation
USB/SO Card Operation Play Each Source Press MODE button(16) or press the current mode icon at up-left of screen to go to mode selection display and press USB / SD card mode icon. According to the source stored in USB or SD card, you can play it. The source types compatible with this unit are in specification on page. -
Page 34: Bluetooth Operation
BLUETOOTH Operation Bluetooth Mode This unit supports Bluetooth wireless connection with a bluetooth cell- -ular phone. Note: Press MODE button(16) in remote control or touch the current mode icon at up-left corner of screen to go to mode selection display, and press BLUETOOTH mode icon in screen. - Page 35 BLUETOOTH Operation Pairing Disconnect Make a Call Receive a Call 2. Talk through the supplied microphone. 3. After finishing conversation, press Hang Up on screen or @ During conversation, for privacy or any other reason, you can transfer the Call Transferring call between the unit and your cellular phone by pressing 1.
-
Page 36: Media Device Operation
Media Device Operation Note: - You should connect your Media Device with this unit first using the cable supplied. - After connecting Media Device the current mode will change to Media mode and the unit will start playing the selected list or play all files registered on the Media Device if no selected list. - Page 37 Troubleshooting Problem No power to unit correctly No sound can be heard Speaker wires shorting to or the volume is low chassis ground or to each other Fader or Balance incorrectly adjusted correctly Disc is upside down Will not read disc Disc is dirty Format nol supported by player...
-
Page 38: I I I
Specifications CEA Power Ratings Power Output: 18watts RMS x 4channels into 4-ohms @ < 1% THD+N Signal to Noise Ratio: 90dBA below reference (Reference: 1watt, 40hms) Dynamic Power: 36watts @ 40hms Frequency Response: 20Hz - 20kHz (-3dB), AudioNideo input used as source reference Standard Power Supply: 14.4 VDC CD/DVD Player Compatible Disc:... - Page 39 Specifications AM Tuner Monitor General Tuning Range: 530 - 1720kHz Sensitivity (-20dB): 30uV Signal to Noise Ratio @ 1kHz: 50dB Image Rejection: 60dB Frequency Response: 50Hz - 2kHz, -3dB Screen Size: 7" (Measured diagonally), 16:9 Widescreen 7"(145mm)H x 3.5"(89mm)W Screen Type: TFT Liquid Crystal Display (LCD) Active Matrix DVD Player: 480(H) x 234(W) X 3(RGB) Back Light: CCFL, 400cd/m2 Audio Input Impedance: 10k...
- Page 41 Place Postage Here VilLOR MULTIMEDIA Valor Warranty Validation Dept V,lLOR 18061 ArenthAve MULTIMEDIA City of Industry . CA 91748 ONE YEAR LIMITED WARRANTY...
- Page 42 Warranty Validation Card Please complete all fields to validate your Valor Multimedia limited warranty. Remember to include a copy of your dated sales invoice. Failure to return this card will result in warranty coverage starting on the date of manufacture based on your serial number.
Need help?
Do you have a question about the SD-906W and is the answer not in the manual?
Questions and answers