Table of Contents

Summary of Contents for Sierra EGL-T12
- Page 1 EGL-T12 Triple Oil-less Air Compressor (1-6 Users) 2022 USER MANUAL/Installation Instructions 1953 W. Gulf To Lake Hwy, Lecanto, FL 34461 Phone: 352-527-1975 FAX: 352-513-4801 www.Dentalvacuums.com sierradentalequipment@outlook.com...
- Page 2 TABLE OF CONTENTS Cover Congratulations Customer support Warranty Policy Safety Safety Continued System Layout System Layout Cont. Specifications Installation Installation Cont. Start-up Procedure Preventative Maintenance Troubleshooting Troubleshooting Cont. Maintenance Log Congratulations! On the Purchase of your Eagle-T12 oil-less dental compressor. Our Eagle-T12 oil-less dental compressors provide clean dry air to each chair flawlessly, requiring less maintenance than traditional compressors.
-
Page 3: Customer Support
“We are happy to help you with any questions or concerns you may have about your equipment” Contact Us at 352-527-1975 We're here to help! sierradentalequipment@outlook.com DentalVacuums.com Look for us… on social media! Sierra Dental Equipment Inc. 1953 W. Gulf to Lake Hwy Lecanto, FL 34461... -
Page 4: Warranty Policy
Sierra Dental Equipment Limited Warranty Warranty for the EAGLE-T12 oil-less compressor is limited to the original purchaser of the unit. Sierra Dental Equipment is only obligated under this warranty to the repair or replacement of defective parts or materials The defect(s) must be reported to Sierra Dental Equipment within the valid warranty period. - Page 5 SAFETY Use of the Eagle-T12 air compressor not in compliance with the instructions specified in this manual may result in permanent failure and voided warranty of the unit. WARNING To prevent fire or electrical shock, do not expose this unit to rain or moisture, excessive heat or improper ventilation.
- Page 6 If any adjustments to the pressure switch is needed, call your authorized dealer for Sierra Dental Equipment Inc. Never perform welding jobs or repairs on the air pressure tank because this can affect its resistance or disguise more serious problems.
-
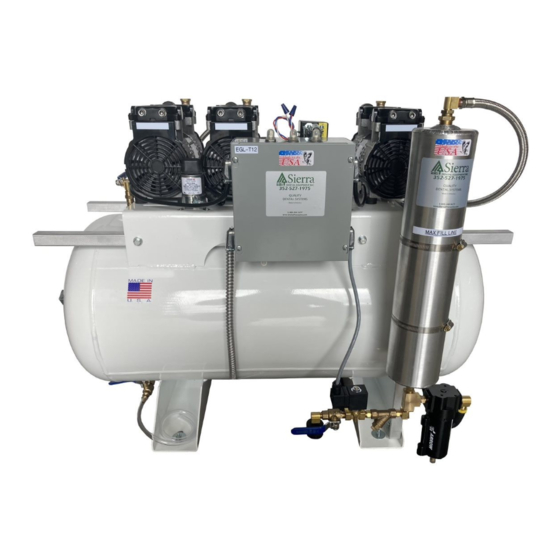
Page 7: System Layout
SYSTEM LAYOUT 24v Remote ¾ HP Compressor wires heads (x3) Capacitors (x3) Outlet Desiccant dryer Low voltage control box Tank Drain Power cord Low voltage reset Air muffler & Auto purge Solenoid Coil Purge silencer Purge shut off valve Coalescing filter Purge solenoid valve Strainer... - Page 8 SYSTEM LAYOUT Inlet Filters (x3) Fan shrouds (x3) ASME Safety valve Heat Exchanger Rubber feet Pressure switch Pressure gauge...
-
Page 9: Specifications
Minimum ambient temp. This equipment must be installed in a well ventilated mechanical room to prevent overheating and failure not covered by the warranty. Description Specification Model # EGL-T12 Max users Air dryer Yes/Dessicant/Auto purge Number of heads Total horsepower 2.25... -
Page 10: Installation
INSTALLATION YOU MUST DO A PRESSURE TEST AFTER THE COMPRESSOR IS INSTALLED TO VALIDATE WARRANTY! (See pg. 12) 1. Location: Install the compressor in a covered, well ventilated area, free of dust, gases, toxic gases, humidity, or any other kind of pollutant. The maximum ambient temperature recommended during operation should be no greater than 95 degrees a. - Page 11 INSTALLATION 5. The electrical input wires must be in accordance to the motor power, voltage and distance from electrical energy source. 6. Before installing the product, verify that the product voltage is compatible to the local electrical power supply (220-240) – (208) require the 24v transformer to be rewired.
-
Page 12: Start-Up Procedure
START-UP PROCEDURE You MUST INCLUDE a signed copy of this with your WARRANTY card to validate warranty. After installation is complete, perform the following start up procedure: Confirm the voltage is between 220-240 Volts AC. Completely open discharge ball valve (Top of tank, next the pressure switch) Turn the compressor on using the main power switch. -
Page 13: Preventative Maintenance
Check for abnormal noise or vibration. If the problem persists after the following corrective actions are taken, contact your local authorized dealer for Sierra Dental Equipment Inc. d. Check the intake filters. When an intake filters are clogged it is necessary that they be replaced. -
Page 14: Troubleshooting
TROUBLESHOOTING Motor(s) will not start -Check supply voltage with a multimeter. (220- 240 is acceptable) Buck-boost transformer will be necessary if your voltage is above or below the acceptable voltage. -Damaged motor or start capacitor. -Automatic Thermal protector tripped . (Motor will re-start as soon as temperature decreases) If this happens, contact technical support. -
Page 15: Abnormal Noise Or Vibrations
-Loose fan cover -Damaged motor mount -Compressor installed incorrectly -Contact your local authorized dealer for Sierra Dental Equipment Inc. -Damaged connecting rod(s) bearings. See Preventative Maintenance Section Moisture in the air lines/operatories -Drain the tank. Make sure there is less than 10 psi before opening the drain. -
Page 16: Maintenance Log
MAINTENANCE LOG Date of Working Ambient Additional Technician Services Provided Service Hours Temp. Remarks Signature... - Page 17 START-UP PROCEDURE You MUST INCLUDE a signed copy of this with your WARRANTY card to validate warranty. After installation is complete, perform the following start up procedure: Confirm the voltage is between 220-240 Volts AC. Completely open discharge ball valve (Top of tank, next the pressure switch) Turn the compressor on using the main power switch.
Need help?
Do you have a question about the EGL-T12 and is the answer not in the manual?
Questions and answers