
Summary of Contents for FJDynamics FJD Trion P1
- Page 1 FJD Trion P1 LiDAR Scanner User Manual October 28, 2023 | Rev. 1.0 © 2023 FJDynamics. All rights reserved.
- Page 2 FJD Trion P1 LiDAR Scanner User Manual Copyright Notice: FJDynamics reserves the copyright for this manual and all content herein. No part of this manual may be reproduced, extracted, reused, and/or reprinted in any form or by any means without the prior written permission of FJDynamics.
- Page 3 FJD Trion P1 LiDAR Scanner User Manual Preface Thank you for purchasing this FJD Trion P1 LiDAR Scanner (“P1”). Before use, ensure that you have read this manual carefully and followed the instructions herein to better understand and operate the product.
-
Page 4: Table Of Contents
FJD Trion P1 LiDAR Scanner User Manual Contents Safety Instructions ..........................1 Laser Safety ..........................1 Device Operation Safety ....................1 Battery Operation Safety ....................2 Overview..............................3 Introduction ..........................3 Specifications ......................... 4 First Use ..............................5 Assembly and Connection ....................5 Software and Hardware Interaction ................ - Page 5 FJD Trion P1 LiDAR Scanner User Manual Scanning Range ........................27 Scanning Duration ......................27 Special Scenario ........................27 Maintenance and Troubleshooting ....................30 Maintenance ......................... 30 Common Faults and Solutions ..................30 Waste Disposal ........................31 © 2023 FJDynamics. All rights reserved.
-
Page 7: Safety Instructions
FJD Trion P1 LiDAR Scanner User Manual 1 Safety Instructions 1. To prevent device damage caused by misoperation, P1 can only be used by trained users. Do not operate the device with suspicious defects or obvious mechanical damage. 2. Use the components or accessories that come with the device, or other accessories recommended by FJDynamics. -
Page 8: Battery Operation Safety
FJD Trion P1 LiDAR Scanner User Manual 4. Use the device at normal ambient temperatures and avoid exposing it to extreme temperatures. Otherwise, the battery life will be shortened or unpredictable risks may occur. 5. The device contains sensitive electrical and mechanical components. Do not forcibly bend or pull the connecting cables, and do not insert unrelated objects into the connectors. -
Page 9: Overview
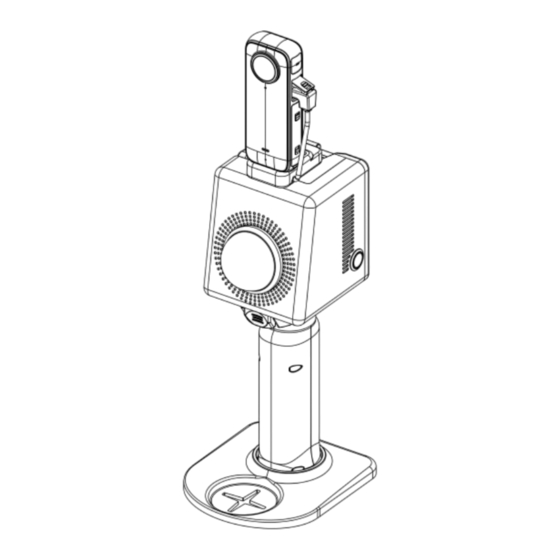
FJD Trion P1 LiDAR Scanner User Manual 2 Overview 2.1 Introduction Name Name LiDAR and housing Power button (with status indicator) Quick-release button for handle Base plate Camera module Quick-release button for camera module USB-3.0 port Type-C port Handle (with battery) Note: Above is the general configuration of P1 and only serves as a reference. -
Page 10: Specifications
FJD Trion P1 LiDAR Scanner User Manual 2.2 Specifications Weight 1.1 kg (excluding the camera module) Dimensions 160×120×270 mm (excluding the camera module) Accuracy 0.8 cm to 2 cm Scanning range 40 m (10% reflectivity) or 70 m (80% reflectivity) -
Page 11: First Use
FJD Trion P1 LiDAR Scanner User Manual 3 First Use 3.1 Assembly and Connection Turn the screw on the base plate clockwise to fit tightly into the threaded hole at the bottom of the handle. Turn the screw anticlockwise to remove the base plate. -
Page 12: Software And Hardware Interaction
FJD Trion P1 LiDAR Scanner User Manual 3.2 Software and Hardware Interaction Starting the Device 3.2.1 Place P1 on a flat surface. Press and hold the power button for 1s to 2s to power on P1. The status indicator flashes green slowly. -
Page 13: Collecting Data
FJD Trion P1 LiDAR Scanner User Manual Collecting Data 3.2.3 Tap Scan in Trion Scan, enter the project name, and then tap OK. Scan initialization starts, and the status indicator of the power button flashes blue. P1 must remain still during the process. - Page 14 FJD Trion P1 LiDAR Scanner User Manual Wait for about 15s until the status indicator of the power button flashes red. P1 is ready for scan, and you can start scanning and view the point cloud data in Trion Scan.
-
Page 15: Downloading Data
FJD Trion P1 LiDAR Scanner User Manual Downloading Data 3.2.4 Tap Data at the bottom, tap Download on the required data, select the format on the pop-up, and then tap Download. © 2023 FJDynamics. All rights reserved. -
Page 16: Updating Firmware
FJD Trion P1 LiDAR Scanner User Manual Updating Firmware 3.2.5 Tap Settings at the bottom, Select Firmware Version, and then tap Upload Package. After the package is uploaded, tap Install on the package information pop-up (version number, package size, and release time). Do not power off P1 during the update. When the process is completed, P1 is restarted automatically. -
Page 17: Powering Off
FJD Trion P1 LiDAR Scanner User Manual Powering Off 3.2.6 Press and hold the power button for 3s to 5s. The status indicator flashes green for 5s before P1 is powered off. Charging the Battery 3.2.7 To charge the battery, plug one end of the charger provided into the Type-C port of the handle and the other end to a power outlet. -
Page 18: Using The Camera
FJD Trion P1 LiDAR Scanner User Manual Note: Do not charge the battery via the Type-C port on the handle while the device is in use. Use the Type-C port on the side of the LiDAR module when you have to charge the battery during use. -
Page 19: Calibrating The Camera
FJD Trion P1 LiDAR Scanner User Manual Calibrating the Camera 3.3.2 Deploy targets: As shown in Figure, randomly distribute target papers with a spacing of 1-2 meters on the four walls of the space. Starting and connecting the Device: Start the scanner: Please refer to Chapter 3.2.1~3.2.3. - Page 20 FJD Trion P1 LiDAR Scanner User Manual Collect point cloud data for calibration:Turn on the P1 and scan all the targets clearly for at least 5 min. Export camera data: Turn off the camera, remove the SD card, and use a card reader to copy the data.
- Page 21 FJD Trion P1 LiDAR Scanner User Manual feature, click in the lower right corner of the screen, click Export 360 video, select the file path, and then click Start Export. Use the Insta360 Studio.exe file provided to install the Insta360 Studio 2023.
- Page 22 FJD Trion P1 LiDAR Scanner User Manual © 2023 FJDynamics. All rights reserved.
- Page 23 FJD Trion P1 LiDAR Scanner User Manual Export point cloud data Open Trion Scan, tap the download button on a project file, and select the .fjslam format to download the package. Then, transfer the package to your PC and decompress it.
-
Page 24: Calculating The Calibration Parameters In Fjd Trion Model
FJD Trion P1 LiDAR Scanner User Manual Calculating the Calibration Parameters in FJD Trion Model 3.3.3 1. Select data for calibration: Select one or more (no more than three) point cloud files under Objects as required. To select multiple files, press and hold the Ctrl key and click the target files. - Page 25 FJD Trion P1 LiDAR Scanner User Manual 4. Select target points: Select the same number of target points on the preview image and the point cloud. The point number must be at least 12. Otherwise, the following message appears when you click Next.
- Page 26 FJD Trion P1 LiDAR Scanner User Manual 6. Calculation result: A message appears indicating whether the calculation is successful. When the success message appears, click OK to colorize the point cloud. Notes: Select the centers of the planar targets as the target points.
-
Page 27: Colorizing The Point Cloud In Fjd Trion Model
FJD Trion P1 LiDAR Scanner User Manual Colorizing the Point Cloud in FJD Trion Model 3.3.4 1. Open the Point Cloud Colorization window: Click on the Start tab. The following window appears: 2. Select data: Select files for the basic data (.las or .fjdata), image data (.mp4 or .fjslam.tgz), and calibration parameters (.yaml). - Page 28 FJD Trion P1 LiDAR Scanner User Manual 4. View the result: When the colorization is completed, the message above disappears, and the colorized point cloud is displayed in the 3D view. The following message appears if the colorization fails. When this occurs, ensure that ...
-
Page 29: Suggestions
FJD Trion P1 LiDAR Scanner User Manual 4 Suggestions Environments When scanning the surroundings, P1 constructs maps and saves the point cloud data in real time. Without the need for a GNSS device, P1 can be widely used for indoor, outdoor, and underground surveying scenarios such as underground parking lots and tunnels. - Page 30 FJD Trion P1 LiDAR Scanner User Manual Loop closure Loop closure Loop closure Loop closure 2. Loop closure during scanning The point cloud data errors accumulate as you walk. The errors decrease with the increase of circular loop closures. Therefore, it is recommended to close the loop as often as possible to minimize the errors.
-
Page 31: Transitioning Between Environments
FJD Trion P1 LiDAR Scanner User Manual 4.3 Transitioning Between Environments Take extra care when transitioning between environments, such as transitioning between rooms and indoor-outdoor transitioning, and when making a U-turn or turn. 1. Transitioning between rooms Open all doors before starting the scanning. Do not scan doors that are being opened. If P1 is not held properly, there are not enough features in front, or you walk too fast, P1 cannot capture enough features in the new room, delivering poor scanning quality. -
Page 32: Holding Instructions
FJD Trion P1 LiDAR Scanner User Manual especially when in a corridor, to ensure that there is a period when P1 can view features on both sides of the turn. 4.4 Holding Instructions The horizontal and vertical FOV of the P1 LiDAR are 360° and 59° respectively as shown below. -
Page 33: Walking Speed
FJD Trion P1 LiDAR Scanner User Manual 4.5 Walking Speed You are recommended to walk at a constant speed (1 m/s) in common environments, and reduce the speed to 0.5 m/s or lower when passing through narrow spaces, such as corridors, tunnels, and stair corners, so that P1 can effectively and fully scan the spaces to ensure the output accuracy. - Page 34 FJD Trion P1 LiDAR Scanner User Manual 2. Scan separately: If there is such a corridor in the area to be scanned, scan the corridor separately. 3. Add features manually: For a corridor with smooth walls on both sides and without obvious features, add features such as chairs manually.
- Page 35 FJD Trion P1 LiDAR Scanner User Manual collect as much point cloud data as possible in such scenarios with sudden spatial change. © 2023 FJDynamics. All rights reserved.
-
Page 36: Maintenance And Troubleshooting
FJD Trion P1 LiDAR Scanner User Manual 5 Maintenance and Troubleshooting Maintenance 1. Wipe P1 with a clean cotton cloth and put it in the case after use. 2. Avoid rough actions, such as impact, bending, throw, and disassembly, on P1, and do not put debris on it. -
Page 37: Waste Disposal
FJD Trion P1 LiDAR Scanner User Manual Waste Disposal The product contains metal and electronic components. Waste must be disposed of in an environmentally safe way according to local laws and regulations. Any waste (such as packaging materials, metal parts, and electronic components) must be delivered to local recycling facilities for disposal. - Page 38 © 2023 FJDynamics. All rights reserved.
- Page 39 NOTE: This equipment has been tested and found to comply with the limits for a Class B digital device, pursuant to part 15 of the FCC Rules. These limits are designed to provide reasonable protection against harmful interference in a residential installation.
Need help?
Do you have a question about the FJD Trion P1 and is the answer not in the manual?
Questions and answers