
Subscribe to Our Youtube Channel
Related Manuals for Badger Basket Liffey 22kW Twin


Summary of Contents for Badger Basket Liffey 22kW Twin
- Page 1 Liffey 22kW Twin Installation Manual BADGER EV Enterprise House, Manchester Science Park, Lloyd St N, Manchester M15 6SE hello@badgr-ev.com www.badger-ev.com WWW.BADGER-EV.COM...
-
Page 2: Table Of Contents
CONTENTS 1. Safety Information P-01 ● Important safety instructions 2. Product Introduction 2.1. Product Appearance P-03 ● ● 2.2. Parameter table P-04 2.3. Product Features P-05 ● ● 2.4. Protection Functions P-06 3. Installation Instructions 3.1. Installation Considerations ● P-08 ●... -
Page 3: Safety Information
1. Safety Information 1. Safety Information Important safety instructions: this document contains important instructions Cautions and warnings that must be followed when installing and maintaining the Liffey EV Charger. Do not use private power generators as a power source for charging. Incorrect installation and testing of the EV Charger could potentially damage either the vehicle's Battery and/or the EV Charger itself. -
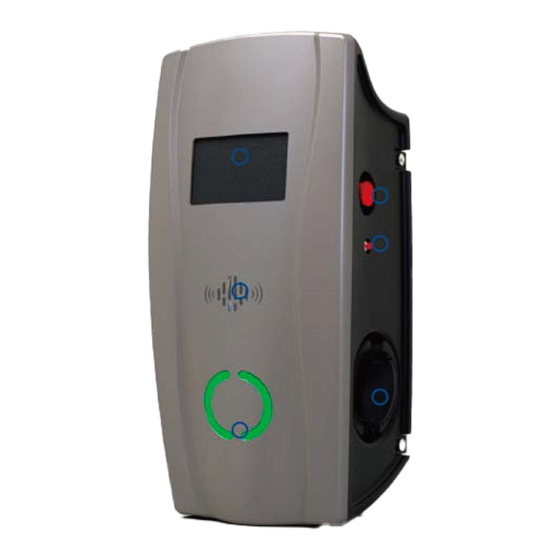
Page 4: Product Introduction
2. Product Introduction 2. Product Introduction 2.1. Product Appearance 2.2. Parameter table BPE Liffey Dual Socket BPE-LFY-Dual-22kW 2 x 22kW Maximum Power 400VAC Input voltage/Output voltage 3-Phase 50Hz/60Hz Input frequency Tethered/Socket 2 x Socket Meter 2 x MID Meter Display LCD Screen + LED Lights Rate Charging Current 6-32A... -
Page 5: Product Features
2. Product Introduction 2. Product Introduction 2.3. Product Features 2.4. Protection Functions Open Cover Detection: If the cover is opened, the Charger will display red light alarm ● and stop any charging session. A warning message will also appear in the App LCD Display ●... -
Page 6: Installation Instructions
3. Installation Instructions 3. Installation Instructions 3.1. Installation Considerations ● Note: Throughout the manual, "conduit" is used as the standard term for the protective tubing that houses the service wiring. In regions where conduit is not used (Europe for example), a cable comprised of service wiring enclosed in a protective jacket may be substituted for conduit if allowed by local regulations. -
Page 7: Installation Position
3. Installation Instructions 3. Installation Instructions 3.7. Accessories List 3.4. Installation Position Ensure that the parking space is within reach of the charging cable. ● Ensure there is enough clearance around the charger for the installation and maintenance ① ② ③... -
Page 8: Installation Step
3. Installation Instructions 3. Installation Instructions 3.8. Installation Step 3.8.1. Step-by-step Installation Instructions 3.8.1. Step-by-step Installation Instructions (bottom entry wiring) (bottom entry wiring) Step 1 Step 3 Positioning lnstall the EV Charger to the Mounting Bracket Ensure the bottom of the positioning plate is 1.2 m (recommended) off the ground. - Page 9 3. Installation Instructions 3. Installation Instructions 3.8.2. Step-by-step Installation Instructions 3.8.2. Step-by-step Installation Instructions (rear entry wiring) (rear entry wiring) Step 3 lnstall the EV Charger to the mounting bracket Step 1 Find the knock-out hole on the back of the EV Wall Positioning charger and use a drill to remove it.
-
Page 10: Web Configuration
4. Web configuration 4. Web configuration 4.1.3. Accessing the Charger through a Browser 4.1. Connection Configuration Open your browser and type 192.168.1.1 into the URL bar at the top. We recommend using Google 4.1.1. Enter the Configuration Mode Chrome for better compatibility. When the charger is powered on for the first time, it will automatically enter the Configuration Mode. -
Page 11: Ocpp Server Configuration
4. Web configuration 4. Web configuration 4.1.5. OCPP User Configuration 4.2. OCPP Server Configuration Configuration Parameters Explanation Maximum Length Choose whether to enable encrypted communication SSL Enable / Unable (select this according to the OCPP platform) Configuration Parameters Explanation Maximum Length Central System Hostname Server domain name or IP address Wi-Fi WPS / Custom /... -
Page 12: The Parameter Configuration
4. Web configuration 4. . Web configuration 4.4. DLB Box Configuration 4.3.The Parameter Configuration The EV charger can be equipped with a DLB box to achieve dynamic load balancing or photovoltaic energy management functions. For specific functions, please refer to the "DLB Manual". -
Page 13: Enter The Rfid Configuration
4. Web configuration 4. . Web configuration Configuration Parameters Explanation 4.5. Enter the RFID configuration DLB Enable / Unable DLB function master switch DLB WebConfig Enable/DLB Whether DLB uses the configuration of the web page WeConfig Unable Normal DLB extreme mode Normal mode Extreme Mode EV charger may be suspended due to DLB Enable / Unable... -
Page 14: Reset The Password
4. Web configuration 4. . Web configuration 4.6. Reset the Password 4.7. WPS Connection Method Enter the WEB configuration mode and set the WiFi WPS connection. Ready for WPS connection The default of the charger is WPS connection mode, please confirm whether it is currently in WPS connection mode When you forget the password, you can restore the password to the default... -
Page 15: Exit Ap Mode
5. Operating instructions 5. Operating instructions 5.2. Buzzer 4.8. Exit AP Mode After the setting is completed, click the "Exit the Wi-Fi AP mode" button, and the EV Enter into WEB configuration mode successfully Long buzzing once charger will automatically connect to the server according to the set parameters. WEB configured successfully Long buzzing once WEB configured failed... -
Page 16: Led Lights Display
5. Operating instructions 5. Operating instructions 5.3. LED Lights Display Normal Status Normal Status LED Behavior LED Status Status Description Potential Cause Solution Status Description LED Behavior LED Status Potential Cause Solution Lights OFF No power supply No power Check the power Green lights up and The Charging source... - Page 17 5. Operating instructions 5. Operating instructions Fault Status Fault Status LCD Screen/LED Light Status Description LED Behavior LCD Screen/LED Light Status Description LED Behavior Potential Cause Solution Potential Cause Solution The connection Abnormal CP 1.Check if the Conector 1 Contactor failure Contactor adhesion Check whether Conector 1...
-
Page 18: Firmware Update Via Bluetooth In Be Smart App
5. Operating instructions 5.4. Firmware Update via Bluetooth in BE Smart App Press and hold the internal reset button, power on, press and hold for 1S, and hear the buzzer beep Click the mark in the Enter the charger upper right corner as number and click “Fix”...
Need help?
Do you have a question about the Liffey 22kW Twin and is the answer not in the manual?
Questions and answers