
Summary of Contents for Livingchy Soft Opening Life Style
- Page 1 Soft Opening Life Style Assembly instructions WARNING If the bed is not properly secured to the wall, it may suddenly tip over, resulting in serious injury or death. Please read this manual carefully before beginning to assemble the bed.
-
Page 2: Specifications
Maximum weight supported by the bed base: 1000 lbs • Mattress weight: 45 lbs • Mattress thickness: 10 in • Minimum ceiling height: 91 in • Minimum holding force required for each fixation: 100 lbs • Do not use with folding mattress. Soft Opening Life Style... -
Page 3: Interactive Guide
WARNING If you purchased a bed with a sofa, please assemble the podium before starting the assembly of the Murphy bed. INTERACTIVE GUIDE Please open and follow this interactive guide in addition to this assembly manual for an installation efficient and safe. Scan this QR code to access the interactive guide. - Page 4 Notched long support HDF-XXVHL-5 Large HDF HDF-XXVHE-5 Narrow HDF MA-SPO Support de porte 2 L/2S MA-PWH-XX Top part of handle MA-PWB-XX Lower part of handle MA-PWF-XX Buttom part of handle PO-COV3DW-HC High center door PO-COV3DW-HE High exterior door Soft Opening Life Style...
-
Page 5: Hardware Checklist
Hardware checklist PART PART PART CAM-B-10 CAM-D-10X35MM GOU-B-516X118 VIS-C-2 BOU-H-M6X25MM PAT-CLOU VIS-P-10X34-NOI VIS-W-8X118 VIS-P-8X1 AMO-BUM VIS-W-8X112 CAV-NOI CAV-XXX CAT-NOI FEUTRE 100279-2/100279- 100279-1/100279- 1G/1D 1G/1D PIS-PXX PAT-RF-T PAT-RF-U VIS-A-14x138 WAS-LONK-14 ELASTIC Reinforcement FIXATION VIS-W-8X2 Plate VIS-P-8X112 VIS-W-8X3 VIS-C-70mm Soft Opening Life Style... - Page 6 Hardware checklist PART PART PART LED Band + wire Extrusion Lens Clip VIS-P-5X12 Switch Power supply Soft Opening Life Style...
- Page 7 WASHER HEAD SCREW #8X3'' VIS-P-10X34-NOI VIS-W-8X112 VIS-W-8X2 BLACK FLATHEAD SCREW #10 X 3/4'' WASHER HEAD SCREW #8X1 1/2'' WASHER HEAD SCREW #8X2'' WAS-LOCK-14 GOU-B-516X118 VIS-C-70mm LOCKING WASHER 1/4 WOOD DOWEL 5/16'' X 1 1/8'' 70mm ASSEMBLY SCREW Soft Opening Life Style...
-
Page 8: Special Remarks
Required tools -Hammer -Level -Robertson screwdriver #1, 2, 3 and flathead -Wrench 10 mm -Tape measure -Drill Two people are required to assemble this bed. Cam and dowel assembly Dowel Arrow aligned Insert Locked position Lock Soft Opening Life Style... - Page 9 1- Assembling the cabinet PART VIS-P-10X34-NOI 100279-2G 100279-2 VIS-P-10x34-NOI 100279-2G CA-COD-XX18 100279-2 CA-COD-XX18 2- Assembling the cabinet PART VIS-C-2 CAV-XXX PAT-CLOU VIS-C-2 CA-COD CA-DED CA-TRH CA-TRC CA-TRC CA-COD PAT-CLOU CA-TRB CAV-XXX Edge band position Soft Opening Life Style...
- Page 10 3- Assembling the cabinet 2 people required WARNING If you have purchased a bed with sofa please refer to the assembly instructions of the podium before continuing with the installation. Assembly instructions of the podium Soft Opening Life Style...
- Page 11 • NEVER attach the wall bed directly to drywall, gypsum board, or any other wall panel. • ALWAYS attach the wall bed to wood, metal or masonry wall structure. • ALWAYS use the 8 mounting screws. Soft Opening Life Style...
- Page 12 Selection of anchors according to the composition of the wall The type of anchor depends on the composition of the wall. Follow the steps below to determine the composition of the wall if it is unknown: 1. Using an electronic stud finder, determine the center of the studs at the future location of the bed. 2.
- Page 13 4c- Place the level on the cabinet and correct the vertical and horizontal as needed. Ensure that the cabinet is level in both directions otherwise the closure of the bed will be compromised. Soft Opening Life Style...
- Page 14 * For this step, refer to the procedure corresponding to the composition of the wall on which the bed will be fixed. Wood studs HARDWARE VIS-W-8X3 REQUIRED TOOLS DRILL STUD FINDER 5a (Wood) - Using the stud finder, locate and mark the studs. The studs can be horizontal or vertical. Soft Opening Life Style...
- Page 15 Never use a hammer drill. Overdriving the crosspiece to the wall may damage the part and compromise its structural integrity. Breaking the crosspiece can cause the bed to suddenly tip over, resulting in serious injury or death. Wood studs Top rail CA-TRH VIS-W-8X2 1/2 Gypsum Soft Opening Life Style...
- Page 16 Wood bit REQUIRED TOOLS Drill 5/32'' 1/8'' 5a (Masonry) - Using the drill and wood bit, drill the 6 pre-holes on the CA-TRH top crosspiece. Mark the location of the holes on the masonry. (128mm) (128mm) (128mm) Soft Opening Life Style...
- Page 17 Breaking the crosspiece can cause the bed to suddenly tip over, resulting in serious injury or death. Min 1 1/4'' (32mm) Max 1 3/4'' (44mm Top rail CA-TRH Gypsum Wood lath Masonry Soft Opening Life Style...
- Page 18 5- Fixing recommandations Pull test *Perform the next step to ensure that the bed cabinet is securely anchored to the wall. On either side of the cabinet, pull simultaneously at the sides of the cabinet in an attempt to pull it off the wall.
- Page 19 6- Assembling hardware on doors PART CAM-D-10x35mm PO-COV3DW-BE PO-COV3DW-BC PO-WOV3DBEU PO-WOV3DHEU PO-COV3DW-HC PO-COV3DW-HE CAM-D-10X35mm 7- Assembling head and foot board PART CAM-B-10 Locked CAM-B-10 MA-TED MA-PID Soft Opening Life Style...
- Page 20 8- Assembling bed side PART CAM-B-10 VIS-C-2 Locked CAM-B-10 MA-CODW VIS-C-2 9- Assembling mechanism plate PART BOU-H-M6X25mm WAS-14 100279-1/G 1G/1D 100279-1 WAS-14 100279-1G BOU-H-M6x25mm Soft Opening Life Style...
- Page 21 VIS-W-8X112 GOU-B-516X118 GOU-B-516X118 MA-SLC VIS-W-8X112 MA-SLP Use wooden studs to Position the support on the side of mattress. Remove the studs after have fixed the support with the screws. 11-Fixing doors supports PART VIS-W-8X118 MA-SPO VIS-W-8X118 Soft Opening Life Style...
- Page 22 12- Assembling supports and USB wires PART VIS-C-2 Fil usb MA-SC-1130 MA-SC-1130 USB Wire VIS-C-2 13- Assembling cross pieces PART VIS-C-70MM CAV-NOI CAT-NOI CAT-NOI VIS-C-70mm CAV-NOI MA-ST-XX Soft opening Life Style...
-
Page 23: Installing The Switch
14b- Pre-assembly top part of the handle PART LED Band Extrusion Lens Lens Affix the LED Band on he extrusion Extrusion Wire on th same side of the notch 15-Installing the switch PART Switch MA-PWB-XX Switch Soft Opening Life Style... -
Page 24: Assembling The Handle
16- Pre-assembling the handle PART GOU-B-516X118 The wire must pass in the notch during assembly MA-PWH-XX Connector on this side GOU-B-5mmX35mm MA-PWF-XX MA-PWB-XX 17- Assembling the handle Insert the handle in the opening in the side of the bed Soft Opening Life Style... - Page 25 18- Assembling the handle PART VIS-W-8X2 Position the handle by aligning the holes PWF, PWB, PWH parts and doors VIS-W-8X2 MA-PWB MA-PWF MA-PWH Actual size screw *Using a longer screw would damage the doors Soft Opening Life Style...
- Page 26 19- Installing the reinforcement plate PART Reinforcement plate VIS-P-10X34-NOI VIS-P-10X34-NOI Reinforcement plate 20- Connection Power supply PART Standard connection Soft Opening Life Style...
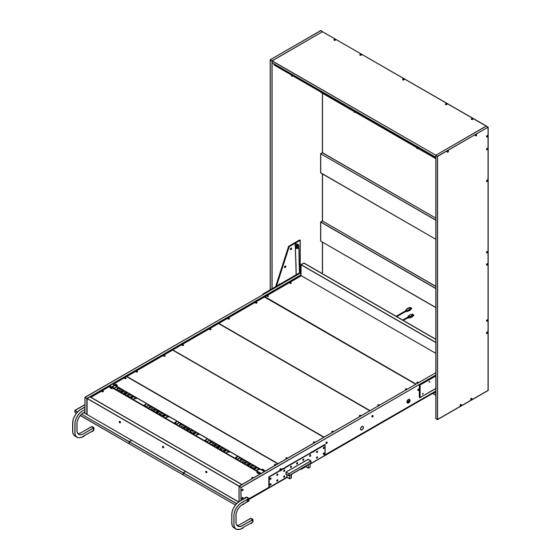
- Page 27 21- Installing bed base on cabinet Warning Heavy load Engage this bed base pivot on both sides Soft Opening Life Style...
- Page 28 Re-open the bed and make sure the pistons are completely to engage engaged. the pistons *The bed will need to be maintained by someone for the next few steps as it will rise on its own. Soft Opening Life Style...
- Page 29 ALWAYS deploy the leg when opening the bed. NEVER climb on a bed with an unfolded leg as • this could damage the bed, floor or cause injury. Soft Opening Life Style...
- Page 30 25- Installing door stopper PART VIS-P-8X112 AMO-BLUM CA-AP-XX CA-AP-XX AMO-BLUM VIS-P-8X112 Dampers more downwards *Important note: Do not climb on the bed to perform this step at the risk of damage or injury. Use a step ladder. Soft Opening Life Style...
- Page 31 26- Installing HDF PART VIS-P-8X1 HDF-XXVHE-5 HDF-XXVHL-5 Narrow HDF-XXVHE-5 Narrow VIS-P-8X1 Soft Opening Life Style...
- Page 32 27- Installing the elastic PART ELASTIC ELASTIC PLATE VIS-R-5X58 Elastic plate VIS-R-5X58 Soft opening Life Style...
- Page 33 With the bed open, secure the center of the cabinet with a minimum of two screws in the center crosspiece of the cabinet. Make sure it is secured in the wall studs. Use the proper anchor for the type of wall. Soft Opening Life Style...
- Page 34 ALWAYS extend the leg when opening the bed. NEVER climb onto a bed with the leg not extended, as • this may cause damage to the bed, floor or injury to yourself. ALWAYS rotate the leg inward before closing the bed to avoid damage to the leg. • Soft Opening Life Style...
- Page 35 Only a professional or qualified person should disassemble a wall bed. • If the wall bed is disassembled incorrectly, it may come off the wall and tip over suddenly. Please contact customer's service at 1-833-296-3832 for instructions. Soft Opening Life Style...