Table of Contents
Advertisement
Quick Links
Help Guide
Wireless/Streaming Microphone
ECM-S1
Use this Help Guide when you have issues or questions on how to use your wireless/streaming microphone.
Compatible cameras
The wireless/streaming microphone ECM-S1 is compatible with a camera that has a Multi Interface
Shoe such as a Sony Interchangeable Lens Digital Camera.
- Even if your camera has a Multi Interface Shoe, you may be unable to use it with this unit or some
functions may not work.
- The receiver and the microphone are factory-set to communicate with each other. Therefore,
operations usually needed for Bluetooth devices such as pairing and passkey entry are not
necessary. With any Bluetooth device other than the receiver and the microphone, on the other
hand, communication is not possible.
For camera models compatible with this unit, view here. (Another window will open.)
When the message "This accessory is not supported by the device and cannot be used." is
displayed on the camera:
View here.
Locating parts and controls
Preparations
Unpacking
Charging the receiver
Charging the microphone
Attaching the receiver to a camera
Attaching the pop guard
Attaching the stand
Attaching the connector protect holder/stand
Recording
Recording with the connected camera
Recording with the connected computer or smartphone
Recording with the microphone and the computer or smartphone connected via the wired connection
1
Advertisement
Table of Contents

Related Manuals for Sony ECM-S1


Summary of Contents for Sony ECM-S1
- Page 1 Use this Help Guide when you have issues or questions on how to use your wireless/streaming microphone. Compatible cameras The wireless/streaming microphone ECM-S1 is compatible with a camera that has a Multi Interface Shoe such as a Sony Interchangeable Lens Digital Camera.
- Page 2 Lamp indications About this unit Notes on use ® Bluetooth Wireless Communication Technology Specifications Trademarks When the message “This accessory is not supported by the device and cannot be used.” is displayed on the camera: 5-054-814-11(1) Copyright 2023 Sony Corporation...
- Page 3 Help Guide Wireless/Streaming Microphone ECM-S1 Locating parts and controls Receiver Slide switch (ANALOG/OFF/DIGITAL) Select “ANALOG” (analog audio output), “OFF” (power off), or “DIGITAL” (digital audio output). If your camera is compatible with the digital audio interface of the Multi Interface Shoe, set the switch to “DIGITAL.”...
- Page 4 Power lamp (Green: Powered, Orange: Charging the battery) Indicates the power state of the receiver or the battery charge state. When the power lamp stays blinking in orange, battery charging is needed. LINK lamp Indicates the connection state between the receiver and the microphone. USB Type-C®...
- Page 5 LINK lamp Indicates the connection state between the receiver and the microphone. Stand Attached to the microphone at the time of purchase. Screw hole for tripod attachment (1/4 inch in diameter) Stand attachment hole AUDIO LEVEL dial Adjusts the recording volume level of the audio from the microphone. Note Turning the AUDIO LEVEL dial does not change the input level for the audio from the computer or smartphone via the USB connection.
- Page 6 Charging the microphone Attaching the pop guard Attaching the stand Attaching the connector protect holder/stand Recording with the connected camera Adjusting the headphone volume level Adjusting the audio mixing ratio Lamp indications 5-054-814-11(1) Copyright 2023 Sony Corporation...
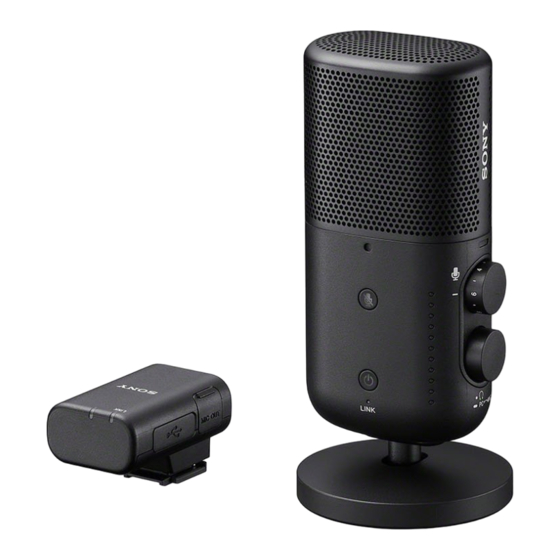
- Page 7 If you find anything missing, please contact your dealer. The number in the parentheses indicates the quantity. Receiver (1) Connector Protect Holder/Stand (attached) (1) Microphone (1) Stand (attached) (1) Pop guard (1) Pouch (1) Set of printed documentation 5-054-814-11(1) Copyright 2023 Sony Corporation...
-
Page 8: Charging The Receiver
Help Guide Wireless/Streaming Microphone ECM-S1 Charging the receiver Use a USB Type-C cable (commercially available) to charge the built-in battery of the receiver. Open the lid of the USB Type-C port and connect a USB Type-C cable to the port. - Page 9 Efficient battery charging may not be possible when the temperature is outside this range. If the failure persists, consult your nearest Sony dealer. In the event of charging the built-in battery after the receiver is kept unused for an extended period of time, the power lamp on the receiver may not immediately light in orange.
-
Page 10: Charging The Microphone
Help Guide Wireless/Streaming Microphone ECM-S1 Charging the microphone Use a USB Type-C cable (commercially available) to charge the built-in battery of the microphone. Connect a USB Type-C cable (commercially available) to the microphone. USB Type-C cable (power) lamp Connect the cable to a power source, such as a computer that is up and running, for battery charging. - Page 11 Efficient battery charging may not be possible when the temperature is outside this range. If the failure persists, consult your nearest Sony dealer. In the event of charging the built-in battery after the microphone is kept unused for an extended period of time, the (power) lamp on the microphone may not immediately light in orange.
- Page 12 Help Guide Wireless/Streaming Microphone ECM-S1 Attaching the receiver to a camera Attach the receiver to a camera. Note Before attaching the receiver to the camera, charge the built-in battery of the receiver sufficiently enough. Before attaching/removing the receiver to/from the camera, be sure to turn off the receiver and the camera.
- Page 13 Multi Interface Shoe, visit the website at: https://www.sony.net/dics/ecms1/ To remove the receiver Slide the receiver in the direction opposite to the one for attachment. Related Topic Charging the receiver 5-054-814-11(1) Copyright 2023 Sony Corporation...
- Page 14 When the pop guard is attached to the microphone, avoid gripping the guard too tightly or waving the microphone around with excessive force, as this could cause the guard to detach and result in injury. Hold the microphone itself when carrying or handling 5-054-814-11(1) Copyright 2023 Sony Corporation...
-
Page 15: Attaching The Stand
When the stand is attached to the microphone, avoid gripping the stand too tightly or waving the microphone around with excessive force, as this could cause the stand to detach and result in injury. Hold the microphone itself when carrying or handling 5-054-814-11(1) Copyright 2023 Sony Corporation... - Page 16 Help Guide Wireless/Streaming Microphone ECM-S1 Attaching the connector protect holder/stand Before carrying around the receiver, attach the connector protect holder/stand (supplied) to the receiver. Slide the Multi Interface foot of the receiver into the connector protect holder/stand until it clicks into place.
- Page 17 5-054-814-11(1) Copyright 2023 Sony Corporation...
- Page 18 Help Guide Wireless/Streaming Microphone ECM-S1 Recording with the connected camera Use the receiver attached to a camera and the microphone at hand for audio recording. Turn on the camera and place the camera on standby. Turn on the receiver and the microphone.
- Page 19 Depending on your camera, however, it may not be capable of supplying power. For the camera models that support power supply to the receiver, visit our website at: https://www.sony.net/dics/ecms1/ Related Topic Lamp indications 5-054-814-11(1) Copyright 2023 Sony Corporation...
- Page 20 While audio recording is in progress, operating the filter switch, the directivity selection switch, or the AUDIO LEVEL dial on the microphone may cause operation sounds to be included in the recording. Before changing the switch/dial settings, be sure to stop the recording. 5-054-814-11(1) Copyright 2023 Sony Corporation...
- Page 21 Help Guide Wireless/Streaming Microphone ECM-S1 Recording with the connected computer or smartphone via the wireless connection Use the receiver connected to a device with a USB audio input capability, such as a computer or a smartphone, and the microphone at hand for audio recording.
- Page 22 Immediately after the receiver and the microphone are turned on, the LINK lamp on the microphone starts blinking slowly in blue. This indicates that each of the devices is making a series of attempts to detect, connect to, and authenticate the other device. When a connection is established between the devices and clear audio recording is possible, the LINK lamps on both devices stay lit in blue.
- Page 23 For details, refer to the operating instructions of your device. 5-054-814-11(1) Copyright 2023 Sony Corporation...
-
Page 24: Monitoring The Audio
(commercially available). Connect headphones (commercially available) to the headphone out jack on the microphone. Launch the software capable of audio recording on the computer or smartphone, and then select [ECM-S1]. Note While the microphone and the computer or smartphone are not connected via the USB connection, audio monitoring with the connected headphones is not possible. - Page 25 Help Guide Wireless/Streaming Microphone ECM-S1 Adjusting the headphone volume level You can adjust the headphone volume level for audio monitoring with the headphone volume/mixing ratio adjustment dial on the microphone. Press the headphone volume/mixing ratio adjustment dial briefly to place the microphone into headphone volume adjustment mode.
- Page 26 (default). Related Topic Recording with the microphone and the computer or smartphone connected via the wired connection Adjusting the audio mixing ratio 5-054-814-11(1) Copyright 2023 Sony Corporation...
- Page 27 Help Guide Wireless/Streaming Microphone ECM-S1 Adjusting the audio mixing ratio You can adjust the audio mixing ratio between the input volume level of the audio from the microphone and that of the audio from the computer or smartphone via the USB connection with the headphone volume/mixing ratio adjustment dial on the microphone.
- Page 28 When the microphone is left unused for 3 seconds or longer, the microphone automatically comes out of mixing ratio adjustment mode and the indication of the indicator lamps changes back to the one for level meter mode (default). Related Topic Monitoring the audio 5-054-814-11(1) Copyright 2023 Sony Corporation...
-
Page 29: Lamp Indications
Help Guide Wireless/Streaming Microphone ECM-S1 Lamp indications The lamp lights, blinks or goes out according to the state of the devices and communication as follows. : Lit in white / -: Unlit : Lit in green / : Lit in orange /... - Page 30 Microphone (Lit in blue) The receiver is turned off. Receiver - (Unlit) Microphone *1 *2 (Blinking slowly in blue (on standby)) The microphone is turned off. Receiver - (Unlit (on standby)) Microphone - (Unlit) Audio is interrupted due to bad communication conditions. Receiver (Blinking in blue (The faster the blinking speed, the worse the communication conditions.)) Microphone...
- Page 31 USB connection. The orange-lit indicator lamps above the white-lit middle indicator lamp indicate that the output audio volume ratio for the microphone is higher.) Related Topic Locating parts and controls Adjusting the headphone volume level Adjusting the audio mixing ratio 5-054-814-11(1) Copyright 2023 Sony Corporation...
-
Page 32: Notes On Use
When the stand and/or pop guard are attached to the microphone, avoid gripping them too tightly or waving the microphone around with excessive force, as this could cause them to detach and result in injury. Hold the microphone itself when carrying or handling it. 5-054-814-11(1) Copyright 2023 Sony Corporation... -
Page 33: Bluetooth ® Wireless Communication Technology
LINK lamps blink in blue. Make sure that the two devices are located appropriately apart from each other, there are no obstacles between them, and the LINK lamps are steadily lit in blue before you use the receiver and the microphone. 5-054-814-11(1) Copyright 2023 Sony Corporation... -
Page 34: Specifications
Up to 150 m (450 ft.) Working range LC3plus is the supported audio format in ECM-S1. This is the approximate communication distance when the microphone is upright and directly facing the receiver. It varies depending on the surrounding conditions, such as the presence or absence of reflective surfaces or obstacles like metallic objects or human bodies, as well as the radio wave conditions. - Page 35 It may vary depending on the using condition. Others Operating temperature 0 °C to 40 °C (32 °F to 104 °F) Storage temperature –20 °C to +55 °C (–4 °F to 131 °F) Design and specifications are subject to change without notice. 5-054-814-11(1) Copyright 2023 Sony Corporation...
- Page 36 The Bluetooth® word mark and logos are registered trademarks owned by the Bluetooth SIG, Inc. and any use of such marks by Sony Group Corporation is under license. “Multi Interface Shoe” is a trademark of Sony Group Corporation. USB Type-C® and USB-C® are registered trademarks of USB Implementers Forum.
- Page 37 (e.g., a cleaning cloth). Do not use water or chemicals for cleaning. Note Make sure that the slide switch is located exactly at the “ANALOG,” “OFF,” or “DIGITAL” position. If the switch is located in between, the receiver may not work properly. 5-054-814-11(1) Copyright 2023 Sony Corporation...
Need help?
Do you have a question about the ECM-S1 and is the answer not in the manual?
Questions and answers