DeLonghi HCX9115E-6A AG; HCX9115E-6A WH; HCX9115ES - PORTABLE ELECTRIC PANEL HEATER Manual
- Instructions for use manual (15 pages)
Advertisement
Visit www.delonghiregistration.com to register your product
Visit www.delonghi.com for a list of service centers near you.
ELECTRIC CHARACTERISTICS
120 V~ 60 Hz 1500 W
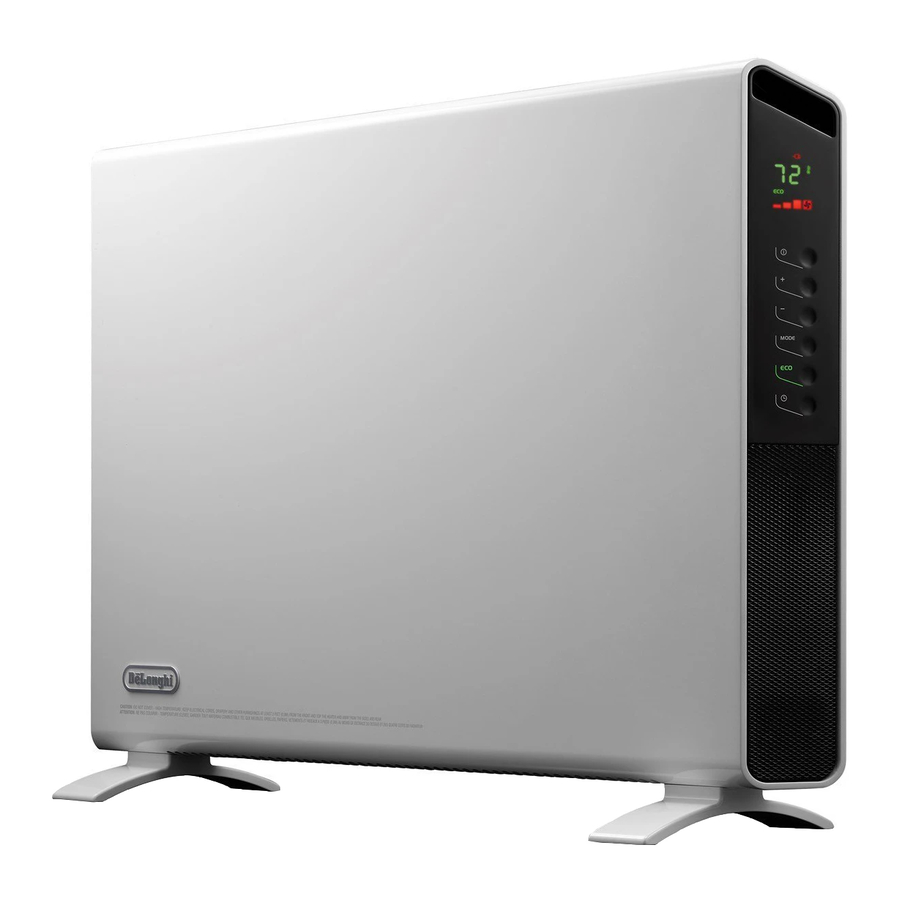
DESCRIPTION

- Power indicator light
- ON/OFF button
- +/- adjustment buttons
- MODE button (selects the operating mode)
- "ECO plus" button
- Timer button
General instructions
Remove the heater from the packaging. Check that neither the heater nor the power cable has been damaged during transport.
Do not operate the heater if damaged. Remove all publicity material present on the appliance. The appliance is suitable for free-standing or wall-mounted usage. Do not assemble the feet if wall-mounted.
Electrical connection
- Before connecting the appliance to the current outlet, check that the voltage indicated on the appliance rating plate is the same as your electric plant and that it can stand the power consumption (Watt) indicated by the labelling.
- If more than one appliance is used at once, it is important to ensure that the electric plant is able to support the power required.
Mounting the feet
Turn the appliance upside down on a rug or soft surface in order to prevent damaging the paint finish.
Fix the feet to the appliance with the nr. 4 screws 4.8x13 PH G supplied (see fig. 1), 2 screws for each foot.

Wall-Mounting Installation
The wall mounting kit contains:

4 metal brackets (H)
4 screws 4.5x25PH (I)
2 butterfly screws M5 (J)
4 plastic anchors 6x30 (K)
Required tools for assembly and estimated assembly time
Drill
Screwdriver PH 2 x 100 (Phillips type)
Estimated assembly time: 30 minutes
Before installing the unit, make sure of the following:
- The appliance must not be located directly beneath a current outlet.
- The plug and outlet must be easy to reach after installation.
- No electric cables or other pipes could be damaged during the installation.
- Keep away from curtains or flammable materials.
To wall-mount, proceed as follows:
Turn the appliance upside down on a flat stable surface. Fix the 2 brackets H with the 2 butterfly screws J as shown in Fig. 2. For brick walls use a 6 mm concrete drill bit. For plaster board or drywall, it is recommended to use appropriate screws and anchors (not supplied).

- Before drilling the wall, mark the exact points, respecting the minimum distances as shown in fig. 3.

- Drill the wall where previously marked, and insert the plastic anchors K.
- Fix the 2 metal brackets H using the two screws I provided.
- Hang the appliance on the bracket.
- Mark out the 2 lower fixing points. Remove the appliance, drill the lower holes and insert the wall anchors K.
- Now, you can hang back the heater on the bracket and fix the lower part of the appliance with the 2 remaining screws I.

USE
Operation and use
- Plug into the outlet socket.
- The appliance emits a beep. The power indicator light (A) comes on and remains lit while the appliance is powered.
- The appliance switches to stand-by.
- Press the ON/OFF (B) to turn the appliance on. It begins heating the room according to the current settings.
- Press the MODE (D) button to select one of the following operating modes:
- Freeze prevention
![]()
In this mode, the appliance keeps the room at a temperature of 45°F (7°C) to avoid freezing. - Heating 1, 2, 3 and Heating 3 + Fan
In this mode, the desired temperature can be selected by pressing the adjustment buttons + and –. By pushing the + or - button once, the temperature (shown on the display) will increase or decrease by 1 degree. - Heating 1
![]()
The appliance operates at low power. - Heating 2
![]()
The appliance operates at medium power. - Heating 3
![]()
The appliance operates at high power. - Heating 3 + Fan
![]()
The appliance operates at the maximum power with the fan. The setting temperature range available is from 61°F to 90°F (16°C to 32°C).


"ECO plus" function
The "ECO plus" function is available in Heating 1, 2 3 and 3 + fan modes only. To activate the function, press the "ECO plus" (E) button. When this function is active the appliance automatically sets the most appropriate power level to guarantee optimum comfort while reducing energy consumption. While the "ECO plus" function is active, the appliance may switch automatically to a lower heating power than the one displayed.
Working indicator
The symbol ![]() indicates the heating status by means of its colors.
indicates the heating status by means of its colors.
![]() RED: the unit is heating at the maximum power.
RED: the unit is heating at the maximum power.
![]() YELLOW: the unit is heating at the medium power.
YELLOW: the unit is heating at the medium power.
![]() GREEN: the unit is heating at the minimum power.
GREEN: the unit is heating at the minimum power.
![]() absent: the unit is not heating.
absent: the unit is not heating.
Brightness of the display
The appliance allows two different brightness settings for the display.
The highest is active when any key button is pressed. After a few seconds of keyboard inactivity, the brightness will decrease to the operating brightness level.
Key lock
In order to avoid accidental operation, you can lock the keyboard using the keylock function. To activate this function press buttons + and - (C) together for at least 3 seconds. The display shows the symbol ![]() and a double acoustic signal will be emitted. To deactivate the function proceed in the same way.
and a double acoustic signal will be emitted. To deactivate the function proceed in the same way.
Timer function
This function can be activated in two different ways.
Delayed start: With the appliance OFF press the timer button (F) ![]() . The
. The ![]() symbol is displayed flashing together with the hours left before the appliance comes on. Change the hours using the + and - (C) buttons, then wait a few seconds for the program to be stored. The display will return to off and the
symbol is displayed flashing together with the hours left before the appliance comes on. Change the hours using the + and - (C) buttons, then wait a few seconds for the program to be stored. The display will return to off and the ![]() symbols remains on. When the programmed time has elapsed, the appliance will come on with the previous settings.
symbols remains on. When the programmed time has elapsed, the appliance will come on with the previous settings.

Delayed stop: with the appliance ON, press the timer button ![]() (F). The
(F). The ![]() symbol is displayed flashing together with the hours left before the appliance goes on-standby. Change the hours using the + and - (C) buttons, then wait a few seconds for the program to be stored. The current settings and
symbol is displayed flashing together with the hours left before the appliance goes on-standby. Change the hours using the + and - (C) buttons, then wait a few seconds for the program to be stored. The current settings and ![]() symbol are displayed.
symbol are displayed.
At the end of the set time the appliance switches on-standby automatically. To go back to operating without the timer, press the timer button twice.
The timer symbol ![]() disappears from the display.
disappears from the display.
 Please note: the time is settable from 0.5 to 24 hours.
Changing of the temperature scale
The display can show the temperature in both °F (Fahrenheit) and °C (Celsius). To select the desired temperature scale, when the unit is in standby position, press and hold the "+" key for at least 10 seconds, then release. The change of scale will be indicated by two short beeps.
SAFETY FUNCTIONS
- Safety device: The appliance is fitted with a safety cutoff device which will switch the appliance off in case of accidental overheating. To reset the cutoff, disconnect the plug from the power supply for a few minutes, remove the cause of overheating, then reconnect the appliance. If this abnormal situation happens several times, contact customer service.
- Tip-over safety device: This device turns the appliance off if it falls over or is positioned inappropriately in such a way as to jeopardize safety. The appliance emits a beep and a dot flashes on the display. The appliance resumes operation a few seconds after being placed in an upright position again.
Alarms
The appliance has a diagnostic system that makes it possible to signal malfunctions.
In case of problems, the display will show an alarm message:
![]() (Probe failure) and
(Probe failure) and ![]() (High temperature), see troubleshooting section.
(High temperature), see troubleshooting section.
MAINTENANCE
Before carrying out any maintenance, unplug the heater from the outlet and wait for it to cool off completely. This heater requires no particular maintenance. It is sufficient to remove the dust with a soft, dry cloth. Never use abrasive powders or solvents. If necessary remove concentrated areas of dirt with a vacuum cleaner. WARNING: any other servicing should be performed by an authorized representative.
Should the heater not be in use over a certain length of time, roll the cable around the feet and store it in a dry place.
TROUBLESHOOTING
| PROBLEM | CAUSE | SOLUTION |
The appliance doesn't work | Be sure it is plugged in and that the electrical outlet is working The temperature may be set too low The Key lock may be activated | Plug into the power outlet Set the temperature to a higher position See the section "Key lock" |
Blinking dot on the display and an intermittend "beep" | The appliance could be tipped over or is positioned in an improper way | Make sure the appliance is standing upright on a flat surface. Position the appliance correctly |
The display shows "PF" | The temperature sensor is malfunctioning | Contact the De longhi toll free number |
The display shows "Ht" blinking | The internal temperature is too high. The air intake or outlet grille is obstructed | Check the appliance is correctly positioned respecting the minum distances from the wall, or objects, as indicated on the instruction manual, if not, position the appliance correctly Remove the obstruction Disconnect the plug from the outlet and let the appliance cool down. After few minutes plug the appliance again. If the appliance doesn't work please contact the De longhi toll free number |
IMPORTANT SAFEGUARDS
When using any electrical appliance, some basic safety precautions should always be observed to reduce the risk of fire, electric shock, and/or injury to persons. Read all instructions carefully before using the appliance. Specifically:

Failure to observe the warning may result in life threatening injury by electric shock.
- Do not operate any heater with a damaged cord or plug or after the heater malfunctions, has been dropped or damaged in any manner. Return heater to authorized service facility for examination, electrical or mechanical adjustment, or repair.
- This heater is not intended for use in bathrooms, laundry areas and similar indoor locations. Never locate heater where it may fall into a bath tub or other water container.
- Do not use this heater in the immediate surroundings of a bath, a shower or a swimming pool.
- Do not insert or allow foreign objects to enter any ventilation or exhaust opening as this may cause an electric shock, fire, or damage the heater.
![]()
to prevent electric shock match wide blade of plug to wide slot, then fully insert.![]()
In order to avoid a hazard due to inadvertent resetting of thermal cutout, this appliance must not be supplied through an external switching device, such as a timer, or connected to a circuit that is regulary switched on and off by the utility.- This heater may include an visual alarm to warn that parts of the heater are getting excessively hot. If the alarm flashes, immediately turn the heater off and inspect for any objects on or adjacent to the heater that may cause high temperatures. DO NOT OPERATE THE HEATER WITH THE ALARM FLASHING.


Failure to observe the warning could result in injury or damage to the appliance.
- The appliance is not intended for use by persons (including children) with reduced physical, sensory or mental capabilities, or lack of experience and knowledge, unless they have been given supervision or instruction concerning use of the appliance by a person responsible for their safety. Children should be supervised to ensure that they do not play with the appliance.
- Extreme caution is necessary when any heater is used by or near children and whenever the heater is left operating and unattended.
- Always unplug heater when not in use.
- Use this heater only as described in this manual. Any other use not recommended by the manufacturer may cause fire, electric shock, or injury to persons.
- The heater must not be located immediately below a socket-outlet.
- To prevent overload and blown fuses, be sure that no other appliance is plugged into the same outlet (receptacle) or into another outlet (receptacle) wired into the same circuit.
- Be sure that the plug is fully inserted into an appropriate outlet. Please remember that outlets also deteriorate due to aging and continuous use: check periodically if signs of overheating or deformations are evi-denced by the plug. Do not use the outlet and CALL your electrician.

Failure to observe the warning could result in burns or scalds.
- This heater is hot when in use. To avoid burns, do not let bare skin touch hot surfaces. Use handle when moving this heater. Keep combustible materials, such as furniture, pillows, bedding, papers, clothes, and curtains at least 3 feet (0,9 m) from the front and top of the heater and keep them away from the sides and rear.
- Do not run cord under carpeting. Do not cover cord with throw rugs, runners, or the like. Arrange cord away from traffic area and where it will not be tripped over.
- To prevent a possible fire, do not block air intakes or exhaust in any manner. Do not use on soft surfaces, like a bed, where openings may become blocked.
- A heater has hot or arcing or sparking parts inside. Do not use it in areas where gasoline, paint, or flammable liquids are used or stored.
- It is normal for the heater's plug and cord to feel warm to the touch. A plug or cord which becomes hot tothe touch or becomes distorted in shape may be a result of a worn electrical outlet. Worn outlets or receptacles should be replaced prior to further use of the heater. Plugging heater into a worn outlet / receptacle/ may result in overheating of the power cord or fire.
- If the supply cord is damage, it must be replaced by the manufacturer, its service agent or similarly qualified person in order to avoid a hazard.
![]()
Do not cover the appliance while it is functioning in order to avoid overheating which may cause risk of fire.

Symbol meaning

This simbol indicates:
(If provided) Class II equipment
Please note:
This symbol indicates recommendations and important information for the user.
- If your appliance is equipped with a polythene tape used as carry handle, remove it before connecting appliance to the outlet.
- Do not use outdoors.
- To disconnect heater, turn controls to off, then remove plug from outlet.
- Connect to properly polarized outlets only.
- This heater is not intended for use with an extension cord or outlet strip. Plug the cord directly into an appropriate wall receptable.
- Check that neither the appliance nor the power cable have been damaged in any way during transportation.
- Make sure that no pieces of polystyrene or other packaging material have been left on the appliance. It may be necessary to pass over the appliance with a vacuum cleaner.
- When switching on the appliance for the first time, allow it to run at full power for at least two hours to get rid of the unpleasant smell. Make sure that the room in which the appliance is located is well ventilated during this operation. It is normal for the appliance to emit small cracking sounds when you turn it on.
SAVE THESE INSTRUCTIONS
THIS PRODUCT IS FOR HOUSEHOLD USE ONLY

Documents / Resources
References
Download manual
Here you can download full pdf version of manual, it may contain additional safety instructions, warranty information, FCC rules, etc.
Download DeLonghi HCX9115E-6A AG; HCX9115E-6A WH; HCX9115ES - PORTABLE ELECTRIC PANEL HEATER Manual
Advertisement


Need help?
Do you have a question about the HCX9115E-6A AG and is the answer not in the manual?
Questions and answers