Advertisement
Wheelhouse in Aft Position only: Using a #68 drill bitt, drill a hole through each of
Ÿ
the running light shields on the top of the wheelhouse to give tie off points. Tie a
length of rope to one of the light shields, then thread it up through the loop on the
back of the mast and tie it off at the other light shield. See photo on cover
Mast Rigging: Using a jump ring, attach a double block
Ÿ
pulley to the rear facing loop at the top of the mast. Attach
a second double block pulley to the loop on top of the
boom using a jump ring. Attach a single block pulley, using
a jump ring to the loop on the bottom of the boom.
Tie off the end of a length of rope to the loop on the rear
Ÿ
top of the Mast. Thread the other end of the same rope
through one hole of the double block pulley attached at the
top of the boom. Continue threading through one hole in
the double block pulley on the mast and then back down to
the remaining hole on the double block pulley on the boom
and then back up to the remaining hole on the pulley on the
mast. Thread this end of the rope down and over the mast
winch drum, wrapping it around several times. Tie it off or coil the remainder on the
deck, whichever you prefer. Fig 2
Finishing Details
From the brass sheet, remove a cargo hook and tie it to a length of rope. Thread the
Ÿ
rope up and through the single block pulley hanging from the bottom of the boom.
Fig 2
Thread the rope down to the mast winch and wrap it around the remaining winch
Ÿ
drum and either tie it off or coil it up on the deck.
You may want to depict the netting hanging from the cargo hook and draped on the
Ÿ
deck as shown. Place the fishing float beads throughout the netting to represent
floats and glue in place.
Remove the ladder from the brass sheet and place it against the mast wherever you
Ÿ
would like to and glue in place.
Place a bead to represent a running light into the corner of each running light shield
Ÿ
on the wheelhouse. The red bead goes on the left (port) side when on the deck
facing the bow and the green one goes on the right (starboard) side.
Remove the radio direction finder antenna from the brass sheet and glue into the
Ÿ
hole on the top of the wheelhouse.
Remove the fish from the brass sheet. You may want to fatten them up using a drop
Ÿ
of acrylic medium and paint them. These can be placed in the fish wells or in the
netting according to your preference.
Fish Well Doors: Thread a small length of rope up through one hole in the door and
Ÿ
down through the other hole to create a rope handle. Repeat for remaining doors.
Glue on the underside and trim off the excess rope.
Fish well doors may be glued in an open position or a closed position as desired.
Ÿ
Glue the clear bead on top of the mast as a running light.
Ÿ
Weather and seal your new kit according to your preference.
Ÿ
Thank you for purchasing this kit. We hope you enjoy building and displaying this Fishing
Boat as much as we have enjoyed producing it. If you have any questions or comments,
please email us at: frenchmanriver@gmail.com or send a letter to the address below.
Frenchman River Model Works, PO Box 86, Langdon, ND 58249
www.frenchmanriver.com
Frenchman River Model Works reserves the right to change or alter this kit without prior
notice. This kit, its contents, and its packaging are all ©opyright protected.
© 2020 James and Anna Cleveland
double block pulley
Made in the USA
(701) 256-2129
single block
pulley
Fig 2
opportunity to create two distinctly different fishing boats by
Always wear your safety glasses when you are working with CA glues and
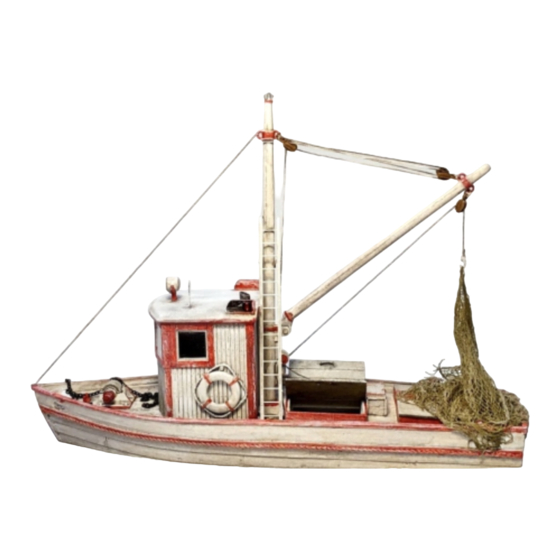
O/On30 1:48 Scale Wooden Fishing Boat
Kit #86
Every wood plank shows off screw holes, wood grain and
"character". Detailed anchor winch and boom winch. The fish
wells and the cabin can be placed fore or aft, giving you the
purchasing two of these kits.
Cautions
Kit contains small and/or sharp parts
NOT SUITABLE FOR CHILDREN UNDER THE AGE OF 14!
when cutting, shaping, or snipping parts and when painting.
Also use adequate ventilation when working with glue or paint.
Advertisement
Table of Contents

Related Manuals for Frenchman River Model Works 86

Summary of Contents for Frenchman River Model Works 86
- Page 1 Also use adequate ventilation when working with glue or paint. Frenchman River Model Works reserves the right to change or alter this kit without prior notice. This kit, its contents, and its packaging are all ©opyright protected. © 2020 James and Anna Cleveland...
- Page 2 Repeat until the void is filled slightly above surrounding surface. When it’s set up, sand smooth into the hole on the deck in the bow. and you’re finished. Frenchman River Model Works offers a line of quality products to assist you. Ÿ...
Need help?
Do you have a question about the 86 and is the answer not in the manual?
Questions and answers