
Summary of Contents for POLLOGEN Legend Pro
- Page 1 Legend Pro™ USER MANUAL Pollogen a company of Lumenis Proprietary Information Version 7 September 2019 Part Number 11600510U ver.7...
- Page 2 Tel: 32 (0) 2 732 5954, Fax: 32 (0) 2 732 6003, GSM 32 47545 4660, e-mail: mail@obelis.net Contact Information Customer satisfaction is a Pollogen priority. To help us in providing you with the best possible product and support, please send us your comments and suggestions. Contact us at the details below: Pollogen Ltd.
-
Page 3: Table Of Contents
System Components and Controls ....................12 7.1.1 Main Unit (System Console) ...................... 13 Figure 1: Legend Pro™ Main System Components (Left – front view, Right – back view) ....... 13 7.1.2 Control Panel:..........................14 Figure 2: User Interface – Control panel ....................14 7.1.3... - Page 4 Legend Pro™ System User Manual Version 7 7.1.6 Applicator No. 2: ........................17 7.1.7 Applicator 1 and 2 indicator LED screen ................... 17 7.1.8 Applicator No. 3: ........................17 7.1.9 Foot Switch..........................18 Figure 13: Foot Switch ..........................18 7.1.10 Patient controlled manual switch: ....................
- Page 5 Legend Pro™ System User Manual Version 7 11.3.2 Select TriPollar® treatment course ................... 38 11.4 VoluDerm ™ Treatment Application ....................39 11.4.1 Select VO Treatment Applicator ....................39 11.4.2 VoluDerm ™ treatment level ....................39 11.4.3 VO Applicator tips ........................40 11.5...
- Page 6 DIAGRAM FOR POWER OUTPUT AT FULL AND HALF FOR THE LOAD RANGE OF 25 - 1,000Ω ..... 60 Figures: Figure 1: Legend Pro™ Main System Components (Left – front view, Right – back view) ....13 Figure 2: User Interface – Control panel .................... 14 Figure 3:Back Panel ..........................
-
Page 7: Introduction To The System
Read this chapter to become familiar with all the safety requirements and operating procedures prior to System operation. In order to protect the Legend Pro™ System from use by unqualified personnel, turn the system off while the system is not in use and lock it in a secure room. -
Page 8: Warnings
When treating with TriPollar® programs, patients should remove all jewelry prior to treatment 2.3 Warnings Before attempting to operate the Legend Pro™ System, be sure to read this manual to become familiar with all safety requirements and operating procedures. No modification of this equipment is allowed! When treating facial area, never treat the area below the eyebrow &... -
Page 9: Vo And Disposable Related Warnings
2.5 Electrical and Mechanical Safety warnings High voltage is present inside the Legend Pro™ System. Always take proper precautions as described in this manual, while making sure to constantly be aware of the possible dangers. -
Page 10: Fire Hazards
Legend Pro™ System User Manual Version 7 The System is grounded through the grounding conductor inside the power cable. This protective grounding is essential for safe operation. Verify fan operation when operating the device and stop device operation when fan is not operating. -
Page 11: Indications
Legend Pro™ System User Manual Version 7 4. INDICATIONS system is intended for dermatological procedures requiring ablation and The Legend Pro™ resurfacing of the skin when using VoluDerm ™ (Applicator VO). It is also indicated for the non-invasive treatment of mild to moderate facial wrinkles and rhytides when using TriPollar®... -
Page 12: Possible Side Effects
7. SYSTEM DESCRIPTION This chapter provides a detailed description of the Legend Pro™ system, including its main components, controls, and technical specifications. Please review this chapter carefully to familiarize yourself with the controls, ports and connectors used during treatment. -
Page 13: Main Unit (System Console)
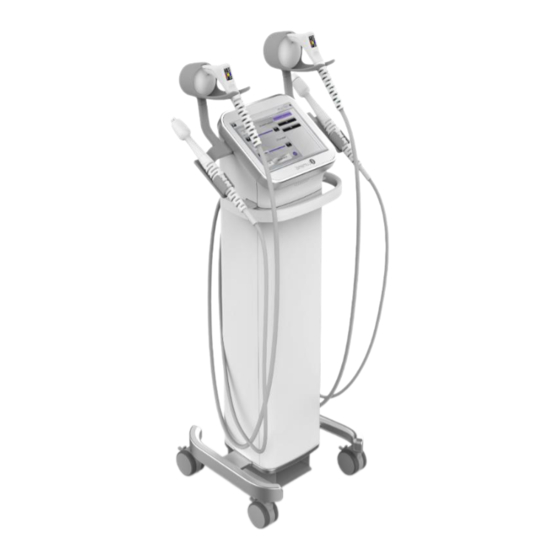
The Main Unit controls the operation of the entire system ( Figure 1 ). It contains the following parts: Figure 1: Legend Pro™ Main System Components (Left – front view, Right – back view) Index: 1 Applicator 1 Device Handle... -
Page 14: Control Panel
Legend Pro™ System User Manual Version 7 Control Panel: 7.1.2 The Control Panel serves as the user interface and is located on the top of the Main Unit. The Control Panel is a touch screen. Figure 2: User Interface – Control panel... -
Page 15: Back Panel
Legend Pro™ System User Manual Version 7 The MENU enables the following operations: Select Treatment Technology – VoluDerm ™ (VO) or TriPollar®. Select the Treatment Applicator – VoluDerm ™ (VO) applicator is selected once the technology is selected. TriPollar® - Applicator No. 1, 2 or 3. -
Page 16: Figure 5:Gen36 Tip
Legend Pro™ System User Manual Version 7 Applicator VO single use disposable tips a) Single use gen36 – an array of 6x6 ultra-thin electrodes, 0.6mm long. Figure 5:gen36 tip b) Single use gen12 – an array of 6x2 ultra-thin electrodes, 0.6mm long. -
Page 17: Applicator No. 1
Legend Pro™ System User Manual Version 7 7.1.5 Applicator No. 1: Applicator No. 1(Figure 10: Applicator No.1) is connected to the main unit by a cable containing electrical wiring and a connector, also consisting of a plastic body with an integrated electronic system, 6 electrodes, IR sensor temperature, LCD screen and indication light guide ring. -
Page 18: Foot Switch
Legend Pro™ System User Manual Version 7 indication light guide ring. When not in use, the applicator should be stored in its holder. Applicator no.3 is not equipped with IR temperature sensors; therefore, during treatment the operator should use the supplied external Thermometer during the entire procedure. -
Page 19: Non-Contact Infrared Thermometer
Legend Pro™ System User Manual Version 7 The Infrared thermometer (Figure 15: Non-Contact Infrared 7.1.11 Non-Contact Infrared Thermometer), measures the surface temperature of the skin. Thermometer: An optical component of the unit collects energy and focuses it onto a detector. Then an electronic component translates the information into a temperature reading which is displayed on the thermometer. -
Page 20: Symbols & Labels
This section describes the symbols used throughout this user manual (Table 1: Precautionary Symbols and Definitions) and the labels affixed to the Legend Pro™ System. It is recommended that users review the meaning of these labels for everyday usage, and in case, any details are needed for service purpose. -
Page 21: Labels Affixed To The System And Its Accessories
Legend Pro™ System User Manual Version 7 MANUFACTURER DATE OF MANUFACTURING PRESCRIPTION USE STATEMENT: CAUTION: FEDERAL LAW (US) RESTRICTS THIS DEVICE TO SALE BY OR ON THE ORDER OF A ONLY PHYSICIAN NON-IONIZING ELECTROMAGNETIC RADIATION Table 3: Symbols used throughout this User Manual 9.2 Labels affixed to the System and its accessories... - Page 22 Legend Pro™ System User Manual Version 7 Label on Applicator VO serial number label. Label on Applicator 1 serial number label. Label on Applicator 2 serial number label. Label on Applicator 3 serial number label. Patient controlled manual switch number label.
- Page 23 Legend Pro™ System User Manual Version 7 gen 36 labeling: gen 36 : 5 pack cover sleeve Label on gen 36 Disposable Tip for VO Label on 5 pack of gen 36 Disposable Tips for VO This label is placed on the 5 pack box...
- Page 24 Legend Pro™ System User Manual Version 7 gen 36L labeling: gen 36L : 5 pack cover sleeve Label on gen 36L Disposable Tip for VO Label on 5 pack of gen 36L Disposable Tips for VO This label is placed on the 5 pack box...
- Page 25 Legend Pro™ System User Manual Version 7 gen 12 labeling: gen 12 : 5 pack cover sleeve Label on gen 12 Disposable Tip for VO Label on 5 pack of gen 12 Disposable Tips for VO This label is placed on the 5 pack...
- Page 26 Legend Pro™ System User Manual Version 7 H7X7 labeling: H7X7 : 5 pack cover sleeve Label on H7X7 Disposable Tip for Label on 5 pack of H7X7 Disposable Tips for VO This label is placed on the 5 pack box and device packaging...
-
Page 27: Table 4: Labels Affixed To The System And Disposables
Legend Pro™ System User Manual Version 7 Gen100 labeling: Label on gen 100 Disposable Tip for VO Label on 5 pack of gen 100 Disposable Tips for VO This label is placed on the 5 pack box and device packaging... -
Page 28: Initial Set Up
Legend Pro™ System User Manual Version 7 10. INITIAL SET UP The System designed for simple installation. To install the system, follow the subsequent procedure: 10.1 Unpacking the System Unpack the System and verify that the system is intact and that all its components are present. -
Page 29: General Overview And Installation Requirements
Legend Pro™ System User Manual Version 7 10.2 General overview and Installation Requirements • Electrical Requirements The System has a universal power inlet Single phase 100 - 240 VAC; 5A; 50-60Hz. The system must be connected to a grounded power outlet (3-pin). Only supplied cable is to be used. - Page 30 Legend Pro™ System User Manual Version 7 Note the locations of the holders, and differentiate left (applicator no.2) and right (applicator no.1) holders Fit each holder and secure the position with the provide screw Make sure to tighten screws properly ...
-
Page 31: Foot Switch Connection
Legend Pro™ System User Manual Version 7 10.3.2 Foot Switch connection. Align the arrow on the connector with the arrow on its receptacle. (labeled accordingly) Push the connector into its receptacle until a click sound is heard Verify that connector is properly connected ... -
Page 32: Attach Vo Disposable Tips
Legend Pro™ System User Manual Version 7 10.3.5 Attach VO disposable tips To connect the VO disposable tips, gen 36, gen36L, gen100, gen 12 or H7X7: do the following: Select a blister pack containing from one of the above mentioned tip boxes. -
Page 33: Connect And Lock Applicator No. 2
Legend Pro™ System User Manual Version 7 10.3.7 Connect and lock Applicator No. 2. Make sure it is properly attached and fastened securely. 10.3.8 Connect and lock Applicator No. 3. Make sure it is properly attached and fastened securely. 10.3.9 Power supply cord connection... -
Page 34: User Interface
Legend Pro™ System User Manual Version 7 11. USER INTERFACE 11.1 Turning System On Before turning the System on, verify that the System power supply cord connected to the System inlet on the back panel and to the power outlet. The System must be connected to grounded power outlet (3-pin) and must be used only with the cable supplied. - Page 35 Legend Pro™ System User Manual Version 7 As part of the System’s self-check, and while the touch screen becomes black, the LED Indicator ring on the applicator flashes green and then orange. Touch screen becomes black and then white as part of the screen quality check.
- Page 36 Legend Pro™ System User Manual Version 7 During preliminary System check, an alarm will sound if the Foot Switch is not connected and will be indicated in red on the screen. Once the Foot Switch is connected properly, the system will continue automatically after check is successful.
-
Page 37: Selecting Treatment Application
Legend Pro™ System User Manual Version 7 In case one of the tips is already connected while turning the system on, the 'Remove tip' screen will be shown. Please remove the tip from the applicator in order to continue to the home screen. -
Page 38: Select Tripollar® Treatment Course
Legend Pro™ System User Manual Version 7 The system does not enable to select an application if its applicators are not properly connected. Its image will appear dim on the screen. In the image to your right, you may select the TriPollar®... -
Page 39: Voluderm ™ Treatment Application
Legend Pro™ System User Manual Version 7 11.4 VoluDerm ™ Treatment Application 11.4.1 Select VO Treatment Applicator Select the VoluDerm ™ (VO) Application on the home screen to start the VO treatment. 11.4.2 VoluDerm ™ treatment level VoluDerm ™ application enables 3 treatment levels: Low, Medium, High. -
Page 40: Vo Applicator Tips
Legend Pro™ System User Manual Version 7 11.4.3 VO Applicator tips If a treatment tip is not connected, a warning message is displayed. The system does not enable starting a VoluDerm ™ treatment until a tip is connected. VoluDerm ™ power will not be emitted unless a tip is connected (For treatment tip connection instructions, please refer to “To connect the... -
Page 41: Adjusting System's Default (Preset) Parameters
Legend Pro™ System User Manual Version 7 To end a VoluDerm ™ treatment, select the “door” Exit symbol in the upper right corner of the treatment screen. The following screen will appear. You will be instructed “To end treatment remove the tip, to continue press return.”... -
Page 42: Indications
Legend Pro™ System User Manual Version 7 During treatment, the System is continuously checking proper connection of the selected Applicator, Foot Switch and Patient-Controlled Manual Switch. In case of a connection failure, the System will sound an alarm and display a warning message (see Footswitch connection error as an example). -
Page 43: Indication On Touch Screen
Legend Pro™ System User Manual Version 7 10.7.2 Indication on Touch Screen During normal operation procedure the selected applicator and treatment parameters are displayed on the touch screen. When treatment begins and after the foot switch has been pressed, all keys become dim and will not enable changes until the end of the pulse emission. -
Page 44: Date/Time Selection
Legend Pro™ System User Manual Version 7 11.8.2 Date/Time selection It is recommended to define the date/time during installation of the system, as this will enable referring to treatment logs with date & time of treatment. To define the date & time: Select the current date and time. -
Page 45: Data Log
Legend Pro™ System User Manual Version 7 2. Select the “Prog Update” key. The selected key will be highlighted blue. 3. The current program versions installed will be displayed on the screen. 4. Connect Lumenis SW USB flash disk to the USB port. The system will display a message: “For Program update connect Lumenis SW Memory Stick to USB port”... -
Page 46: Legend Pro™ Treatment
Legend Pro™ System User Manual Version 7 12. Legend Pro™ treatment Legend Pro™ This section is a safe start guidelines for treatments with the System. This is intended as a guide only and it is not a replacement for clinical training, certification or supervised experience. -
Page 47: Treatment Parameters
Legend Pro™ System User Manual Version 7 treatment details: treatment tip to be used, suitable treatment parameters and any other special treatment requirements. Five types of tips are available: gen 36 (6x6),gen36L (6x6), gen100 (10x10), gen 12 (6x2) and H7X7. -
Page 48: Treatment Procedure
Legend Pro™ System User Manual Version 7 12.1.3.1 VO : Default Treatment parameters: VoluDerm ™: Default Treatment parameters: Treatment Mode LOW (Min – Max) MED (Min – Max) HIGH (Min – Max) Energy 8 (5 – 10) 10 (5 – 10) 20 (10 –... - Page 49 Legend Pro™ System User Manual Version 7 Low program and to increase gradually after inspecting the skin response to the treatment. Using high settings increases the treatment impact on both the epidermis and dermis When treating skin types IV -VI or Asian skin, use Low parameter settings Prepare the treatment area: ...
-
Page 50: Post Treatment Care
Legend Pro™ System User Manual Version 7 Summary of treatment sequence is as follows: The Applicator tip should be placed on the skin, a pulse emitted, and then Applicator is lifted and moved to an adjacent area. Emitted pulses usually create tip- shaped erythema and edema zones ... -
Page 51: Tripollar® Energy Treatments Using Applicators 1, 2, 3
Legend Pro™ System User Manual Version 7 the treated area Suggested number of treatments may vary between individuals and between treatment areas Typical course of VoluDerm ™ treatment involves 4-5 treatments: 3 treatments spaced 1-2 weeks apart (depends on skin condition and healing rate) followed by additional 1-2 treatments spaced 2-3 weeks apart ... -
Page 52: Treatment Parameters
Legend Pro™ System User Manual Version 7 12.2.3 Treatment Parameters The following table shows the default treatment parameters based on physician’s experience with the TriPollar® Applicators. Treatment Course Applicator Default Power Treatment duration Level (minutes) Course A 18 (5-95) 8 (1-40) -
Page 53: Performing Treatment Procedure
Legend Pro™ System User Manual Version 7 Once treatment area is selected and treatment plan has been discussed with the patient, it is recommended to take a picture of the treatment area for recording the pre-treatment condition in the patient’s file. -
Page 54: Post Treatment Care
Legend Pro™ System User Manual Version 7 Treatment endpoint is increasing the skin temperature to above 40 C (104 F ) and below 43 (109.4 F ) and maintaining it for a minimum of 10 minutes. Elevated skin temperature should be maintained for at least the recommended exposure time. -
Page 55: Maintenance
Legend Pro™ System User Manual Version 7 13. MAINTENANCE 13.1 Cleaning the System Clean the System at least once a week. Turn the System off and wipe all surfaces with a soft, damp, non- abrasive cloth. Be careful not to spill any liquids on the system. -
Page 56: Troubleshooting
Legend Pro™ System User Manual Version 7 15. Troubleshooting Failure Cause of Description Action Failure Device Mains All indications and display The device will turn back on unexpectedly Electrical are off automatically once power is shut down power resume interruption A1 &... - Page 57 Legend Pro™ System User Manual Version 7 No text on the Communi- ON/OFF power switch is lit. Switch OFF the system and then TOUCH SCREEN cation problem switch ON again. If there is still no display on TOUCH SCREEN, stop system...
-
Page 58: Warranty Terms
Legend Pro™ System User Manual Version 7 Energy cannot be Touch Screen No feedback on touch screen Contact local Lumenis adjusted failure when Slider or button are representative for service. adjusted Energy cannot be Failure to enter Machine in Ready Mode... - Page 59 Legend Pro™ System User Manual Version 7 17. ELECTROMAGNETIC COMPATIBILITY TABLE SHOWN IN SECTION 5.2.2 IEC 60601- 1-2 Ed. 4.0 (2014) Summary of Test Results Test Test Standard Class/ Severity level result Emission (IEC 60601-1-2 sec. 7, IEC 60601-2-2 sec. 202.6.1 & IEC 60601-2-10 sec. 202.6.1)
-
Page 60: Diagram For The Rf Output That Show The Subject Device Power Output Vs. Output
Legend Pro™ System User Manual Version 7 18. DIAGRAM FOR THE RF OUTPUT THAT SHOW THE SUBJECT DEVICE POWER OUTPUT VS. OUTPUT CONTROL Control setting of 10-100% of available maximum power presented 19. DIAGRAM FOR POWER OUTPUT AT FULL AND HALF FOR THE LOAD RANGE OF 25 - 1,000Ω...
Need help?
Do you have a question about the Legend Pro and is the answer not in the manual?
Questions and answers