Advertisement
Quick Links
Advertisement

Summary of Contents for Shogun NORD-EX
- Page 1 https://shogunsports.com/products/mr1nf1n1ty-x-shogun-nordex...
- Page 2 THE ULTIMATE POSTERIOR CHAIN TRAINING SOLUTION...
- Page 3 CONTENTS 1. BOX COMPONENTS 2. Disclaimers and safety instructions 3. Assembly Steps 4. Assisted Nordic instructions 5. Back extension and length adjustments https://shogunsports.com/products/mr1nf1n1ty-x-shogun-nordex...
- Page 4 BOX A ITEM NO. NAME STEP 1: Wheels Assembly M8*12 Washer M8*14 Hex Socket Screw M8 Spring Washer STEP 2: Weight Panel Assembly NBM-001 M10*30 Hex Socket Screw M10*20 Washer M10 Spring Washer STEP 3: Adjustable Angle Tube Assembly NBM-011 Hex Socket Shoulder Screw M10 Washer M10 Nut...
- Page 5 Box A Box B Wheel Right Plate Structure Left Plate Structure Handle Tube...
- Page 6 ITEM NO. NAME Angle Tube Assy Foot Holder Foot Plate...
- Page 7 Weight Panel Sub Assy Left Cushion Right Cushion Empty Box NORD-EX Box...
-
Page 8: Important Safety Instructions
- You assume all risks and responsibilities for all damage, injury, or death which may be occurring during or following the incorrect use of this equipment in any manner whatsoever. - Shogun Sports LLC, Infinity LLC, or its associates are not liable for any claims for injury and damages resulting from or connected with the use of this product or its accessories. -
Page 9: Warranty
By registering your NORD-EX™, you will have the peace of mind that comes with knowing that you are covered in case of any unexpected issues. To learn more about the warranty and register, please scan the QR code located below. - Page 10 M8*12 Washer M8*14 Hex Socket Screw M8 Spring Washer...
- Page 11 Using the M6 hexagonal wrench, hex socket screws, and washers, attach the wheels to the left and right plates. https://shogunsports.com/products/mr1nf1n1ty-x-shogun-nordex...
- Page 12 ITEM NO. NAME Weight Panel Sub Assembly Right Plate Structure Sub Assembly Left Plate Structure Sub Assembly M10*30 Hex Socket Screw 19 Spanner M10 Washer 24 Spanner M10 Lock Washer M10 Nut M10*56.5 Shoulder Screw Handle Tube Safety Pin Bottom Support Tube...
- Page 13 Using the M8 hexagonal wrench, M10 socket screws, and lock washers, install 4 degrees, and proceed to install the right-hand side plate. Do not fully tighten yet. screws on the left-hand side plate. Do not fully tighten yet. https://shogunsports.com/products/mr1nf1n1ty-x-shogun-nordex...
- Page 14 2.3 Take the Safety Pin, remove the nut, insert the safety pin, in the hole on the side plate, and screw the nut again before inserting it in the threaded hole. Twist the safety pin inside the threaded hole and tighten both nuts with the spanner. https://shogunsports.com/products/mr1nf1n1ty-x-shogun-nordex...
- Page 15 Once the handle tube is fully tightened, proceed to tighten all the screws on the side panels. If the side panels are very tight, it will be hard to insert the handle tube which will lead to cosmetic damage. Damage caused by this, or similar circumstances is not covered by the warranty. https://shogunsports.com/products/mr1nf1n1ty-x-shogun-nordex...
- Page 16 2.5 Install the Bottom support tube. Use the M10 Washer, M10 Nut and M10 shoulder screw to install the part as shown in the illustration above. https://shogunsports.com/products/mr1nf1n1ty-x-shogun-nordex...
- Page 17 17 Spanner...
- Page 18 Take the angle tube subassembly and insert it between the support structures as illustrated below. Use the hexagonal wrench to hold the shoulder screw and tighten the washer and nut by using the spanner. Ensure it’s fully tightened to avoid any wobbliness issues. Pull the safety pin to lock the product in place. https://shogunsports.com/products/mr1nf1n1ty-x-shogun-nordex...
- Page 19 17 Spanner M10 Spring Washer...
- Page 20 Take the footplate and install it as illustrated below, fully tighten it by using the washer and nuts. https://shogunsports.com/products/mr1nf1n1ty-x-shogun-nordex...
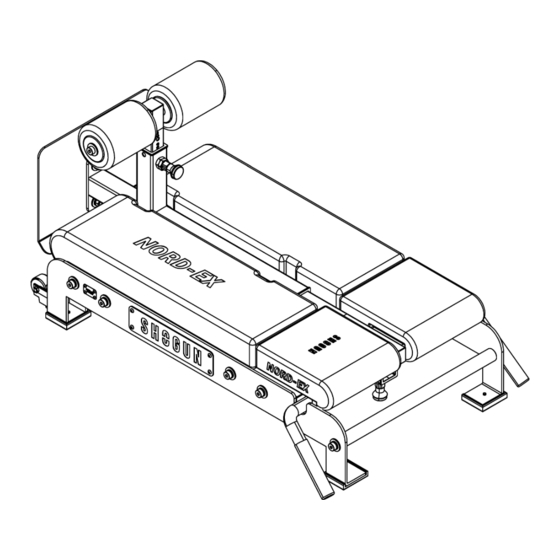
- Page 22 Lift the product and place it on its side as illustrated in the image below. Take the large cushions and install them using the M8 washers and screws. Fully tighten the screws. https://shogunsports.com/products/mr1nf1n1ty-x-shogun-nordex...
- Page 24 Install the foot holder subassembly by pulling the pin as illustrated below. https://shogunsports.com/products/mr1nf1n1ty-x-shogun-nordex...
- Page 26 Carefully pull the pin and insert the adjustable length sub-assembly containing the small cushions. Place it on the number 3, where you can see a line. This is the default position, carefully lower the entire back extension, and lock it using the safety pin. https://shogunsports.com/products/mr1nf1n1ty-x-shogun-nordex...
- Page 27 NORDIC CURL PROGRESSION SETUP 1. Remove the top part that has the cushions from the back extension hole. 2. Unlock the incline adjustment part and insert the top part with the cushions on to the other hole. https://shogunsports.com/products/mr1nf1n1ty-x-shogun-nordex...
- Page 28 PLEASE ENSURE THAT THE PIN IS FULLY INSERTED AND ENGAGED WHEN PERFORMING ASSISTED NORDICS. FAILURE TO INSERT AND SECURE THE PIN COULD LEAD TO PRODUCT MALFUNCTION AND INJURY. DAMAGE CAUSED BY MISUSE WILL NOT BE COVERED BY THE PRODUCT WARRANTY. https://shogunsports.com/products/mr1nf1n1ty-x-shogun-nordex...
- Page 29 10 POSITIONS FOR LENGTH ADJUSTMENTS. 1. Utilize positions 1-7 for the back extension length adjustment. 2. Utilize positions 8-10 only for extending the length of the bench in the flat Nordic position. https://shogunsports.com/products/mr1nf1n1ty-x-shogun-nordex...
- Page 30 1065.20 mm / 41.94 in 1093.70 mm / 43.06 in THE NORD-EX LENGTH CAN BE ADJUSTED TO FIT TALLER USERS, USE HOLE POSITIONS 8-10 TO ADJUST THE LENGTH. ADJUSTING THE LENGTH CAN ALSO HELP WITH MINOR ROCKING MOTION CAUSED WHEN PERFORMING EXPLOSIVE NORDICS.
- Page 31 https://shogunsports.com/products/mr1nf1n1ty-x-shogun-nordex...
- Page 32 https://shogunsports.com/products/mr1nf1n1ty-x-shogun-nordex...
- Page 33 Manufacturer’s name: Shield Works Precision Manufacturing Co Ltd Address: Floor 4, Building C, Zhong Yuan Industrial Park, No. 2 Shengli Road, Sanzao Town, Jinwan District, Guangdong, 519040, China Telephone number: +86 186 6698 6723 For home use.
- Page 34 THE ULTIMATE POSTERIOR CHAIN TRAINING SOLUTION...
Need help?
Do you have a question about the NORD-EX and is the answer not in the manual?
Questions and answers