
Related Manuals for VNS Therapy 3100


Summary of Contents for VNS Therapy 3100
- Page 1 PHYSICIAN'S MANUAL VNS Therapy™ Programming System Model 3100 Model 2000 October 2023 26-0011-5400/1 (US)
- Page 2 © 1998 – 2023 LivaNova, PLC, London, UK. All rights reserved. All trademarks and trade names are the property of LivaNova or the property of LivaNova's consolidated subsidiaries and are protected under applicable intellectual property laws. Solely for convenience, LivaNova's trademarks and trade names may appear without the ® or TM symbols, but such references are not intended to indicate in any way that LivaNova will not assert, to the fullest extent under applicable law, LivaNova's rights to these trademarks and trade names.
-
Page 3: Table Of Contents
TABLE OF CONTENTS INTRODUCTION 1.1. Brief Description 1.2. Compatibility 1.3. System Communication INDICATIONS, WARNINGS, AND PRECAUTIONS 2.1. Intended Use 2.2. Warnings 2.2.1. General 2.2.2. Security 2.3. Precautions 2.3.1. General 2.3.2. Security COMPONENTS 3.1. Programming System Parts 3.1.1. Parts Included 3.1.2. Parts Not Included 3.2. - Page 4 6.1. Interrogate 6.1.1. Initial Interrogation 6.1.2. In-Session Interrogation 6.2. Parameters 6.2.1. Stimulation Parameters 6.2.2. Detection Parameters 6.2.2.1. Tachycardia Detection and AutoStim 6.2.2.1.1. Tachycardia Detection Setup 6.2.2.1.2. Verify Heartbeat Detection 6.2.2.2. Low Heart Rate Detection 6.2.2.3. Prone Position Detection 6.3. Titration Plans 6.3.1.
- Page 5 7.3.1. Possible Causes 7.3.2. Solution Steps MAINTENANCE, HANDLING, AND DISPOSAL 8.1. System 8.2. Programmer 8.3. Wand 8.4. Disposal PROGRAMMING SYSTEM SPECIFICATIONS AND GUIDANCE 9.1. Wand and Programmer Specifications 9.2. Wand Electromagnetic Conditions 9.3. Wireless Security CONTACTS AND RESOURCES 10.1. Contacts 10.2.
-
Page 6: Introduction
Chapter 1 Introduction Links to the following documents are found at www.livanova.com. Indication-specific physician's manuals VNS Therapy System Glossary LivaNova Neuromodulation Symbols and Definitions Detailed cybersecurity information is available upon request. For contact information, see "Technical Support" on page 61. This topic includes the following concepts: 1.1. -
Page 7: Brief Description
Introduction 1.1. Brief Description The VNS Therapy programming system includes a tablet (Programmer), Model 3100 programming software (Clinician App), and a Model 2000 programming wand (Wand). The system allows you to perform the following: Interrogate compatible VNS Therapy devices Adjust VNS Therapy parameters and features Assess VNS device health... -
Page 8: Indications, Warnings, And Precautions
Chapter 2 Indications, Warnings, and Precautions This topic includes the following concepts: 2.1. Intended Use 2.2. Warnings 2.3. Precautions Page 8 — 26-0011-5400/1 (US) -
Page 9: Intended Use
Indications, Warnings, and Precautions 2.1. Intended Use The VNS Therapy programming system is intended for use with compatible VNS Therapy devices in a professional healthcare facility environment and is subject to the same indications for use. 2.2. Warnings Follow these warnings for optimal performance and safety. -
Page 10: Security
Indications, Warnings, and Precautions 2.2.2. Security Safeguard Against Theft Safeguard the programming system against theft. Theft could lead to malicious activities against the system. Unauthorized Connections Use the system in a controlled area to prevent unauthorized connections. Do not connect the Programmer to insecure networks (e.g., hotel Wi-Fi, conferences). -
Page 11: Precautions
Indications, Warnings, and Precautions 2.3. Precautions Follow these precautions for optimal performance and safety. 2.3.1. General Do Not Load Other Software Do not load other software onto the Programmer. This may interfere with the efficiency and function of the programming software. Use in Patient Environment The Programmer is tested to the same level as typical consumer electronic devices;... -
Page 12: Components
Chapter 3 Components This topic includes the following concepts: 3.1. Programming System Parts 3.2. Programmer Hardware 3.3. Wand Hardware Page 12 — 26-0011-5400/1 (US) -
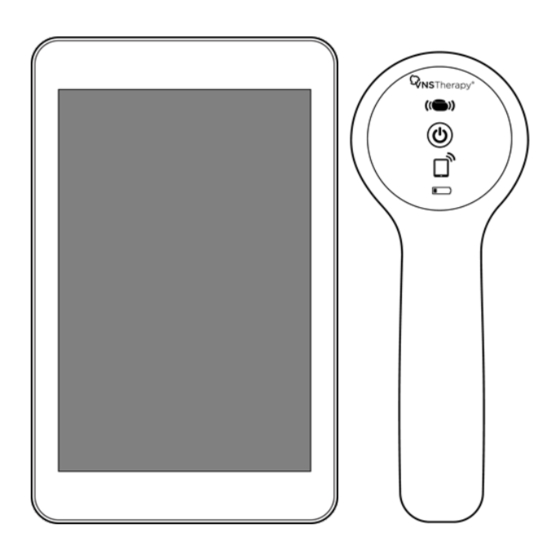
Page 13: Programming System Parts
Components 3.1. Programming System Parts The VNS Therapy programming system includes a tablet (Programmer), Model 3100 programming software (Clinician App), and a programming wand (Wand). NOTE: If parts of the system are missing, contact "Technical Support" on page 61. 3.1.1. Parts Included Figure 1. -
Page 14: Programmer Hardware
Components 3.2. Programmer Hardware 3.2.1. Tablet Layout and Functions Recents key Opens a list of recent apps. Home key If the screen is on, press and release to return to the Programmer Home screen. If the screen is locked, press and release to unlock the screen. Back key Press and release to return to the previous screen. -
Page 15: Tablet Battery Status
Components USB-C Cable Charge the battery Connect the cable to the wall charger and the tablet. Disconnect the cable and charger from the port tablet after it is charged. Do not plug the wall charger into an electrical outlet while the Programmer is in use with a patient. - Page 16 Components No Battery Power Indicator – No If only the orange battery icon illuminates, communication will not be Communication possible until you replace the batteries. Wand Battery Replacement If the battery is low, replace the batteries. Remove the cover located on the back of the Wand.
-
Page 17: Get Started
Chapter 4 Get Started This topic includes the following concepts: 4.1. First -Time Programmer Setup 4.2. The Kiosk 4.3. Programmer Update 4.4. Connect Wand and Programmer Page 17 — 26-0011-5400/1 (US) -
Page 18: First -Time Programmer Setup
Get Started 4.1. First -Time Programmer Setup Internet connectivity is required for first-time Programmer setup. The Programmer is equipped with cellular access and automatically connects to the internet. You can also connect the Programmer through Wi-Fi. A secure Wi-Fi connection is recommended for first-time setup, or in areas of poor cellular coverage. 4.1.1. -
Page 19: Download And Install The Clinician App
Get Started 4.1.2. Download and Install the Clinician App When you access the Programmer for the first time, complete the following steps to download and install the Clinician App: Tap the Clinician App icon on the Programmer Home screen. Tap OK to open to open Google Play. Tap Install to download and install the Clinician App. -
Page 20: The Kiosk
Get Started Press the Recents key and tap Close All. Tap the Clinician App icon on the ProgrammerHome screen to restart the app. 4.2. The Kiosk The kiosk is your home screen to access Programmer settings, Clinician App, and Remote Support. Page 20 —... -
Page 21: Clinician App
The Clinician App software provides the user interface for you to interact with compatible VNS Therapy devices. Use the Clinician App to interrogate, program and perform device health checks on a supported VNS device. You can also backup Programmer data and access Wand firmware updates through the Clinician App. - Page 22 Get Started 3. Modify settings as described below. Press the Back key to return to this menu after you are finished with a setting. Tap OK to return to the Programmer Home screen. Wi-Fi View and connect to available Wi-Fi networks. ®...
-
Page 23: Programmer Update
Get Started Screen Lock A screen lock is required for security purposes. The default screen lock type is a personal identification number (PIN), but you can choose to use a swipe pattern or password. Change the Programmer unlock passcode after you access the Programmer for the first time. -
Page 24: Wireless Wand Connection Options
Get Started 4.4.1. Wireless Wand Connection Options 4.4.1.1. Preferred Wireless Wand Set up a preferred Wand connection that is always used with the same Programmer. This setup is recommended for a Wand and Programmer that are always used together. It provides a quicker connection since the Programmer will automatically look for the preferred Wand. -
Page 25: Navigation
Chapter 5 Navigation This topic includes the following concepts: 5.1. User Interface Elements for the Clinician App 5.2. Home & Out-Of-Session Menu 5.3. Dashboard & In-Session Menu 5.4. Parameters Screen Page 25 — 26-0011-5400/1 (US) -
Page 26: User Interface Elements For The Clinician App
Navigation 5.1. User Interface Elements for the Clinician App For information about specific elements within the Clinician App user interface (UI) see the following table. Table 4. User Interface Elements — Clinician App Examples Description Card Cards contain content and actions about a single topic. - Page 27 Navigation Table 4. User Interface Elements — Clinician App (continued) Examples Description Banner Banners display prominent messages and related optional actions across the top of the screen. You can tap on a banner to access available options. Status banners are colored based on the severity of the issue: Muted purple –...
-
Page 28: Home & Out-Of-Session Menu
Navigation Table 4. User Interface Elements — Clinician App (continued) Examples Description Drop-downs Drop-down inputs are compact UI controls that allow you to select an input from a list. 5.2. Home & Out-Of-Session Menu The Home screen is the first screen you see after you open the Clinician App. The following information briefly describes the available options. - Page 29 Navigation Tap the Wand icon or button to connect to a Wand and communicate with a VNS device to start a patient session. For more information, see "Interrogate" on page 34. Interrogate Return to the Home screen from your current location. Home Access VNS device reset.
-
Page 30: Dashboard & In-Session Menu
Navigation 5.3. Dashboard & In-Session Menu The Dashboard is the first screen that appears after the interrogation is complete. Dashboard In-Session Menu Access in-session menu options. View the Battery, Lead Impedance, and Normal Output Current delivery status. Tap the banner on the Dashboard to view the VNS Device Health flyover. You can also access the full VNS Device Health screen from the in-session menu, which allows you to VNS Device Health run a System Diagnostics test and access history of past tests. - Page 31 Retrieves the latest parameter settings from the VNS device. For more information, see "Interrogate" on page 34. Return to the Dashboard from your current location. Dashboard View current VNS Therapy parameters. For more information, see "Parameters" on page 34. Parameters Includes Events & Trends and Therapy Summary cards. For more information, see "Events &...
-
Page 32: Parameters Screen
5.4. Parameters Screen Access parameters from the in-session navigation menu. The Parameters screen allows you to view details or access options to edit VNS Therapy parameters. NOTE: For details on each parameter option, see "Parameters" on page 34 Access in-session menu options. -
Page 33: Function
Chapter 6 Function This topic includes the following concepts: 6.1. Interrogate 6.2. Parameters 6.3. Titration Plans 6.4. Day-Night Programming 6.5. Events & Trends 6.6. VNS Device Health (System Diagnostics) 6.7. Wand Update 6.8. Wand Settings 6.9. Backup Data 6.10. Troubleshooting in the Clinician App Page 33 —... -
Page 34: Interrogate
In addition to retrieval of VNS device parameters, a System Diagnostics test is automatically performed as part of the initial interrogation. After the interrogation is complete and a new patient session is established, you can adjust VNS Therapy, view VNS device health, and perform troubleshooting. 6.1.2. -
Page 35: Detection Parameters
6.2.2.1. Tachycardia Detection and AutoStim To use responsive VNS Therapy, you must configure Tachycardia Detection and AutoStim parameters. Tachycardia Detection monitors the patient’s heart rate for increases above a selected threshold during stimulation OFF Time. AutoStim provides stimulation automatically in response to those detected events. -
Page 36: Low Heart Rate Detection
Function Table 5. Example Adjustments to the Heartbeat Detection Setting Programmer Independent Action Heartbeat Detection Detection Method 90 bpm 60 bpm Change the setting to a lower less sensitive setting (e.g., 3 to 2) 40 bpm 60 bpm Change the setting to a higher more sensitive setting (e.g., 3 to 4) 60 bpm The Programmer is unable to detect the heart rate. -
Page 37: Titration Plans
Communicate the dates and times of the titration schedule to your patient and their caregiver so they know when to expect an increase in the VNS Therapy dosage. If the patient cannot tolerate the new dose, instruct the patient to use the magnet to disable stimulation, and follow up with you for an adjustment to their titration plan. -
Page 38: Day-Night Programming
Default Plan Values When you create a new plan, the suggested default plan values are based on the dosing strategy recommended in the VNS Therapy Generator and Lead Manual for Epilepsy. Configurable Values For AutoStim Mode and Magnet Mode output current values, only step 1 values are configurable. The plan increment is applied for values after step 1. -
Page 39: Enable Or Disable Day-Night
Function and caregiver when to expect a setting change. As with any therapy setting change, the risks and benefits of altering a patient's known efficacious settings should be considered when adjustments are made. CAUTION: Time-based features do not automatically adjust for daylight saving time or time zone changes. Tell the patient to follow up with their physician for reprogramming if needed. -
Page 40: Events & Trends
Function 6.5. Events & Trends The Events & Trends feature displays magnet stimulation and event detection data from the VNS device and is only available when you are in session. 6.5.1. Dashboard After you interrogate the VNS device, the Dashboard displays the following data: Total magnet events for the past 30 days and, if available, its trending pattern in comparison to the previous 30-day period Average AutoStim events per day for the past 30 days and, if available, its trending pattern in... -
Page 41: Events & Trends Screen
Function 6.5.2. Events & Trends Screen After initial interrogation, you can access VNS device data for the past 60 days. Figure 4. Sixty Days of Data Example Swipe on the magnet and AutoStim event cards to view details. Tap on each card to access a full-screen view. Figure 5. -
Page 42: Figure 6. Autostim Calendar Events By Day Example
Function The AutoStim events calendar (i.e., the AutoStim heatmap) displays 60 days of color-coded AutoStim events. Tap on the card to access a full-screen view. This patient-specific heatmap separates AutoStim activity into high, middle, and low categories. The high and low categorizations include the top and bottom 10% of the AutoStim data. -
Page 43: Get More Data
Function 6.5.3. GET MORE DATA Tap GET MORE DATA to download up to 180 days of data from the VNS device. After the data downloads, all events and trends screens are updated with the most recent data. If the Low Heart Rate or Prone Position features are enabled, you can tap VIEW TIMESTAMPS on the Events &... -
Page 44: Events & Trends Data
Function 6.5.4. Events & Trends Data The table below shows types of data accessible through Events & Trends for Model 1000 and Model 1000-D VNS devices. You cannot access Events & Trends data if the VNS device is disabled or has out-of-range parameters. -
Page 45: Vns Device Health (System Diagnostics)
Function Table 6. Events & Trends Data (continued) Screen Data Description Action Available Data Low Heart Timestamps of low heart After you tap Up to 20 Rate rate events. GET MORE DATA most recent Timestamps timestamps Prone Timestamps of Prone After you tap Up to 20 Position... -
Page 46: System Diagnostics Test Results And Definitions
Function VNS device health check. 6.6.2. System Diagnostics Test Results and Definitions The table below contains possible results and their definitions. Table 7. System Diagnostics Test Results and Definitions Battery Status OK (15–25%) The battery is OK. OK (25%–50%) OK (50%–75%) OK (75%–100%) IFI (8%–15%) The battery has decreased to a level where more frequent clinical monitoring is recommended. NEOS (0%–8%) The battery is near end of service. -
Page 47: Therapy Disabled Or Paused
Function Table 7. System Diagnostics Test Results and Definitions (continued) Output Current The programmed Normal output current is delivered. The programmed Normal output current may not be delivered at the specified level. Unknown Programmed output current delivery status is unknown or cannot be assessed. Follow on- screen instructions or retry System Diagnostics. -
Page 48: In-Session Troubleshooting
Function 6.10.2. In-Session Troubleshooting 6.10.2.1. Generator Diagnostics The Generator Diagnostics test verifies that the generator, independent of the lead, functions properly. Perform the test with a test resistor, during troubleshooting scenarios in surgery. For more information, see the indication-specific physician's manual. NOTE: The test resistor is in the accessory pack. -
Page 49: General Troubleshooting
Chapter 7 General Troubleshooting This section provides solution steps to resolve error conditions with the programming system components. For other programming system issues not included in this section, contact "Technical Support" on page 61. NOTE: LivaNova can remotely connect to your programming system for troubleshooting. Discuss the option with Technical Support if this is needed. -
Page 50: Anomalous Behavior Or Non-Responsive System
General Troubleshooting 7.1. Anomalous Behavior or Non-Responsive System If your system displays anomalous behavior or becomes non-responsive, follow the solution steps below: 7.1.1. Programmer 1. Ensure that the Programmer is sufficiently charged. 2. Close any open instances of the Clinician App and restart the app. 3. -
Page 51: Solution Steps
General Troubleshooting 7.2.2. Solution Steps STEP 1 Turn on the Wand. STEP 2 Check the Wand power. Does the low battery icon illuminate? THEN Change the batteries and turn the Wand on. NOTE: If you have changed the batteries and there are no green power indicator lights, contact "Technical Support"... - Page 52 General Troubleshooting STEP 7 Perform a soft reset on the Wand. Press and hold the Wand power button for 5 seconds and release. Press the Wand power button again. STEP 8 Retry the wireless connection to the Wand. Is the connection successful? THEN Proceed with use.
-
Page 53: Wand Will Not Communicate With Generator
General Troubleshooting 7.3. Wand Will Not Communicate with Generator 7.3.1. Possible Causes Depleted Wand batteries Wand is moved away from generator during communication Electromagnetic interference (EMI) (e.g., OR lights) Generator battery at end of service (EOS) Defective Wand Defective Programmer Defective generator 7.3.2. -
Page 54: Maintenance, Handling, And Disposal
Chapter 8 Maintenance, Handling, and Disposal Follow the guidelines below for proper maintenance, handling, and disposal for the programming system. This topic includes the following concepts: 8.1. System 8.2. Programmer 8.3. Wand 8.4. Disposal Page 54 — 26-0011-5400/1 (US) -
Page 55: System
Chapter 8 8.1. System Clean External Surfaces To clean external surfaces of the programming system components, wipe with pre-moistened or damp cloth using one of the following cleaners: isopropyl alcohol (70-90%), ethanol, or CaviCide®. Do Not Sterilize Do not sterilize any parts of the system. Inspect Parts Regularly inspect the system parts for damage. -
Page 56: Wand
Chapter 8 8.3. Wand Battery Status Check the Wand battery periodically to verify battery status. Battery Installation Remove (and install) the battery only when the Wand is not in contact with the patient and not connected to the Programmer. Open Battery Compartment Never connect the Wand to external equipment while the battery compartment is open. -
Page 57: Programming System Specifications And Guidance
Chapter 9 Programming System Specifications and Guidance This topic includes the following concepts: 9.1. Wand and Programmer Specifications 9.2. Wand Electromagnetic Conditions 9.3. Wireless Security Page 57 — 26-0011-5400/1 (US) -
Page 58: Wand And Programmer Specifications
Programming System Specifications and Guidance 9.1. Wand and Programmer Specifications Table 8. Wand and Programmer Specifications Wand Programmer Storage Conditions Temperature -20 °C to +55 °C Relative Humidity Up to 95%, including condensation 10% to 90%, non-condensing Operation Conditions Temperature +15 °C to +40 °C +15 °C to +35 °C Relative Humidity... -
Page 59: Wand Electromagnetic Conditions
Programming System Specifications and Guidance 9.2. Wand Electromagnetic Conditions The Wand is intended to be used in the electromagnet conditions specified in the tables below. Table 9. Wand Electromagnetic Emissions EmissionsTest Compliance Level RF Emissions CISPR 11 Group 1, Class A NOTE: The emissions characteristics of this equipment make it suitable for use in industrial areas and hospitals (CISPR 11 class A). -
Page 60: Wireless Security
Programming System Specifications and Guidance Table 11. Wand Electromagnetic Immunity to Proximity Fields from RF Wireless Communications Equip- ment (continued) Test Frequency Service Compliance Level 1720 GSM 1800 28 V/m 1845 CDMA 1900 1970 GSM 1900 DECT LTE Band 1, 3, 4, 25 UMTS 2450 Bluetooth®... -
Page 61: Contacts And Resources
10.4. Return Product Form A Returned Product Form is used for the return of any VNS Therapy system component. Call first for a Return Goods Authorization (RGA) number, available from "Technical Support" above. Before device components are returned, disinfect them with Betadine®, Cidex® soak, or other similar disinfectant, and double seal them in a pouch or other container properly labeled with a biohazard warning.
Need help?
Do you have a question about the 3100 and is the answer not in the manual?
Questions and answers