
Subscribe to Our Youtube Channel
Related Manuals for Link2Home 6820F

Summary of Contents for Link2Home 6820F
- Page 1 Caméra connectée et rechargeable avec panneau solaire WLAN Kamera wiederaufladbar mit Solarzelle Akumulatorowa kamera Wi-Fi z panelem solarnym Rechargeable WiFi camera with solar panel 6820F...
- Page 2 Caméra connectée rechargeable + panneau solaire caméra Support fixation Câble USB rechargeable mural 3 mètres Panneau solaire Mode d’emploi Lot de vis AVERTISSEMENT : 1. La caméra ne doit pas être installée à proximité d'une source de chaleur comme : l'unité extérieure d'un climatiseur,une bouche de ventilation ou un système d'évacuation de chaudière car cela pourrait provoquer des interférences et compromettre le bon fonctionnement de la caméra de surveillance.
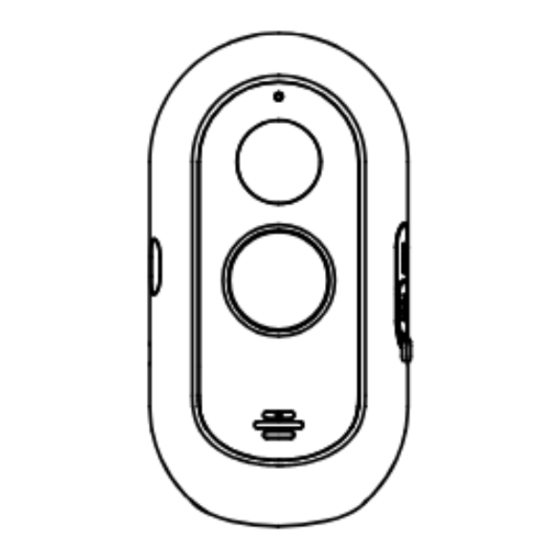
- Page 3 Description Voyant d’état Objectif Haut-parleur Détecteur infra-rouge Bouton réinitialiser Bouton Carte SD ON/OFF Port USB de chargement Micro Alimentation DC 5V±10% Bouton ON/OFF Maintenez le bouton appuyé 3s pour allumer/éteindre la caméra Voyant d’état Voyant rouge fixe : la caméra n’est pas connectée correctement au réseau Voyant rouge clignotant : en attente de connexion wifi...
-
Page 4: Installation
Installation Installation du support mural 0~360° 0~90° Réglez l’angle de vision de la caméra, puis vissez le support à fond. 1. Fixez le support mural avec les vis prévues, après avoir positionné les chevilles. 2. Fixez la caméra sur le support et visser le support après avoir réglé... - Page 5 Etape 4 Orientez le panneau solaire afin qu'il soit orienté directement face à la lumière du soleil. Etape 5 Connectez le câble à la caméra extérieure Link2home afin de maintenir la caméra chargée à 100%...
- Page 6 Télécharger l’application Link2Home Pro Téléchargement Link2Home Pro est disponible pour les systèmes d'exploitation iOS et Android. Recherchez le nom « Link2Home Pro » dans l'App Store ou sur l'Android Market, ou scannez le code QR ci-dessous pour télécharger l’application. L'obtenir Télécharger...
- Page 7 Processus d'enregistrement Étape 1 Ouvrez l’appli Link2Home Pro, cliquez sur « S’enregistrer », lisez la « Politique de confidentialité » et cliquez sur « J’accepte ». Politique de c onfidentialité Nous accordons une grande attention à la confidentialité des informations personnelles. Pour présenter intégralement la façon dont nous...
- Page 8 fixe au rouge clignotant. Processus Étape 1 Ouvrez l'appli Link2Home Pro, cliquez sur « + » (dans le coin supérieur droit de l'écran) ou sur « Ajouter un appareil ». Puis sélectionnez « Ajouter manuellement ».
- Page 9 Annuler Code QR Scan automatique Ajouter Manuellement Éclairage Réinitialisez d'abord l'appareil. Surveillance Vidéo Allumez l'appareil et assurez-vous que le voyant clignote rapidement ou qu'un ton se Capteurs fait entendre. Gros appareils Caméra Caméra Caméra ménagers intelligente intelligente intelligente (BLE) (Wifi) (bi-baCaméra) Petits appareils ménagers...
- Page 10 Étape 4 Lorsque vous entendez un bip. Cliquez sur « J'ai reçu une invitation ». La configuration doit prendre environ 30 secondes. Annuler Annuler Ajouter un appareil Veillez à ce que l'appareil est allumé Pas de tons Scanner Enregistrer Initialiser J'ai reçu une invitation un appareil sur la Cloud...
-
Page 11: Caractéristiques Techniques
Modifier les paramètres de la caméra Sur la page d’accueil, accédez aux paramètres de la caméra : Caméra de sécurité nuageux Qualité d'air à Excellent l'extérieur excéllente Température extérieur PM 2.5 extérieure Tous les appareils Salle de Séjour Chambre à coucher principale Parler Enregistrer Capture... - Page 12 Q : L'appareil ne répond pas et je ne vois aucune image ? R : Vérifiez la connectivité réseau sur l'appareil (voyant bleu fixe) et si votre routeur est activé et dans une zone de signal. Sinon, réinitialisez votre appareil et ajoutez-le à nouveau. Q : Pourquoi est-il toujours dans la liste des appareils après réinitialisation ? R : Ce dispositif réinitialise uniquement la configuration réseau de...
- Page 13 Vue web Diffusion en direct par l'Internet Explorer. Visitez le lien web: https://ipc-eu.ismartlife.me/login Scannez le code QR via l'App Link2Home Pro Nuit et jour Une vision nocturne optimisée, même dans l'obscurité totale. Le passage du mode nuit au mode jour est automatique. Il est paramétrable dans les paramètres de la caméra.
- Page 14 DÉCLARATION UE DE CONFORMITÉ SIMPLIFIÉE Produit: Caméra extérieure rechargeable avec panneau solaire Référence: 6820F Marque: Link2Home Nous, EverFlourish Europe GmbH déclarons que l’équipement radioélectrique décrit ci-dessus est conforme à la Directive RED 2014/53/UE. Le texte complet de la Déclaration UE de Conformité est disponible à l’adresse suivante: www.everflourish-europe.de...
- Page 15 Lieferumfang Wiederaufladbare 3 Meter USB Wandhalterung Kamera Kabel Solarpanel Schrauben Bedienungsanleitung ACHTUNG : 1. Die Kamera sollte nicht in der Nähe einer Wärmequelle installiert werden, wie z. B. dem Außengerät einer Klimaanlage, einer Entlüftungsöffnung oder einem Boilerabzugssystem, da dies Störungen verursachen und die ordnungsgemäße Funktion der Überwachungskamera beeinträchtigen könnte.
- Page 16 Übersicht Statusleuchte Objektiv Lautsprecher Infrarotsensor Reset SD Karte AUS/AN Ladeanschluss Mikrofon Power DC 5V±10% AN/AUS Für 3 s gedrückt halten um die Kamera ein- oder auszuschalten Statusleuchte Leuchtet rot: Kamera ist nicht richtig mit dem Netzwerk verbunden Blinkt rot : wartet auf Verbindung oder wird gerade verbunden (blinkt schnell) Leuchtet blau : Kamera funktioniert einwandfrei Micro...
- Page 17 Setup Wandhalterung anbringen 0~360° 0~90° Stellen Sie den Blickwinkel der Kamera ein und schrauben Sie dann die Halterung ganz hinein. 1.Nachdem Sie die Dübel angebracht haben, befestigen Sie die Wandhalterung mit den mitgelieferten Schrauben. 2.Nachdem Sie den Blickwinkel der Kamera eingestellt haben, bringen Sie die Kamera an der Halterung an und schrauben sie fest.
- Page 18 Replace the solar panel on the bracket and make sure it is properly secured. Schritt 4 Stellen Sie das Solarmodul so auf, dass es direkt in das Sonnenlicht gerichtet ist. Schritt 5 Schließen Sie das Kabel an die Link2Home-Außenkamera an, damit die Kamera voll aufgeladen bleibt.
- Page 19 Verbindung herunterzuladen Pro is Link2Home Pro gibt es für iOS und Android OS. Sie finden es unter 'Link2Home Pro' im App Store oder auf Android Market, oder scannen Sie den QR-Code unten um die App herunterzulad- Auf Google Play Im Apple Store...
- Page 20 Registrierung Schritt 1 Öffnen Sie die Link2Home Pro App, klicken Sie auf "Registrieren", lesen Sie sich die "Datenschutzrichtlinie" durch und klicken Sie auf "Zustimmen". Schritt 2 Geben Sie eine gültige E-Mail Adresse ein und klicken Sie weiter. Geben Sie den Verifizierungscode aus der E-Mail in die App ein.
- Page 21 Danach startet es automatisch neu und die Statusanzeige leuchtet nicht mehr blau sondern rot. Ablauf Schritt 1 Öffnen Sie die Link2Home Pro App, klicken Sie auf "+" (rechte obere Ecke) oder "Gerät hinzufügen". Wählen Sie "Manuell hinzufügen". Manuell hinzufügen Beleuchtung Videoüberwachung...
- Page 22 Abbrechen Manuell hinzufügen Setzen Sie das Gerät zunächst zurück. Beleuchtung Videoüberwachung Schalten Sie das Gerät ein und vergewissern Sie sich, dass die Anzeige schnell blinkt oder ein Ton zu hören ist. Sensoren Smartkamera Smartkamer Smartkamer Große (Wifi) (Breitband) (BLE) Haushaltsgerä Kleine Haushaltsgerä...
- Page 23 Schritt 4 Scannen Sie den QR-Code mit Ihrem neuen Gerät. Wenn Sie ein Piepen hören klicken Sie "Ich höre einen Ton". Das Set-Up sollte etwa 30 Sekunden dauern. Abbrechen Abbrechen Geräte hinzufügen Stellen Sie sicher, dass das Gerät eingeschaltet ist Ich höre keinen Ton Geräte in der Cloud...
-
Page 24: Technische Daten
Kameraeinstellungen ändern Über den Startbildschirm kommen Sie in die Kameraeinstellungen : Überwachungskamer bewölkt Hervorragende Hervorragende Außentemperatur PM 2.5 im Freien Außenluftqualität Alle Geräte Wohnzimmer Großes Schlafzimmer Sprechen Sie Aufnehmen Screenshot Keine Geräte Geräte hinzufügen Cloud Wiedergabe Fotoalbum Speicherplatz Noch nicht aktiviert Technische Daten WLAN Kamera wiederaufladbar mit Solarzelle - Bewegungsmelder : Intelligente Erkennung von Personen... - Page 25 F : Das Gerät kann nicht richtig angezeigt werden? A : Prüfen Sie, ob das Netzwerk korrekt funktioniert. Sie können die Kamera in der Nähe des Routers platzieren. Ansonsten empfiehlt es sich, das Gerät zurückzusetzen und erneut hinzuzufügen. F : Warum ist es nach dem Zurücksetzen immer noch in der Liste der Geräte? A : Mit dem Reset wird nur die Netzwerkkonfiguration der Kamera zurückgesetzt, die Konfiguration in der App kann damit nicht...
- Page 26 (max. 128 GB) oder dem Speicherplatz der Cloud (optional). Letzteres können Sie in den Einstellungen abonnieren. Web-Ansicht Live streaming über den Internet Explorer. Besuchen Sie den Link: https://ipc-eu.ismartlife.me/login Scannen Sie den QR-Code mit der Link2Home Pro App Tag & Nacht Leistungsstarke Nachtsicht bietet Ihnen den Durchblick-selbst bei völliger Dunkelheit. Nacht WEEE-Entsorgungshinweis Gebrauchte Elektro- und Elektronikgeräte dürfen gemäß...
- Page 27 Podłączona kamera akumulatorowa z panelem słonecznym Kamera Wspornik do 3-metrowy akumulatorowa montażu ściennego kabel USB Panel słoneczny Instrukcja obsługi Zestaw śrub UWAGA: 1. Nie należy instalować kamery w pobliżu źródeł ciepła, takich jak: jednostka zewnętrzna klimatyzatora, otwór wentylacyjny, układ wydechowy kotła ciepła. Ciepło może negatywnie wpływać na prawidłowe działanie kamery monitoringu.
- Page 28 Opis Kontrolka statusu Obiektyw Głośnik Czujnik podczerwieni Przycisk „RESET” Przycisk Karta SD ON/OFF Port USB do ładowania Mikrofon Zasilanie DC 5V±10% Przycisk ON/OFF Przytrzymaj przycisk przez 3 sekundy, aby uruchomić lub wyłączyć kamerę Kontrolka statusu Świeci na czerwono: kamera nie jest prawidłowo połączona z siecią Miga na czerwono: oczekiwanie na połączenie lub w trakcie połączenia (szybkie miganie) Świeci na niebiesko: kamera działa prawidłowo...
- Page 29 Montaż Montaż wspornika 0~360° 0~90° Dostosuj kąt pola widzenia kamery, następnie dokręć śrubę do końca. 1.Po rozmieszczeniu kołków rozporowych przymocuj wspornik do montażu ściennego za pomocą dostarczonych śrub. 2.Po wyregulowaniu kąta widzenia kamery, przymocuj kamerę do wspornika i przykręć ją. 3.Powtórz powyższe kroki, aby zamontować...
- Page 30 (Nie stosować kołków do montażu w drewnie i metalu). Załóż panel słoneczny z powrotem na wspornik i upewnij się, że jest solidnie zamontowany. Ustaw panel słoneczny tak, aby padało na niego bezpośrednie światło słoneczne. Podłącz kabel do kamery zewnętrznej Link2Home, aby kamera była zawsze w pełni naładowana.
-
Page 31: Połączenie Bezprzewodowe
Połączenie bezprzewodowe Pobieranie Aplikacja Link2Home Pro jest dostępna zarówno na iOS jak i system Android. Wyszukaj ”Link2Home Pro” w App Store lub Android Market lub zeskanuj poniższy kod QR, by pobrać aplikację. Pobierz z Pobierz z Google Play Apple Store Pobierz aplikację... - Page 32 Rejestracja 1. Otwórz aplikację Link2Home Pro. Kliknij „Zarejestruj się”, zapoznaj się z „Polityką Prywatności”, a następnie kliknij „Zgoda”. 2. Wprowadź prawidłowy adres e-mail, a następnie kliknij Dalej. Wprowadź kod weryfikacyjny, który otrzymałeś w wiadomości e-mail. (Sprawdź folder Spam).
- Page 33 Kolor kontrolki statusu zmieni się z niebieskiego na pulsujące czerwone. Proces dodawania urządzenia 1. Otwórz aplikację Link2Home Pro, następnie kliknij ikonkę „+” w prawym górnym rogu ekranu lub przycisk „Dodaj urządzenie”. Następnie wybierz „Dodaj ręcznie”. Dodaj ręcznie Skan automatyczny Oświetlenie...
- Page 34 Anuluj Code Dodaj ręcznie Skan automatyczny Oświetlenie Manuell hinzufügen Najpierw zrestartuj urządzenie. Uruchom urządzenie i upewnij się, że Czujniki kontrolka pulsuje lub wydany został sygnał dźwiękowy. Inteligentna Inteligentna Inteligentna Duże urządzenia kamera kamera kamera gospodarstwa (Wi-Fi) (Dwupasmowa (BLE) domowego Małe urządzenia gospodarstwa Inteligentna...
- Page 35 4. Gdy usłyszysz sygnał, wciśnij „Słyszałem dźwięk”. Konfiguracja powinna zająć około 30 sekund. Dodawanie urządzeń Upewnij się, że urządzenie jest uruchomione Zeskanuj kod QR z odległości 15-20cm Skanuj za Uruchom Zarejestruj w urządzeniami chrmurze urządzenie 5. Urządzenie zostało dodane. Na tym ekranie możliwa jest zmiana nazwy urządzenia.
-
Page 36: Dane Techniczne
Zmiana ustawień kamery Otwórz menu ustawień z ekranu głównego aplikacji: Kamera do monitoringu Pochmur wartość PM2.5 jakość powietrza Temperatura na zewnątrz na zewnątrz zewnętrzna Wszystkie urządzenia Salon Główna sypialnia Mów Nagrywaj Zrzut ekranu Brak urządzeń Dodaj urządzenie Przestrzeń w Odtwarzanie Album chmurze Nie aktywowano... -
Page 37: Pytania I Odpowiedzi
Pytania i odpowiedzi Problem: Kamera przestała reagować, nie widzę żadnego obrazu. Rozwiązanie: Sprawdź, czy urządzenie jest połączone z siecią (czy świeci się niebieska kontrolka), czy twój router jest włączony oraz czy znajduje się w zasięgu. Jeżeli nie, zresetuj swoje urządzenie i dodaj je ponownie. - Page 38 Widok online Transmisja poprzez przeglądarkę internetową. Otwórz stronę: https://ipc-eu.ismartlife.me/login Zeskanuj kod QR za pomocą aplikacji Link2Home Pro Dzień i noc Efektywny widok nocny oznacza brak przerw, nawet w kompletnych ciemnościach. Możesz włączyć automatyczne przełączanie trybu nocnego na dzienny w ustawieniach kamery.
- Page 39 Solar Panel + Battery Camera Rechargeable Wall mounting 3 meter USB camera bracket cable Product user Solar Panel Screw bag manual CAUTION : 1. The camera should not be installed near a heat source such as: the outdoor unit of an air conditioner, an air vent or a boiler exhaust system as this could cause interference and compromise the proper functioning of the surveillance camera.
- Page 40 Description Status Light Objectif Speaker Infrared Detector RESET ON/OFF SD Card Button USB Port for charging Power Supply DC 5V±10% ON/OFF Button Hold the button for 3s to turn the camera on/off Status Light Permanent red light: camera is not correctly connected to the network Blinking red light : waiting for wifi...
- Page 41 Setup Setup wall mounting bracket 0~360° 0~90° Adjust the camera’s viewing angle, then screw the bracket all the way in. 1.After positioning the wall plugs, fix the wall mounting bracket with the screws provided. 2.After adjusting the camera’s viewing angle, attach the camera to the bracket and screw it.
- Page 42 Replace the solar panel on the bracket and make sure it is properly secured. Step 4 Place the solar panel so that it faces directly into the sunlight. Step 5 Connect the cable to the Link2home outdoor camera to keep the camera fully charged.
- Page 43 Connect Download Link2Home Pro is available for both iOS and Android OS. Search the name “Link2Home Pro” in the App Store or Android Market, or scan the QR code below to download the App. GET IT ON Download on the...
- Page 44 Registration Process Step 1 Open the Link2Home Pro App, click "Register", read the "Privacy Policy" and click "Agree". Step 2 Input a valid email address and click continue. Then enter the verification code from your email back into the App. (check you...
-
Page 45: Add A Device Manually
flashing red. Process Step 1 Open the Link2Home Pro App, click "+" (in the upper right hand corner of the screen) or "Add Device". Then select "Add Manually". - Page 46 Select your device type : “Rechargeable Outdoor Camera” Step 3 Your device WiFi network will be the default network displayed. Simply add your WiFi password or choose another network. Click confirm and then continue and scan the QR code with your new device. SKYAEEE02.4...
- Page 47 Step 4 When you hear a beep . Click "I Heard a Prompt". The set up should take around 30 seconds. Step 5 The device is added, and the device nickname can also be changed in this interface. Cancel Added Outdoor Camera Outdoor Camera Device added successfully...
-
Page 48: Change The Camera Settings
Change the Camera Settings Access the camera settings on the home screen : Technical features Rechargeable WiFi camera with solar panel - Presence Detection : Intelligent Detection of Human Shapes - PIR Detection:9m max, 120° - Distance de détection : 10 mètres, 100° - IR Distance:Night Visibility up to 10m - Optical Sensor : 1/4"... - Page 49 Q : The camera doesn't respond and I can't see any images? A : Check network connectivity on the device (solid blue light) and whether your router is enabled and in a signal area. If not, reset your device and add it again. Q : Why is it still in the list of devices after reset? A : This device only resets the network configuration of the camera, but cannot change the configuration on the app.
- Page 50 Web view Live streaming through an internet explorer. Visit weblink: https://ipc-eu.ismartlife.me/login Scan the QR code via Link2Home Pro App Day & Night Powerful night vision means no interruptions, even in complete darkness. You can enable the automatic switch of Night to Day Mode in the camera settings.
Need help?
Do you have a question about the 6820F and is the answer not in the manual?
Questions and answers