Table of Contents
Advertisement
Quick Links
Parcelsend Kit - Printer
Installation Instructions
1E42 Printer - Windows Installation
Read Now BEFORE you unpack your equipment
Right, let's get your Printer up
and running quickly...
Let's start by opening and unpacking the box that contains your
Parcelsend Kit 1E42 Printer on the next page.
Continue reading below
Advertisement
Table of Contents

Summary of Contents for mailcoms 1E42
- Page 1 1E42 Printer - Windows Installation Read Now BEFORE you unpack your equipment Continue reading below Right, let’s get your Printer up and running quickly… Let’s start by opening and unpacking the box that contains your Parcelsend Kit 1E42 Printer on the next page.
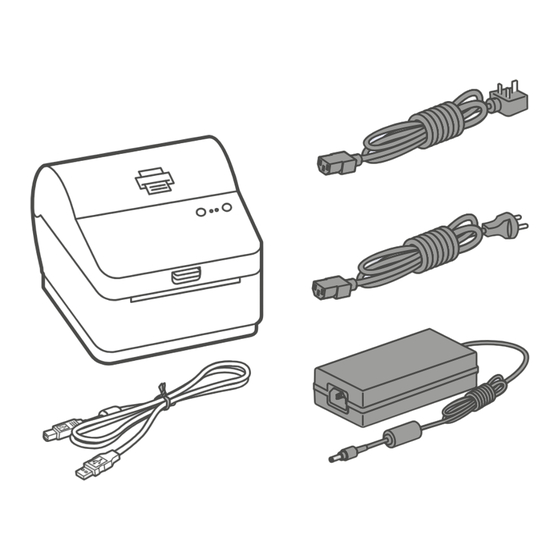
- Page 2 Opening the box and unpacking Here’s a diagram and explanation of the items you should find in your box. Please select the correct power cable for your location. If you have any problems during this installation, refer to the online help available.
- Page 3 Aligning the Label Roll Press the button and check that the label feeds out correctly. Note- If the label does not feed correctly please refer to label alignment instructions inside the printer top cover. Tear off the correctly dispensed label. Connecting the USB Cable Connect your printer to your computer with the USB cable.
- Page 4 Connecting the Printer via Network Connect your Network cable to your printer and Network socket. Ensure you have the correct power cord for your region. Connect the power cord and adapter (as shown) to your printer and switch on. Network Cable Power Cable Printer Ready Wait for approximately 45 seconds until the green light remains constant and...
- Page 5 Downloading the Printer Driver Ensure you are signed into SendPro and click on the Help icon. ® Select the Datamax Printer Driver Select the correct printer driver for your operating system. Select Run or Open dependant on your browser. Accept the licence agreement and follow the on screen prompts to install. Connecting to the Printer Select Network and press Next.
- Page 6 Printer Port Wizard Select Next to run the Printer Port Wizard. Enter the Ethernet IP from the system report printed in step 8 and Select Next. Note- The Port Name will automatically be populated with a default value. Windows Wizard will automatically find the device. If not found, Select Generic Network Card from the drop down menu and Select Next.
- Page 7 Completing Printer Setup Select Finish to complete the wizard and begin using your printer. Test Print Your Printer is now connected. To test your printer is working correctly follow the steps below- On a PC Go to your Control Panel Select Device &...
- Page 8 USB cable. • Dispose of old batteries properly. • Always follow the specific occupational safety and health standards for your workplace. Address: Mailcoms Ltd, Units 6-8 Primary Point, Progress Drive, Cannock, Staffordshire, WS11 0JF Call: 01543 572 776 Email: info@mailcoms.co.uk...
Need help?
Do you have a question about the 1E42 and is the answer not in the manual?
Questions and answers