
Summary of Contents for aubor MY04
- Page 1 SECURITY CAMERA Indoor Quick Installation Guide Thank you for choosing our security camera. Please read the quick installation guide carefully before using and keep it in good conditions.
-
Page 2: Table Of Contents
Catalogue I. Product Packing List …………………………………………1 II. Appearance Brief …………………………………………2 III. Product Instructions …………………………………… 3~14 ……………………………3 1.1 APP Download and Installation …………………………… 4 1.2 APP Permission Settings ………………………………… 5~6 2. Accounts Registration … …………………………………7~9 3. Device Adding …… …………………………………10 4. Function Overview …………………………………11 5. -
Page 3: Product Packing List
I. Product Packing List 1 Camera 3 Screws 1 Power Adapter Type-C cable Bracket 3 Expansion Bolts 1 Specification 1 Quality Certificate 1 Location Sticker... -
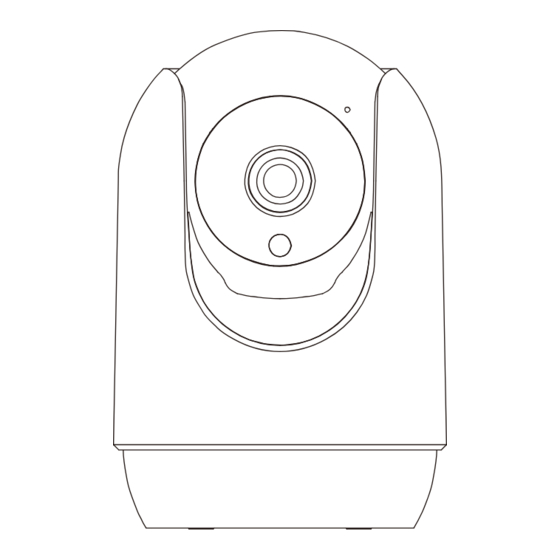
Page 4: Appearance Brief
II. Appearance Brief Camera Lens Reset Button Temperature & Humidity sensor Infrared LEDS Microphone TF Card Status light Power port Speaker Warning: 10ft length cable is provided in package. If it is not long enough, please use extension cord (not included) to ensure the best performance of the camera, not the USB extension cable. -
Page 5: Product Instructions
III. Product Instructions 1.1 APP Download and Installation CloudEdge is available for both iOS and Android OS. Search the name 'CloudEdge'in App Store or Google Play, or scan the QR-Code to download the App. ·Support ipad Android Android OS Download App(IOS&Android) -
Page 6: App Permission Settings
1.2 APP Permission Settings Please turn on 2 permissions below when use this APP at the first time. Otherwise,add IP camera fails. (1) Allow“CloudEdge"APP to access mobile cellular data and wireless LAN, or it will be failed to add IP camera. (2) Allow“CloudEdge"APP to receive pushed message, or the cellphone will not receive alarm push when motion detection or audible alarm is triggered. -
Page 7: Accounts Registration
2. Accounts Registration Registration process Step 1: Open the App, click "Sign up now" to register. If you already have an account, click “Log in”. Step 2: Input a legal Email address and tick the privacy agreement. Then enter the nickname and password. Notes: 1) Please tick “Agree”... - Page 8 Before you start to pair the camera to the WiFi, please make sure your smart phone is in 2.4G WiFi Signal. If you can not see the 2.4G signal in the setting of the WLAN, you can turn it on from your router. All routers, no matter 5G or dual channel comes with 2.4G signal.
-
Page 9: Device Adding
3. Device Adding Step 1: Click "Add Device" or "+", and then select the corresponding camera icon to add. Step 2: Select the WiFi network and input the password, and then click "Next".Note : All routers, contains 5G router comes-with 2.4G signal as well, you just need choose the 2.4G signal during the configuration. - Page 10 Step 3: View the operation instructions of scanning, and then click “Next”. Scan the QR code in your phone with the camera and click “Next”, when the camera comes out the prompt tone. And you can complete the configuration about 30s. Step 4: When connecting, you should make sure your router, mobile, and camera are as close as possible.
- Page 11 Step 5: All done. You have added the camera successfully to your phone.Begin to monitor your home. Step 6: In live view interface, click " ", and then you can set up the camera common functions.
-
Page 12: Function Overview
4. Function Overview 1. Time Stamp 10. ON / OFF Motion Detection 2. Mute Button 11. Temperature and Humidity 3. Resolution Button 12. Setting Button 4. Full Screen 13. Return to Homepage 5. Network Speed 14. Lens Switch 6. Temperature and Humidity 15. -
Page 13: How To Store Recordings
5. How to Store Recordings 1. Stored By Manual Go to live video, manually record the video by clicking 'Record' button to start or end, existing the live view will automatically stop recording. 2. Memory Card The camera supports micro SD card(NOT INCLUDED), up to 128GB. 3. -
Page 14: Video Playback
6. Video Playback 1. Video Playback in SD Card 1. Go to the main interface, click"History-Alert"icon, you will see today's motion detected events. Tap any of these videos to playback. 2. Open the 'Calendar'to trace back and playback early recorded videos. 2.Video Playback in Cloud Go to the main interface, click"Cloud-Alert"icon, you will see today's motion detected events. -
Page 15: Camera Sharing
7. Camera Sharing If you need to view the camera with other family members or friends, you can use this device sharing function. Only the administrator whose account is bound with the camera for the first time can share and set the device. -
Page 16: Alarm Management
8. Alarm Management If you need crying detection,click “Alarm Management” and open “Crying Detection”... -
Page 17: Installation Instructions
IV. Installation Instructions Use the 2 large screws included in the box to fix the bracket to the position where you need to install it. Put the product directly on a clean and flat table. -
Page 18: Troubleshooting
V. Troubleshooting 1. APP can't be registered successfully ● Please check if the network of the mobile phone is normal; ● Please tick the software service agreement and privacy policy; ● Please check if the verification code is in the spam mail; ●... - Page 19 ● Connect the network cable to your computer firstly, then check the computer and obtain the IP address. If the IP address of the computer is setted by manual please go to the router and enable the DHCP server to obtain the IP address; ●...
- Page 20 5. Motion detection messages prompt frequently ● If motion detection sensitivity is too high, light changes also can cause alarm; ● Reduce sensitivity of alarms (recommended low level). 6. After inserting SD, it displays damaged ● Before inserting the SD card, Disconnect the power. Connect the power to start after plugging in the card;...
- Page 21 Sign in your router account, Rename your Wi-Fi with 2.4G and 5G respectively for easy distinction.(Do not use 5G preferred,2.4Ghz & 5Ghz will mix together if you open it, You don't know whether you have connected to 2.4Ghz Wi-Fi or 5Ghz Wi-Fi)
- Page 22 10. How to view camera on web browser? https://web.meari.com.cn/ Choose your location, input your account and password to view it from web browser.
-
Page 23: Notification Of Compliance
Notification of Compliance FCC Compliance Statement This device complies with Part 15 of the FCC Rules. Operation is subject to the following two conditions: (1) this device may not cause harmful interference, and (2) this device must accept any interference received, including interference that may cause undesired operation. - Page 24 SECURITY CAMERA Indoor After-sales E-Mail Services.us@auborshop.com...
Need help?
Do you have a question about the MY04 and is the answer not in the manual?
Questions and answers