Advertisement
Quick Links
50387_Wireless_BLE_Gateway
Overview
● Gateway provides data via MQTT to the cloud
● Each gateway supports up to 32 sensors that can be configured remotely via the
gateway and BAPI's WAM user interface
BAPI's gateway receives the data from one or more sensors and provides the
data to the cloud via MQTT using your local Wi-Fi connection. Sensors can be
configured remotely via the gateway and BAPI's WAM user interface.
The gateway sends a confirmation signal to each sensor upon a successful
reception. If the sensor doesn't receive this confirmation, then the sensor retains
the readings in its onboard memory and transmits them once communication is
re-established.
Note: A WAM subscription is necessary to view sensor data and adjust
sensor settings. See "WAM and the WAM Website" on pg 4.
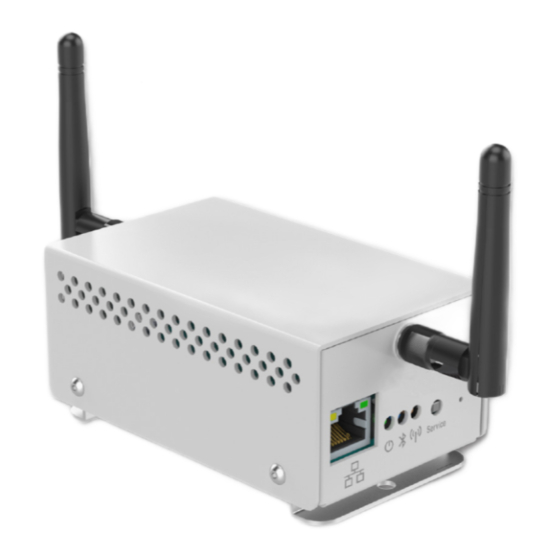
Powering Up and Connecting the Gateway
Power Up of the Gateway
Attach the provided antennas. Power the unit by inserting the
included Micro USB cable into the "Micro USB" power port or
by connecting a PoE-enabled cable to the PoE Port. Note: The
ethernet port does not have network capabilities at present but is
only used for PoE.
Upon power-up, the green "Power" LED will be blinking rapidly
(on and off about twice per second). This indicates that the
gateway is in SoftAP mode waiting for you to complete the
connection process. If the green "Power" LED is blinking slowly
(on for a second and off for a second), then the gateway will
need to be reset to SoftAP mode. See "Resetting the Gateway
to SoftAP Mode" on pg 3.
Connecting the Gateway
Use your phone, tablet or computer to follow the steps below.
1. With the gateway in SoftAP mode as described above, open
up the Wi-Fi settings on your mobile device or computer and
select "bapi_gateway" from the list of available networks
(Fig 2). If your device asks for a password or network security
key, enter "changebp".
2. Using the same device, open a web browser and enter
"10.10.0.1" into the address bar, not the search bar. The
gateway's list of available Wi-Fi Networks will come up (Fig 3).
3. Click on the desired Wi-Fi network from the "Scan List" and
enter the password for that network (Fig 4). Click Connect.
4. During the connection process, the various LEDs will blink
for 15 to 20 seconds. The connection is complete when the
green "Power" LED is blinking slowly (on for a second, off for
a second) and is the only LED on. You can now close your
web browser window. (Note: If the amber "Wi-Fi" LED doesn't
go out and continues to blink, the connection has failed. See
"Resetting the Gateway" on pg 3.)
Continued on next page...
Building Automation Products, Inc., 750 North Royal Avenue, Gays Mills, WI 54631 USA
Tel:+1-608-735-4800 • Fax+1-608-735-4804 • E-mail:sales@bapihvac.com • Web:www.bapihvac.com
Wireless Bluetooth Low Energy Gateway
Installation & Operating Instructions
Wireless Gateway and
included USB to Micro
Ethernet
Green
PoE
"Power"
"Bluetooth"
Port
LED
"Service" Button
Fig. 1: Gateway PoE Port and LEDs
Fig. 2: Gateway on
Wi-Fi Network
rev. 12/08/23
USB Cable
Blue
Amber
"Wi-Fi"
LED
LED
Fig. 3: Available
Wi-Fi Networks
Fig. 4: Wi-Fi Network
Password
1 of 5
Advertisement

Related Manuals for BAPI 50387


Summary of Contents for BAPI 50387
- Page 1 USB Cable gateway and BAPI’s WAM user interface BAPI’s gateway receives the data from one or more sensors and provides the data to the cloud via MQTT using your local Wi-Fi connection. Sensors can be configured remotely via the gateway and BAPI’s WAM user interface.
- Page 2 6. Reconnect your phone, tablet or computer to your original Wi-Fi or ethernet network and open the BAPI WAM website (https://wamstage.bapihvac.com). Enter the Username and Password for your WAM subscription. (A WAM subscription is required to view your sensor data.
-
Page 3: Led Operation
Gateway mounting NOTE ON ANTENNA: The unit must use the supplied antennas. Do not replace the antennas with other antennas. Using antennas other than the ones provided by BAPI may violate FCC regulations. LED Operation GREEN “POWER” LED Green Blue •... - Page 4 QR Code to WAM Login Page credentials. https://wamstage.bapihvac.com/ Fig. 12: BAPI WAM Website “Dashboard” screen showing multiple sensors and a sensor trend. Building Automation Products, Inc., 750 North Royal Avenue, Gays Mills, WI 54631 USA Tel:+1-608-735-4800 • Fax+1-608-735-4804 • E-mail:sales@bapihvac.com • Web:www.bapihvac.com...
-
Page 5: Specifications
Wireless Bluetooth Low Energy Gateway Installation & Operating Instructions 50387_Wireless_BLE_Gateway rev. 12/08/23 FOTA (Firmware Over The Air) Updating Any firmware updates for the gateway or sensors are downloaded through the WAM Website and installed directly to the gateway or sensors. See the WAM instruction documents for more information on how FOTA works. Diagnostics The LED Operation section describes the various statuses and issues that the gateway may be experiencing.
Need help?
Do you have a question about the 50387 and is the answer not in the manual?
Questions and answers