Table of Contents
Advertisement
Advertisement
Table of Contents

Related Manuals for Graphy Tera Harz Cure

Summary of Contents for Graphy Tera Harz Cure
- Page 1 Tera Harz Cure User Manual 1 / 25...
-
Page 2: Table Of Contents
Contents 0. General Information ∙∙∙∙∙∙∙∙∙∙∙∙∙∙∙∙∙∙∙∙∙∙∙∙∙∙∙∙∙∙∙∙∙∙∙∙∙∙∙∙∙∙∙∙∙∙∙∙∙∙∙∙∙∙∙∙∙∙∙∙∙∙ 3 - Greetings - Sign 1. Product Information ∙∙∙∙∙∙∙∙∙∙∙∙∙∙∙∙∙∙∙∙∙∙∙∙∙∙∙∙∙∙∙∙∙∙∙∙∙∙∙∙∙∙∙∙∙∙∙∙∙∙∙∙∙∙∙∙∙∙∙∙∙∙ 4 2. Parts Name ∙∙∙∙∙∙∙∙∙∙∙∙∙∙∙∙∙∙∙∙∙∙∙∙∙∙∙∙∙∙∙∙∙∙∙∙∙∙∙∙∙∙∙∙∙∙∙∙∙∙∙∙∙∙∙∙∙∙∙∙∙∙ 5 3. Basic Specification ∙∙∙∙∙∙∙∙∙∙∙∙∙∙∙∙∙∙∙∙∙∙∙∙∙∙∙∙∙∙∙∙∙∙∙∙∙∙∙∙∙∙∙∙∙∙∙∙∙∙∙∙∙∙∙∙∙∙∙∙∙∙ 7 4. Installation ∙∙∙∙∙∙∙∙∙∙∙∙∙∙∙∙∙∙∙∙∙∙∙∙∙∙∙∙∙∙∙∙∙∙∙∙∙∙∙∙∙∙∙∙∙∙∙∙∙∙∙∙∙∙∙∙∙∙∙∙∙∙ 8 - Component List - Unpacking and Installing components - Product Installation 5. -
Page 3: General Information
0. General Information □ Greetings Thank you for purchasing Graphy's Tera Harz Cure device. This device is to make the output printed using a 3D printer into a fully cured state. Improper use or handling can cause hazards and damage. Therefore, please read the user manual carefully and follow it. Always keep the instruction manual within easy reach, and follow the safety instructions to prevent personal injury and property damage. -
Page 4: Product Information
1. Product Information Tera Harz Cure is a product made to completely cure the output printed from a 3D printer using UV LED. It is designed to minimize the variation of light quantity over a wide area by optimizing the arrangement of UV LED irradiated on the curing surface, and it can be effectively cured with high light quantity. -
Page 5: Parts Name
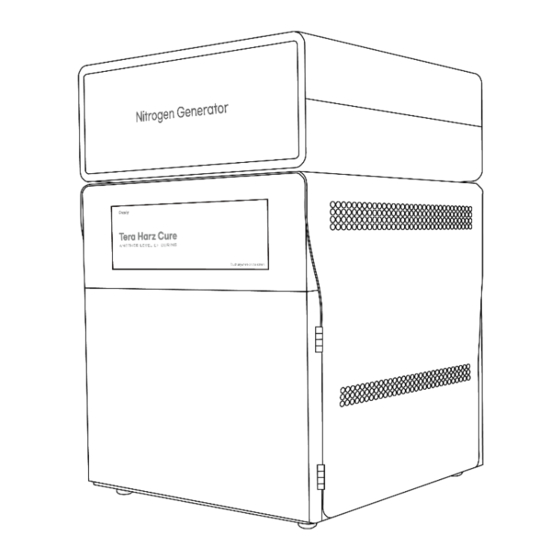
2. Parts Name (Without Nitrogen Generator) 5 / 25... - Page 6 (With Nitrogen Generator) 6 / 25...
-
Page 7: Basic Specification
3. Basic Specification □ Tera Harz Cure Properties Description Input Voltage 100-240VAC, 50/60Hz Output Voltage 24V, 12.5A Screen 7.9” TFT Touch LCD Light Source UV LED LED Wavelength 405nm LED power 200W LED Energy Density(Max) (*) 280,000mJ/㎠ Irradiance of UV Light(Max) (*) 1,000mW/㎠... -
Page 8: Installation
4. Installation □ Component List (* mark : 2ea) < Components of Tera Harz Cure with Nitrogen Generator > < Components of Tera Harz Cure without Nitrogen Generator > 8 / 25... -
Page 9: Unpacking And Installing Components
(41x37x60cm) (*) There is a shape that can be used as a handle on the Tera Harz Cure box. When lifting the Tera Harz Cure from the outer box, insert your hand through the gap in the shape and take it out of the box so that you can easily take the product out. -
Page 10: Product Installation
□ Product Installation 1) Avoid installing the product in an environment that may affect the operation of the product, such as humidity, high heat, dust, wet places, and uneven floors. 2) Keep the product 10 cm away from the wall for effective cooling of the internal temperature. (Side and rear) 3) Connect the power cable that meets the local standard to the rear of the product.. - Page 11 Place the Nitrogen Generator on top of the Attach the Hose Module as shown in the picture. Tera Harz Cure and attach the Fix Bracket.. Push it all the way in to prevent air leakage. Connect the air line after assembling the air...
- Page 12 Caution In order to satisfy the nitrogen conditions generated by the Nitrogen Generator, the air compressor must satisfy the following conditions. Pressure : 7kgf/cm (0.7Mpa) or more, Recommended : 8kgf/cm or more Flow rate : 100L/min or more If the air flowing into the nitrogen generator does not receive sufficient pressure, it will not proceed when selecting Nitrogen curing.
-
Page 13: User Interface
5. User Interface □ Boot Screen After connecting the power cable to the back of the equipment and turning on the switch, wait until the booting is finished as it takes about 20 seconds to boot. After booting, the screen below will appear as a video.. -
Page 14: Progress Screen
(d) : Curing time is displayed in minutes. (e) : Curing time in (d) can be adjusted in units of 1 minute by pressing the arrow icons. (f) : Curing time is displayed in seconds. (g) : Curing time in (f) can be adjusted in units of 5 second by pressing the arrow icons. (h) : Curing level is displayed (1~5) (i) : Curing level in (h) can be selected by pressing the arrow icons. - Page 15 (h) : Displays Upper LED board temperature. (i) : Displays Right LED board temperature. ( j) : Displays Curing chamber temperature. Caution Each temperature is the result of reading the position where the temperature sensor is embedded, not the maximum temperature of the corresponding part. The displayed temperature has an offset value proportional to the maximum temperature of each part, and is used to protect the equipment.
-
Page 16: Operation And Curing
6. Operation and Curing □ Normal Curing (without using a nitrogen generator) Example) 8 aligners placement Open the door and put the curing object on the tray plate and put it into the equipment.. Caution When placing it on the equipment, the protrusions and the grooves of the inner plate must be aligned so that slippage does not occur during rotation at curing. - Page 17 Main page : Start curing by selecting the saved mode from the above screen or by selecting minutes, seconds, LEVEL, and nitrogen curing. Caution When performing normal curing, make sure that the nitrogen curing option is disabled. (Curing does not proceed when nitrogen curing is selected) Progress Page : After checking that the time, level, and nitrogen curing set on the curing progress screen are correct, wait until the curing machine is finished.
-
Page 18: Nitrogen Curing
Caution If you want to proceed with the next curing immediately after curing is finished, the internal temperature is high and the curing conditions may change slightly. Use it after having enough cool-time or cooling the inside for a while using an air gun. Caution After curing is complete, clean the tray plate before use. -
Page 19: Intro Video Update
7. Intro video update (add-on) Tera Harz Cure standby screen image (intro video) can be changed according to the user's preference. In order to update the intro video, the Updater S/W provided by Graphy Co., Ltd. must be installed. Caution The resolution of the intro video (avi) must be 1280x400 for normal upload. - Page 20 5) At Properties, double-click Internet Protocol Version 4 (TCP/IPv4) to run it, and change it to Use the following IP address (S). Enter 192.168.0.10 in the IP address and press Tab to automatically enter the value in the subnet mask.. Caution If the currently assigned IP address (IP address in use) is 192.168.0.10, it does not matter if you enter a number other than 10, and it is okay if the last digit is not '100'.
- Page 21 When Connection Check 1 is performed in Graphy Update Tools, if 'Product Connection Success' appears after checking the connection as in No. 2, it means that the connection was successful. Specify the location of the video to be uploaded in Video change, click upload below to complete the upload, and reboot the device to confirm.
-
Page 22: Precautions For Use
8. Precautions for use □ Compliance with equipment use Warning If you hold the cured object or tray plate right after curing, you may get burned or other injury to your hands due to the hot temperature during curing, so be sure to cool it sufficiently or wear gloves before taking out the cured object. -
Page 23: Safety Instructions
□ Safety Instructions Danger As this product uses electricity, be sure to attach the power cord with dry hands, and do not use a damaged power cord. If there is vibration when the power cord is plugged in, or if there are other strange sounds or smells, turn off the power and check. -
Page 24: Maintenance
9. Maintenance □ Tera Harz Cure 1) For consistent curing quality, please remove foreign substances inside the chamber. 2) When not using the equipment, please turn off the power for the life of the LCD. 3) Be careful not to get foreign substances on the oxygen sensor inside the chamber. -
Page 25: Notification Message
10. Notification Message If the replacement cycle is reached according to the recommended LED usage time, the above alarm will be displayed, so please contact the C/S team to replace the LED. It is an alarm that the temperature of the inside & LED Board is high and is being cooled to lower the temperature.
Need help?
Do you have a question about the Tera Harz Cure and is the answer not in the manual?
Questions and answers