Advertisement
Quick Links
Advertisement

Summary of Contents for DiFluid Omni
- Page 1 DiFluid Omni User Manual 简体中文 日本語 English...
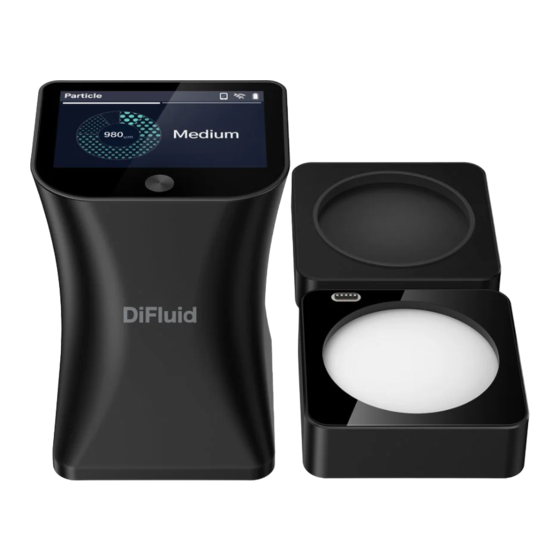
- Page 2 1. Know Your Omni Omni Main Unit Touchscreen Buttons (Power / Test / Calibration)
- Page 3 Particle Analysis Tray Roast Analysis Tray Magnetic Connector USB-C Charging Port Deeper side for coffee beans Reverse Tray Shallower side for coffee ground...
-
Page 4: Product Parameters
2. Product Parameters Specs Name Professional Roast / Particle Analyzer (2-in-1) Model DFT-SD101 Dimensions (Main Unit) 109*79*72mm(L*W*H) Weight (Main Unit) 290g Screen 2.8-inch HD touchscreen Battery 2500mAh rechargeable lithium battery Light Source (Roast Analysis) Multi-band NIR light source (850nm, 940nm) Optical Sensor Two-dimensional imaging sensor Data Records... -
Page 5: Preparation Before Use
Scraper *1 Test Report *1 Calibration Plate *1 Coffee Ground Spoon *1 Manual (including warranty card)*1 USB-C Charging Cable *1 Velvet Bag *1 3. Preparation Before Use APP Download Scan the QR code below to download the DiFluid Café App. - Page 6 Charging and Icons Please ensure that the battery is fully charged. Attach the Omni Main Unit to the Charging: Particle Analysis Tray and connect the included charging cable to the USB-C port of the side of the Particle Analysis Tray for charging.
-
Page 7: Basic Operation
Icon WIFI Bluetooth and Fully Bluetooth Description Charging connected WiFi connected charged connected 4. Basic Operation Operate with Button Power-off State Press the button once to start the device. When the screen displays "READY", the device has finished booting up. Power-on State Short click: Perform the test. - Page 8 2. Particle: Perform particle analysis. 3. Calibration: Perform the calibration. 4. Settings: Access more settings for Omni. Swipe left to access the analysis history page 1. View Roast Analysis History: Swipe left from the Home Page to view the last roast analysis result, and swipe down to access all roast analysis history.
-
Page 9: Function Operation
5. Function operation Test There are three methods to start the test 1. Click the button: In smart test mode, the system will automatically determine whether to perform roast analysis or particle analysis. 2. Tap the screen on the Home Page: In smart test mode, the system will automatically determine whether to perform roast analysis or particle analysis. - Page 10 Particle Analysis 1. Recommended Procedure 1) Use a coffee ground spoon to scoop an appropriate amount of ground coffee into the center area of the particle analysis tray. 2) Click to power up, put the main unit over the particle analysis tray. Make sure the meganetic ports are connected.
- Page 11 The screen will display 'Success' after After completion.(See page 15 for more details) Test Each Omni has its unique calibration plate. If you lost the original calibration plate, you could contact our online store to purchase a new one. Settings On the menu screen, click the <Settings>...
- Page 12 Roast Analysis Operation Diagram coffee beans coffee ground Use a roast analysis tray and a tray. Fill the beans Click to power up, put the main unit over the into deeper side while the coffee ground into roast analysis tray. shallower side.
- Page 13 Roast Analysis Result Page (COMMON) Sample Type Roast The current sample being tested is coffee beans or coffee grounds. Roast Analysis Standard Full The roast degree standard is used for the current result. 43.9 City Roast Degree Agtron The roast degree of the currently highlighted part of the pie chart.
- Page 14 Particle Analysis Operation Diagram coffee grounds coffee ground spoon Click to power up, put the main unit over the particle Use a coffee ground spoon to scoop an appropriate analysis tray. Make sure the meganetic ports are amount of ground coffee into the center area of the particle analysis tray.
- Page 15 Particle Analysis Result Page Particle (ISO) Particle Analysis Standard The particle analysis standard is used for the current result. Grind Size The grind size of the currently highlighted part Medium of the pie chart. Ratio μm Ratio:58% The ratio of the highlighted part of the pie chart. Counts:174 Counts The total counts of particles in this round of...
- Page 16 Calibration Operation Diagram 45.3 45.3 Agtron Agtron Click to power up, put the main unit over the Take off the protective cover. calibration plate. Success Success Roast Particle Calibration Settings Start > Exit > Again > Exit > Swipe from left to right on READY page to enter the menu page. Click on the 'Calibration' button or start calibration by short click and then long click the button.
-
Page 17: Standards Specifications
7. Standards Specifications Summary of Roast Analysis Standards AGTRON Values COMMON Very Dark 0 ≤ AGTRON ≤ 30 Espresso Roast 30 < AGTRON ≤ 40 Dark French Roast 40 < AGTRON ≤ 50 Medium-Dark Full City Roast 50 < AGTRON ≤ 60 City Roast Medium 60 <... - Page 18 Summary of Particle Analysis Standards American Society for International Standard American Sieve Society Testing and Materials ISO Sieve pore Sieve specification size (μm) Sieve Specifications 1180 1400 1700 2360...
- Page 19 Grind Size Standard Particle Size (μm) Grind Size 100 ≤ Particle Size < 500 Fine Medium Fine 500 ≤ Particle Size < 800 800 ≤ Particle Siz < 1100 Medium Medium Coarse 1100 ≤ Particle Siz < 1400 Coarse 1400 ≤ Particle Size ≤ 2500...
- Page 20 1. 认识部件 Omni 主机 触控屏 按键(开关 / 检测 / 标定)...
- Page 21 色度盘 粒径盘 磁吸接口 USB-C 充电接口 深凹槽 反面 装咖啡豆 托盘 浅凹槽 装咖啡粉...
- Page 22 2. 规格说明 参数 产品名称 专业级烘焙色度 / 粒径分析仪(二合一) 型号 DFT - SD101 尺寸(主机) 109*79*72mm(长 * 宽 * 高) 重量(主机) 290g(主机机身) 屏幕 2.8 寸高清触控屏 电池 2500mAh 可充电锂电池 光源(烘焙分析) 多波段近红外光源(850nm、940nm) 光学传感器 二维成像传感器 数据记录 烘焙 500 条 / 粒径 500 条 工作温度 0-45℃ 充电接口 USB-C 充电参数...
- Page 23 豆勺 *1 钢化膜 *1 色度盘 *1 粉刷 *1 工具箱 *1 托盘 *1 刮尺 *1 合格证 *1 色值标定卡 *1 微量粉勺 *1 检测报告 *1 USB-C 充电线 *1 绒布袋 *1 说明书 ( 含保修卡 )*1 3. 使用前准备 App 下载 扫描下方二维码 ,即可下载 DiFluid Café 应用程序。...
- Page 24 充电与图标 充电:将 Omni 主机与粒径盘扣合,并使用附带的充电线连接粒径盘侧面的 USB-C 接 口进行充电。 Omni 主机与粒径盘的磁吸对齐扣合 将充电线插入粒径盘充电接口 ! 注意:如果您在充电过程中开机,机器会先出现“DiFluid”页面 , 再进入充电状 态页面,需要再次短按按键,才能进入“READY”页面。...
- Page 25 图标 说明 充满电 充电中 蓝牙已连接 WIFI 已连接 蓝牙和 WIFI 已连接 4. 基础操作 按键操作 关机状态下 短按按键:启动设备,当屏幕显示 "READY" 时表示开机完成。 开机状态下 短按按键:进行检测操作。 短按、再长按按键:进行色卡校准。 快速双击按键:查看设备信息。 长按按键:屏幕将显示 " 关机 ",松开按键即可完成关机操作。 触屏操作...
- Page 26 烘焙 43.9 右划 左划 左划 占比:58% μm Agtron 颗粒数:174 色卡校准 参数设置 占比:34% 左页面 首页 右一页 右二页 菜单设置 轻触屏幕,启动检测 上一次烘焙度分析结果 上一次粒径分析结果 往右滑动,出现菜单页面 1. 烘焙分析:进行烘焙分析操作。 2. 粒径分析:进行粒径分析操作。 3. 色卡校准:对色度值进行校准操作。 4. 参数设置:访问更多的 Omni 设置。 往左滑动,出现历史记录页面 1. 查看烘焙历史记录:从主界面上向左滑动可查看上一次的历史记录,向下滑动可查 看全部历史记录。 2. 查看粒径历史记录:从主界面上向左滑动两次可查看上一次的历史记录,向下滑动 可查看全部历史记录。 主界面直接轻触,进行检测分析 在子页面,往右滑动,返回上一级页面...
- Page 27 5. 功能操作 检测操作 触发检测方法 1. 短按按键:智能检测模式,系统自动判断进行烘焙分析或粒径分析。 2. 在主界面轻触屏幕:智能检测模式,系统自动判断进行烘焙分析或粒径分析。 3. 菜单页面轻触 < 烘焙分析 > 或 < 粒径分析 > 选项:系统会直接执行相应的分析。 烘焙分析 1. 操作方法 1)使用色度盘和托盘,色度盘浅凹槽部分放咖啡粉,深凹槽部分放咖啡豆。注意需要 使用刮尺使其与色度盘表面平齐。 2)短按按键,设备开机;再将主机和色度盘扣合。 3)在 READY 页面从左向右滑动,进入菜单页面;随后点击烘焙分析,进行检测;触控 屏显示检测结果,可下滑查看更多细节。(详细第 29 页。) 2. 结果页面(详见第 30 页) 3. 注意事项 1)光源:烘焙色度分析使用近红外光源(850nm、940nm)进行探测分析。白光则用 于智能检测判断和银皮检测等辅助功能。 2)银皮检测:您可以在设置中选择是否开启咖啡豆粉的银皮检测功能,并进行灵敏度 设置。...
- Page 28 粒径分析 1. 操作方法 1)使用微量勺舀取适量咖啡粉放入粒径盘的中心区域。 2)短按按键,设备开机;再将主机连接到粒径盘上,确保粒径盘和主机的磁吸接口正 确连接。 3)在 READY 页面从左向右滑动,进入菜单页面;随后点击粒径分析,进行检测;触控 屏显示检测结果,可下滑查看更多细节。(详细第 31 页。) 2. 结果页面(详见第 32 页) 3. 注意事项 1)取粉量如多于一勺的情况下 , 对于较细的颗粒分析可能造成影响。 2)智能震粉模式功能开启后 , 可以自动根据当前颗粒分布情况进行震粉。在颗粒均匀 分布的情况下,不会再进行震粉。 3)检测过程中 , 粒径盘会在震粉时发出蜂鸣声 , 属于正常现象。 4. 取样建议 1) 对于粗研磨度 , 请取三分之二勺微量粉。 2) 对于细研磨度 , 请控制在三分之一勺微量粉。 3) 如果无法判断研磨度...
- Page 29 3)在 READY 页面从左向右滑动 , 进入菜单页面 ; 随后点击色卡校准 , 进入标定页面或 通过短按再长按按键进入标定页面 , 点击启动进行色卡标定 , 当屏幕显示成功即完成 标定。(详细第 33 页。) 注意事项 色值标定卡和设备之间是一对一绑定的关系。如果不慎丢失了色值标定卡,请联系官方 旗舰店再次购买色值标定卡进行绑定。 参数设置 菜单界面下,点击 < 参数设置 > 选项,进入设置页面 1. 烘焙分析参数:可以设置更多 Omni 烘焙分析的参数。 2. 粒径分析参数:可以设置更多 Omni 粒径分析的参数。 3. 通用:设备通用设置如语言和屏幕亮度。 4. 设备信息:可以查看更多 Omni 产品信息。 5. 恢复出厂模式:长按屏幕,等待进度条指示完成填充,即可完成出厂设置(请注意: 此操作将清空历史记录并恢复参数为出厂默认设置状态。)...
- Page 30 烘焙分析操作示意图 咖啡豆 咖啡粉 使用色度盘和托盘,色度盘浅凹槽部分放咖啡 短按按键,设备开机,再将主机和色度盘扣合。 粉,深凹槽部分放咖啡豆。注意需要使用刮尺 使其与色度盘表面平齐。 烘培分析 (COMMON) 检测中 检测中 深城市 烘焙分析 粒径分析 烘焙 43.9 Agtron 色卡校准 参数设置 占比:34% 在 READY 页面从左向右滑动,进入菜单页面;随后点击烘焙分析,进行检测;触控屏显示检测结果, 可下滑查看更多细节。...
- Page 31 烘焙分析结果页面 烘培分析 (COMMON) 样品类型 当前被测样品为咖啡豆或咖啡粉。 深城市 烘焙分析标准 当前结果页面烘焙度使用的标准。 烘焙 43.9 烘焙度 当前饼图高亮部分的烘焙度。 Agtron 占比:34% 比例 当前饼图高亮部分的烘焙度占全部 样品的比例。 43.9 16.2 均值 均值 标准差 烘焙度平均值,反映整体烘焙度。 标准差 烘焙度标准差,反映烘焙均匀度, 数值越小越均匀。 分布详情 样品烘焙度的详细分布柱状图,以 均值为中心展现。 历史数据 查看全部烘焙分析结果历史记录。 历史数据...
- Page 32 粒径分析操作示意图 咖啡粉 微量粉勺 使用微量勺舀取适量咖啡粉放入粒径盘的中心 短按按键,设备开机;再将主机连接到粒径盘 区域。 上,确保粒径盘和主机的磁吸接口正确连接。 (ISO) 粒径分析 中 检测中 检测中 烘焙分析 粒径分析 占比:58% μm 颗粒数:174 色卡校准 参数设置 在 READY 页面从左向右滑动,进入菜单页面;随后点击粒径分析,进行检测;触控屏显示检测结果, 可下滑查看更多细节。...
- Page 33 粒径分析结果页面 粒径分析 (ISO) 粒径分析标准 当前结果页面粒径分类使用的标准。 中 研磨度 当前饼图高亮部分的研磨度。 比例 当前饼图高亮部分的研磨度占全部样 占比:58% μm 品的比例。 颗粒数:174 颗粒数 本轮检测中总颗粒数。 273.8 标准差 粒径中位数,反映集中趋势。 μm 标准差 粒径标准差,反映颗粒大小均匀度, 数值越小越均匀。 分布详情 样品粒径大小的详细分布图,根据所 选粒径分析标准展示。 历史记录 查看全部粒径分析结果历史记录。 历史数据...
- Page 34 色卡校准操作示意图 45.3 45.3 Agtron Agtron 取下色值标定卡保护盖。 短按按键,设备开机;再将主机和色值标定卡 扣合。 成功 成功 烘焙分析 粒径分析 色卡校准 启动 退出 再来一次 退出 参数设置 在 READY 页面从左向右滑动 , 进入菜单页面;随后点击色卡校准,进入标定页面或通过短按再长按按 键进入标定页面 , 点击启动进行色卡标定 , 当屏幕显示成功即完成标定。...
- Page 35 7. 烘焙和粒径标准规范 烘焙标准汇总 AGTRON 数值 COMMON 0 ≤ AGTRON ≤ 30 意式烘焙 非常深 30 < AGTRON ≤ 40 法式烘焙 深色 40 < AGTRON ≤ 50 深城市烘焙 中深 50 < AGTRON ≤ 60 城市烘焙 中等 60 < AGTRON ≤ 70 深度烘焙 中浅...
- Page 36 粒径标准汇总 国际标准 IS0 美国材料实验协会 美国筛网协会 筛网孔径 (μm) 筛网规格(ASTM) 筛网规格( TYLER) 1180 1400 1700 2360...
- Page 37 研磨度标准 粒径大小 (μm) 研磨度 100 ≤直径< 500 细 500 ≤直径< 800 中细 800 ≤直径< 1100 中 1100 ≤直径< 1400 中粗 1400 ≤直径≤ 2500 粗...
- Page 38 1. 各部の名称 Omni 本体 タッチパネル ポタン (電源 / 測定 / 校正)...
- Page 39 粒度トレイ 焙煎度合いトレイ 磁石付き接続ポート USB-C 充電ポート 深いくぼみにコーヒー 反面 豆を詰める トレイ 浅いくぼみに挽いた コーヒー粉を詰める...
- Page 40 2. 製品規格 仕様 製品名 プロ級 焙煎度合い / 粒度分析機器 (2-in-1) 型番 DFT - SD101 寸法(本体) 109*79*72mm( 長さ * 幅 * 高さ ) 重さ(本体) 290g 液晶画面 2.8 インチ高解像度タッチスクリーン バッテリー 2500mAh 充電式リチウム電池 光源(焙煎度合い分析) 多波長近赤外線光源(850nm, 940nm) 光学センサー 2D CMOS イメージングセンサー データ記録 焙煎度合い 500 件 / 粒度 500 件 動作温度範囲...
- Page 41 Omni 本体 *1 粒度トレイ *1 コーヒー豆スプーン *1 保護フィルム *1 焙煎度合いトレイ *1 ブラシ *1 道具箱 *1 トレイ *1 スクレーパー *1 検査報告書 *1 校正用色カード *1 微量粉スプーン *1 取り扱い説明書 ( 保証カード )*1 USB-C 充電ケーブル *1 収納袋 *1 3. 使用する前の準備 アプリのダウンロード 下の左側の QR コードをスキャンすると、DiFluid Café アプリをダウンロードできます。...
- Page 42 充電方法 & アイオンの説明 充電: バッテリーが十分に充電されていることを確認してください。電池残量が少ない場合は、 Omni 本体を粒度トレイにセットして、付属の充電ケーブルを粒度トレイ側面の USB-C 充電ポートに接続して充電してください。 Omni 本体と粒度トレイの磁気吸着を合わせ 充電ケーブルを粒度トレイの充電ポート てセットしてください。 に接続してください。 ! ご注意:充電中に電源を入れた場合、画面が最初に「DiFluid」と表示され、その後充電状態 の表示画面に入ります。再びボタンを短押してから、「READY」の画面に入ることができます。...
- Page 43 アイコン ブルートゥース 説明 ブルートゥースと WIFI 接続済み 満充電 充電中 接続済み WIFI 接続済み 4. 基本操作 ボタンの操作 電源オフの状態 短押し:電源をオンにします。画面に "READY" と表示されます。 電源オンの状態 1回短押し:測定を開始します。 短押してから長押し:色カードで校正の画面に入ります。 速く2回押し:デバイスの情報を確認します。 1回長押し:液晶画面に 「電源オフ」 と表示され、 ボタンから手を離すと、 電源オフになります。 タッチパネルの操作...
- Page 44 フルシティ 43.9 右にス 左にス 左にス 比率:58% μm Agtron 校正 設定 粒子数:174 ワイプ ワイプ ワイプ 比率:34% 左の画面 ホーム画面 右の画面① 右の画面② メニュー設定 軽く画面をタッチし 前回の焙煎度合い 前回の粒度分析結果 て、測定を開始します。 分析結果 ホーム画面で右にスワイプした時、メニュー画面が表示されます。 1、焙煎:焙煎度合い分析の操作を行います。 2、粒度:粒度分析の操作を行います。 3、校正:焙煎度合いの値に対し、校正の操作をします。 4、設定:さらに Omni の設定項目にアクセスします。 ホーム画面で左にスワイプした時、履歴データが表示されます。 1、焙煎の履歴データ:ホーム画面で左に1回スワイプすると、前回の履歴が確認できます。もっ と下にスワイプすると、すべての履歴が確認できます。 2、粒度の履歴データ:ホーム画面で左に2回スワイプすると、前回の履歴が確認できます。もっ と下にスワイプすると、すべての履歴が確認できます。 直接ホーム画面を軽くタッチして、測定が開始されます。 ホーム画面のほかの画面では、右にスワイプすることで、前のページに 戻れます。...
- Page 45 2、ホーム画面でタッチパネルを軽くタッチする:(スマート測定モード)デバイスが自動的に 焙煎度合い分析か粒度分析かを判断し、測定を開始します。 3、メニュー画面で、「焙煎」または「粒度」を軽くタッチすると、デバイスが 指定の分析を直 接開始します。 焙煎度合い分析 1、操作の方法 1)焙煎度合いトレイとトレイを使って、焙煎度合いトレイの浅いくぼみにコーヒー粉を入れ、深 いくぼみにコーヒー豆を入れます。スクレーパーを使用して、豆や粉を焙煎度合いトレイの表 面と平らに均してください。 2)ボタンを短押しして電源を入れて、Omni 本体と粒度トレイの磁気吸着を合わせてセットします。 3)READY 画面で左から右にスワイプして、メニュー画面に進みます。< 焙煎 > をタップして測定 を行い、タッチパネルには測定結果が表示されます。結果表示画面で 下にスワイプして詳細情 報を表示できます。(詳細は第 47 ページをご参照ください。) 2、結果表示の画面(詳細は第 48 ページをご参照ください。) 3、取り扱い上の注意 1) 光源:焙煎度合い分析には近赤外線光源 (850nm、940nm) を使用して測定と分析を行います。 一方、白色光はスマート測定判断やシルバースキン ( 銀皮 ) 計測などの補助機能に用いられます。 2)シルバースキン ( 銀皮 ) 計測:「設定」でコーヒー豆と粉のシルバースキン計測機能のオンオ...
- Page 46 粒度分析 1、操作の方法 1)微量粉スプーンを使って、適量なコーヒー粉を取り、粒度トレイの中心部に置きます。 2)ボタンを短押しして電源を入れます。Omni 本体を粒度トレイに接続し、本体と粒度トレイの 磁気接続が正しく合っていることを確認してください。 3)READY 画面で左から右にスワイプして、メニュー画面に進みます。< 粒度 > をタップして測定 を行い、タッチパネルには測定結果が表示されます。結果表示画面で下にスワイプして詳細情 報を表示できます。(詳細は第 49 ページをご参照ください。) 2、結果表示の画面(詳細は第 50 ページをご参照ください。) 3. 取り扱い上の注意 1) 粉の取り量がスプーンの 1 杯分以上の場合、 細かい粒子の分析に影響を及ぼす可能性があます。 2)スマート粉振動モードがオンにすると、現在の粒子分布状況に基づいて自動的に粉振動が行 われます。粒子が均等に分布している場合、粉振動は行われません。 3) 測定中に、 粒度トレイが振動する際にブザー音が鳴ることがありますが、 これは正常な現象です。 4、サンプル 1) 粗挽きの場合、微量粉スプーンの 3 分の 2 のサンプルを取ってください。 2) 細挽きの場合、微量粉スプーンの 3 分の 1 のサンプルを取ってください。...
- Page 47 2)短押しして電源を入れます。校正用色カードと本体をセットします。 3)READY 画面で左から右にスワイプして、メニュー画面に進みます。< 校正 > をタップして、ま たは任意の画面で、短押ししてから長押しして、校正の画面に入ります。< スタート > をタッ プして校正を開始します。液晶画面に成功が表示されたら、校正完了です。(詳細は第 51 ペ ージをご参照ください。) 取り扱い上の注意 校正用色カードと機器は 1 対 1 の関係で結び付けられています。もし校正用色カードをなくなっ た場合は、お買い上げ店または弊社にお問い合わせいただき、再度校正用色カードを購入して結 び付けてください。 仕様の設定 メニュー画面で、< 設定 > クリックし、設定の画面に入ります。 1、焙煎度合いの設定値:より多くの Omni 焙煎度合い分析に関する設定値を設定できます。 2、粒度分析の設定値:より多くの Omni 粒度分析に関する設定値を設定できます。 3、一般設定:言語、画面の明るさなどを設定できます。 4、デ バイス情報:Omni に関する情報がもっと確認できます。 5、工場出荷時設定に戻す:タッチパネルを長押しし、進捗バーが完了するのを待ってください。 これで出荷時設定に戻ります(注意:この操作により、履歴が消去され、設定値が工場出荷時 のデフォルト設定に戻ります)。...
- Page 48 焙煎度合い分析 操作イメージ図 コーヒー豆 コーヒー粉 焙煎度合いトレイとトレイを使って、焙煎度合いトレイ ボタンを短押しして電源を入れて、Omni 本体と焙 の浅いくぼみにコーヒー粉を入れ、深いくぼみにコーヒ 煎度合いトレイを合わせてセットします。 ー豆を入れます。スクレーパーを使用して、豆や粉を焙 煎度合いトレイの表面と平らに均してください。 焙煎 (COMMON) 測定中 測定中 焙煎 粒度 フルシティ 43.9 Agtron 設定 色卡校准 比率:34% READY 画面で左から右にスワイプして、メニュー画面に進みます。< 焙煎 > をタップして測定を行い、タ ッチパネルには測定結果が表示されます。結果表示画面で下にスワイプして詳細情報を表示できます。...
- Page 49 焙煎度合い分析の結果画面 焙煎 (COMMON) サンプルのタイプ サンプルがコーヒー豆または粉。 焙煎度合いの分析基準 現在の結果画面で使用されている焙煎 フルシティ 度の基準。 焙煎度 43.9 現在の円グラフでハイライトされてい る部分の焙煎度です。 Agtron :34% 比率 比率 現在の円グラフでハイライトされてい る部分の挽き目が、全体のサンプルに 占める割合です。 16.2 43.9 平均値 平均値 標準偏差 焙煎度平均値は、全体の焙煎度を反映してい ます。 標準偏差 焙煎度の標準偏差、焙煎の均一性を反 映し、値が小さいほど均一です。 分布詳細 サンプルの粒子サイズの詳細な分布図 を、選択した粒度分析基準に基づいて 表示します。 履歴データ すべての焙煎度合いの分析結果の履歴 を確認します。 履歴データ...
- Page 50 粒度分析 操作イメージ図 コーヒー粉 微量粉スプーン 微量粉スプーンを使って、適量なコーヒー粉を取 ボタンを短押しして電源を入れます。0mni 本体を粒 り、粒度トレイの中心部に置きます。 度トレイに接続し、本体と粒度トレイの磁気接続が 正しく合っていることを確認してください。 粒度 (ISO) 中 測定中 測定中 焙煎 粒度 比率:58% μm 校正 粒子数:174 参数设置 READY 画面で左から右にスワイプして、メニュー画面に進みます。< 粒度 > をタップして測定を行い、タ ッチパネルには測定結果が表示されます。結果表示画面で下にスワイプして詳細情報を表示できます。...
- Page 51 粒度分析の結果画面 粒度 (ISO) 粒度の分析基準 現在の結果画面で使用されている粒度分類の基準。 挽き目 中 現在の円グラフでハイライトされている部分の 挽き目です。 比率 比率:58% 現在の円グラフでハイライトされている部分の μm 挽き目が、全体のサンプルに占める割合です。 粒子数:174 粒子数 現在測定対象となるサンプルの総粒子数。 273.8 粒子径の中央値は、大まかな平均傾向を反映し 標準偏差 ています。 μm 標準偏差 粒度の標準偏差、粒子のサイズの均一性を反映 し、値が小さいほど均一です。 分布詳細 サンプルの粒子サイズの詳細な分布図を、選択 した粒度分析基準に基づいて表示します。 履歴データ すべての粒度分析結果の履歴を確認します。 履歴データ...
- Page 52 色カードで校正 操作イメージ図 45.3 45.3 Agtron Agtron カードのカバーを取り外します。 短押しして電源を入れます。校正用色カードと 本体をセットします。 成功 成功 焙煎 粒度 校正 設定 校正 戻す 再校正 戻す READY 画面で左から右にスワイプして、 メニュー画面に進みます。 < 校正 > をタップして、 または任意の画面で、 短押ししてから長押しして、校正の画面に入ります。< スタート > をタップして校正を開始します。液晶画面 に成功が表示されたら、校正完了です。...
- Page 53 7. 焙煎と粒度の基準規格 焙煎度合い 標準のまとめ アグトロン値 COMMON イタリアンロースト 0 ≤アグトロ≤ 30 もっとも深煎り (深煎り) フレンチロースト 30 <アグトロ≤ 40 深煎り (深煎り) フルシティロースト 40 <アグトロ≤ 50 中深煎り (中深煎り) シティロースト 50 <アグトロ≤ 60 中煎り (中煎り) ハイロースト 60 <アグトロ≤ 70 中浅煎り ( 中浅煎り ) ミディアムロスト 70 <アグトロ≤ 80 浅煎り...
- Page 54 粒度標準のまとめ 国際規格 ISO アメリカ材料試験協会 アメリカふるいメッシュ協会 ふるい目のサイズ (μm) ふるい目の仕様 (ASTM) ふるい目の仕様 (TYLER) 1180 1400 1700 2360...
- Page 55 挽き目標準のまとめ 粒子のサイズ(μm) 挽き目 100 ≤粒子のサイズ< 500 細挽き 500 ≤粒子のサイズ< 800 中細挽き 800 ≤粒子のサイズ< 1100 中挽き 1100 ≤粒子のサイズ< 1400 中粗挽き 1400 ≤粒子のサイズ≤ 2500 粗挽き...
-
Page 56: Product Warranty Card
Product Warranty Card 保修卡 / 保証書 One year warranty 一年品质保证 一年安心品質保証 Thank you for purchasing our product. Please contact us with any questions 感谢您选购我们的产品 , 有任何产品问题请联系我们 ! この度はお買い求め頂き、誠にありがとうございます。 本機についてご不明な点や技術的なご質問、故障と思われる時のご相談につい ては下記のお問い合わせ先をご利用ください。 Scan here to check quality assurance regulations 扫码音看质保条例 保証内容を確認するには QR コードをスキャンしてください。 User Information/ 用户信息... - Page 57 Shenzhen Digitizing Fluid Technology Co., Ltd. Add : Room 1602, Jinhua Building, Longhua District, Shenzhen, China. Tel : (+86) 0755-23761557 Web : www.digitizefluid.com...
Need help?
Do you have a question about the Omni and is the answer not in the manual?
Questions and answers