
Summary of Contents for Aquafire Pro Series
- Page 1 Installation Guidelines and Best Practices Aquafire Pro Series AWPR2-20 / AWPR2-40 / AWPR2-60...
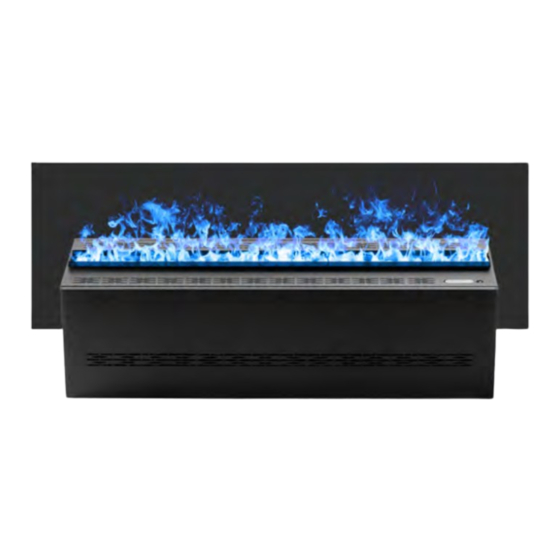
- Page 2 Experience the world’s most advanced water vapor fireplace technology in our most advanced model yet, the Aquafire Pro. Aquafire Pro Series 3 Sizes, AWPR2-20-50 20’’ / AWPR2-40-100 40’’ / AWPR2-60-150 60’’ . Shown: AWPR2-40-100 40” • Units can be ganged together to create continuous ribbons of flames up to 20 feet (240’’) .
-
Page 3: Connecting To Water Supply
Install Aquafire into its housing, as shown in example below. Reinstall the top plate of the fireplace and install is complete. 2. Filling Aquafire with Automatic Pump When the water tank is empty, you will see the lights blinking and you will hear small beeps. - Page 4 Too small, and fireplace will not fit, too large of opening, and fireplace insert will look sloppy or may even fall through the opening. Using the built in ‘lifting loops’, suspend the Aquafire Pro into the cutout after plugging in electric power converter(s) and connecting the 1/4’’...
-
Page 5: Cutout Dimensions
Fireplace Specs and Cutout Dimensions Aquafire Dimensions 20’’ AWPR2-20-50: 40’’ AWPR2-40-100: 60’’ AWPR2-60-150: Power: Power: 120 W (Standard wall receptacle) 60 W (Standard wall receptacle) Power: 180 W (Standard wall receptacle) Tank Capacity: 4.0 Liters / Run Time 20 Hours Tank Capacity: 2.0 Liters / Run Time 20 Hours... - Page 6 Cutout for 60” Model is 12 ¹⁄ in. x 60¹⁄ in. (shown here) A minimum of 12” clearance plus a blind corner will help to dramatically cut down on horizontal light reflection. +6” For optimal results, utilize an Back open-ended hearth design. Wall +3” www.aquafire.com...
- Page 7 Installing Aquafire Insert Installing Insert into custom enclosure SIDE VIEW FRONT VIEW Recessed Light Trap Fireplace Fireplace Insert 120v/60 Hz (min 12-amp) outlet Optional ¼ PE water supply line Air Intake through toe kick, Optional if top vents are covered Drop-in install Aquafire inserts are designed to drop in to an enclosure...
- Page 8 Fireplace Fireplace Front View Front View horizontal light reflection. For 6 in. plus a Open-ended blind corner enclosure design optimal results, utilize an or 12 in. total with no side walls open-ended hearth design. recommended yields the best results www.aquafire.com...
-
Page 9: Air Intake Requirements
Should there be a preference for a decorative top or media obstructing these vents, the enclosure design needs to facilitate adequate airflow through the sides or bottom. air vents air vents www.aquafire.com... - Page 10 • If water hardness needs to be adjusted, consult local water conditioning professional. • Water that is too soft will have reduced flame effect. Reverse Osmosis is not recommended, it removes all minerals and vapor flame effect will be greatly diminished. For complete descaling instruction visit www.aquafire.com/cleaning www.aquafire.com...
- Page 11 Contact Us sales@aquafire.com www.aquafire.com (877) 888-4260 Aquafire® is a registered trademark of Lumina Products Inc, the North American Distribution Partner for A|Fire Design www.aquafire.com...
Need help?
Do you have a question about the Pro Series and is the answer not in the manual?
Questions and answers