
Summary of Contents for DXonJet VPJet4.0
- Page 1 DXonJet.com DXonJet VPJet4.0 Wall Printer User Guide Version 1.0 DXonJet VPJet4.0 Wall Printer User Guide V1.0...
-
Page 2: Table Of Contents
1 Storage printer ......................... 62 2 Maintain the print head ....................62 3 Travel Model for automatic maintenance ................ 62 4 Regular Maintenace ......................63 5 Check the condition of the print head ................64 DXonJet VPJet4.0 Wall Printer User Guide V1.0... -
Page 3: Copyright Statement
DXonJet. © 2023 DXonJet All content is the confidential property of, or licensed to, DXonJet (“DXonJet,” “we,” or “us”) and is protected under China and Foreign copyright, trademark and other intellectual property laws. -
Page 4: Certificate Of Compliance
DXonJet.com 1 Certificate of Compliance DXonJet VPJet4.0 Wall Printer User Guide V1.0... -
Page 5: Introduction
DXonJet.com 1.1 Introduction Original instructions These instructions are DXonJet’s original instructions for the VPJet wall printer (henceforth called the machine or DXonJet printer or VPJet4.0). Purpose The purpose of these instructions is to ensure correct installation, use, handling and maintenance of the machine. -
Page 6: Machine Plate
Attention: The materials should be flat. If you want to print on uneven materials, please consultant our technician. Warining about foreseeable musese The VPJet4.0 wall printer may not be used with inks not endorsed by DXonJet. All inks purchased from DXonJet Company or from official DXonJet distributors worldwide are endorsed by DXonJet company. -
Page 7: Operating Environment
Print Speed and Resolution Printing technology: Drop on Demand Piezoelectric inkjet Resolution and Speed: 6 pass 2 sqm/hour ; 8 pass: 1.5 sqm/hour 12 pass : 1.2 sqm/hour ; 16 pass: 1 sqm/hour DXonJet VPJet4.0 Wall Printer User Guide V1.0... -
Page 8: Overview
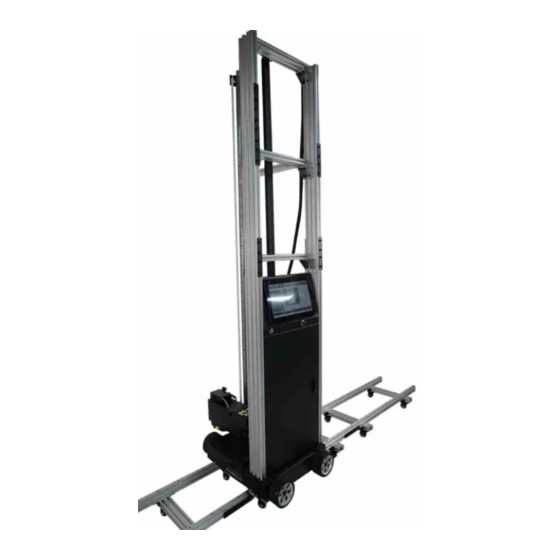
1: Door lock, 2: Drive wheel, 3: Touch screen computer, 4: TWO USB 3.0 Port, 5 Network Port, 6: Printer Power switch,7: Computer power switch (insde the frame, use one or two fingers can touch) DXonJet VPJet4.0 Wall Printer User Guide V1.0... - Page 9 1: Cables for motors and limited location switch, 2: SIX ink tanks, 3: UV l amp, 4: Ink pump box switch, 5: Laser cross light, 6: Sensors, 7: Motor for drive printhead kit, 8: belt, 9: limited location switch DXonJet VPJet4.0 Wall Printer User Guide V1.0...
-
Page 10: Setting Up The Wall Printer
2 Setting Up The Wall Printer 2.1 Physical Setup The VPJet4.0 Wall Printer is packed in a wooden crate and shipped strapped on top of a w ooden pallet(Total weight of the package including the crate is around 230kg). After opening the wooden crate, the machine machine be lifted out from the crate. -
Page 11: Dxonjet Control Software Operation
If there is no content displayed in the red box, it means that the software has not connected to the printer's control system. At this time, check if the power switch of the machine is turned on. DXonJet VPJet4.0 Wall Printer User Guide V1.0... -
Page 12: Introduction To Control Software Interface
3.2 Introduction to Control Software Interface Click on the triangle pop-up symbol in the red box, and we will see the control interface of the machine (click the triangle pop-up symbol again to hide this interface): DXonJet VPJet4.0 Wall Printer User Guide V1.0... - Page 13 At this time, the print head does not spray ink, and the machine does not move in the left and right directions, but the UV light is working. For DXonJet VPJet4.0 Wall Printer User Guide V1.0...
- Page 14 7. Generally, the Clean work is enough for 5-10 seconds, and then click the Clean button again, and the icon will return to normal, and the Clean will stop working. 8. Then wait for another 20 seconds, and you can remove the Pump box. DXonJet VPJet4.0 Wall Printer User Guide V1.0...
- Page 15 Press and hold this button and the machine will move left. Release your finger or mouse and the machine will stop moving. Press and hold this button and the machine will move right. Release your finger or mouse and the machine will stop moving. DXonJet VPJet4.0 Wall Printer User Guide V1.0...
- Page 16 230MM above the lowest and highest positions of the image to display the correct value at position B, because during the printing process, the head needs to exceed the lowest and highest positions of the image). DXonJet VPJet4.0 Wall Printer User Guide V1.0...
- Page 17 Skip: Selecting this function causes the printer head to move along the edge of the image. It is generally used for printing irregular images, where the printer head skips over parts that do not need to be printed, thus shortening the printing time. DXonJet VPJet4.0 Wall Printer User Guide V1.0...
-
Page 18: File Select Setting
Click on the File Select button to choose the required PRN (PRN file from Maintop RIP) or PRT (PRT file from Flexiprint RIP) file, and double-click to open it. Then we will get the following DXonJet VPJet4.0 Wall Printer User Guide V1.0... - Page 19 CMYK is set in the RIP software and there is no W, then 4 will be displayed here; if CMYKW 5 colors are set in the RIP software, then 5 will be displayed here. B: Footer Setting. DXonJet VPJet4.0 Wall Printer User Guide V1.0...
- Page 20 Color_CH4 represents yellow. 100% represents the maximum ink usage, usually kept at the default value of 100%. This percentage value can only be decreased. After clicking OK, it will automatically enter the Print Control interface. DXonJet VPJet4.0 Wall Printer User Guide V1.0...
-
Page 21: Print Control Setting
(this is a simulated value, it will change with the printing process and the accurate value can only be obtained after the printing is completed). 3.5 Parameter Setting DXonJet VPJet4.0 Wall Printer User Guide V1.0... - Page 22 The higher the set proportion of feather, the better the printing effect, but the printing speed will be slower. The default setting is Small. Wave and Random: These two options are not used. DXonJet VPJet4.0 Wall Printer User Guide V1.0...
- Page 23 Step 1: Click the Parameter Setting button. Step 2: Select the desired print mode. Step 3: Click the Apply button. Step 4: Click the Print Calibrate button. Step 5: Click the Apply button. DXonJet VPJet4.0 Wall Printer User Guide V1.0...
- Page 24 DXonJet.com DXonJet VPJet4.0 Wall Printer User Guide V1.0...
- Page 25 There is a video tutorial on how to use this function, please contact the after-sales support service if you need it.(support@dxonjet.com) DXonJet VPJet4.0 Wall Printer User Guide V1.0...
- Page 26 Color_CH1: represents black Color_CH2 represents cyan Color_CH3 represents magenta Color_CH4 represents yellow. 100% represents the maximum ink usage, usually kept at the default value of 100%. This percentage value can only be decreased. DXonJet VPJet4.0 Wall Printer User Guide V1.0...
- Page 27 Export: Save the software parameters as a file in .cfg format. Import: Import a file in .cfg format and read its parameters. 7:Print Calibrate Note that in this interface, any changes to the settings require clicking the Apply button. A:Calibrate a:Select Media DXonJet VPJet4.0 Wall Printer User Guide V1.0...
- Page 28 Media Feeding Ratio: This function is very important. If the machine's left and right movement value is not accurate enough, which needs to adjust it. Clicking this button will bring up the following interface: DXonJet VPJet4.0 Wall Printer User Guide V1.0...
- Page 29 Accumulate button, and then click the Save button. Repeat the above steps until the difference between the entered value and the actual distance the machine moved is within 1MM。 d:Vertical Gap CAL Keep this setting as default DXonJet VPJet4.0 Wall Printer User Guide V1.0...
- Page 30 Bid box from this value. Then repeat this test, with the ultimate goal of making the line next to the value 0 the most horizontal. DXonJet VPJet4.0 Wall Printer User Guide V1.0...
- Page 31 Scanning offset: Increasing this value can shift the printed image upwards, decreasing it can shift the printed image downwards. The unit for each value is in pixels. Pager offset and Scanning offset are used to adjust the position of the crosshair. DXonJet VPJet4.0 Wall Printer User Guide V1.0...
- Page 32 This represents the speed at which the head moves up and down during the printing process. The limit for the VPJet4.0 wall printer is a maximum of 40CM/S and a minimum of 10CM/S. The default setting is usually 30CM/S, but it can be adjusted according to the actual situation.
- Page 33 First set f box, and then set e box; the order of f and e must be the same. 8:UV setting a: UV Lamp setting In general, keep the default settings. Upper UV lamp: click on the box to the right to set when it will turn on. DXonJet VPJet4.0 Wall Printer User Guide V1.0...
- Page 34 Upper UV lamp will light up; click the Test button below, and the Lower UV lamp will light up. b: Normal Here we choose Normal option, keep the others as default. 9:Advanced DXonJet VPJet4.0 Wall Printer User Guide V1.0...
- Page 35 Software Setting: On this interface, you can select the language and machine model. Display language: Click on the box on the right side and select the desired language. Select printer: Keep it as default 10: About DXonJet VPJet4.0 Wall Printer User Guide V1.0...
- Page 36 Print history records the printer's history of printed information. 11:Exit The exit button of the software, when clicked, will pop up a dialog box. If you want to exit the software, click Yes. If you don't want to exit, click No. DXonJet VPJet4.0 Wall Printer User Guide V1.0...
- Page 37 DXonJet.com DXonJet VPJet4.0 Wall Printer User Guide V1.0...
-
Page 38: Maintop Rip Sofware Operation
Note: not to unplug it during use. (Note that this is only a security token, not a USB drive). Double click on the Maintop icon ,The software will be opened. We will get the following interface: DXonJet VPJet4.0 Wall Printer User Guide V1.0... - Page 39 Spacing option in the upper right corner of the pop-up window must all be 0mm. If these four values are not 0, you need to modify them to 0. Other parameters do not need to be changed. Then click OK. Then we will get the following interface. DXonJet VPJet4.0 Wall Printer User Guide V1.0...
- Page 40 Then we will get the following pop-up window: Then click on the triangle symbol in the Adjust option box, and we will get the following pop- up window: DXonJet VPJet4.0 Wall Printer User Guide V1.0...
- Page 41 After selecting this option, you can enter the size in the box on the right side of the pop-up window. Please note that the size is in millimetre. DXonJet VPJet4.0 Wall Printer User Guide V1.0...
- Page 42 Sometimes the image may appear a bit blurry, which is normal. Don't worry, it won't affect the print. Then we click on the Show Metric Panel button as shown in the following figure: DXonJet VPJet4.0 Wall Printer User Guide V1.0...
- Page 43 W and H are the width and height dimensions of the image. Then click on the File menu in the upper left corner of the software, and select “Print” in the pop-up window that appears: DXonJet VPJet4.0 Wall Printer User Guide V1.0...
- Page 44 90 °. The orientation of the portrait can be adjusted through the buttons in positions B and C. Then we click on the Properties button in position A, and we will get the following pop-up window: DXonJet VPJet4.0 Wall Printer User Guide V1.0...
- Page 45 Note: After selecting the printing resolution in the A-1 (Resolution) option, it is important to select the same resolution option in the A-2 (PrintMedia) option, otherwise it may result in incorrect color output for printing. DXonJet VPJet4.0 Wall Printer User Guide V1.0...
- Page 46 DXonJet.com Keep other settings as default. After setting the printing resolution, click the OK button and you will return to the Print option pop-up window. DXonJet VPJet4.0 Wall Printer User Guide V1.0...
- Page 47 PRN file a name and enter a name in the File name option. Then click the Save button to save it. Finally, you need to close the software. When you click the X button in the upper right corner of the software, the software will prompt a pop-up window: DXonJet VPJet4.0 Wall Printer User Guide V1.0...
- Page 48 DXonJet.com In this pop-up window, always select No so that it does not change the original image. DXonJet VPJet4.0 Wall Printer User Guide V1.0...
-
Page 49: Flexiprint Rip Software Operation
Dongle. Please make sure to confirm which version you need before purchasing. Also, each software Dongle is unique, so be sure to keep it safe. Double-click the FlexiPrint icon , and the software will be opened. We will get the following interface. DXonJet VPJet4.0 Wall Printer User Guide V1.0... - Page 50 DXonJet.com Click Job, and we will have the interface: DXonJet VPJet4.0 Wall Printer User Guide V1.0...
- Page 51 Choose this task and click the right mouse button (or press and hold for 2 seconds if using a touch screen computer) to see the interface below. Double click “Job Properties” DXonJet VPJet4.0 Wall Printer User Guide V1.0...
- Page 52 E: This menu has 3 options, usually we choose the first option (Page preview), so the image will be larger and easier for us to view. Look at the picture below. DXonJet VPJet4.0 Wall Printer User Guide V1.0...
- Page 53 DXonJet.com The second Page(Workflow): DXonJet VPJet4.0 Wall Printer User Guide V1.0...
- Page 54 In the “Priority” options, it is generally recommended to keep the default selection of Medium. The Third Page(Color Management) A: Select the option: User color correction B: Select the “Output profile”, where we can select the printing resolution as shown in the following picture: DXonJet VPJet4.0 Wall Printer User Guide V1.0...
- Page 55 Clicking on this button can control the variation of white ink at the edges of the image, as shown in the following figure: DXonJet VPJet4.0 Wall Printer User Guide V1.0...
- Page 56 Choke: White ink that will shrink the edges of the image Bleed: White ink that will spread to the edges of the picture F: Keep the option as default G: Keep the option as default The fourth Page(Printer Options) DXonJet VPJet4.0 Wall Printer User Guide V1.0...
- Page 57 Wall printing, only Spot_1 is valid, the others are invalid and do not need to be adjusted. Select Spot_1, we will have the interface: If there is no need to print white, select “None” And about the other options: DXonJet VPJet4.0 Wall Printer User Guide V1.0...
- Page 58 Photoshop software. Under color:Output white according to color depth Fill color: Output white in inverse according to color depth DXonJet VPJet4.0 Wall Printer User Guide V1.0...
- Page 59 DXonJet.com Substrate: Full white output Under solid: 100% output white in colored parts DXonJet VPJet4.0 Wall Printer User Guide V1.0...
- Page 60 DXonJet.com Fill substrate: Output white in inverse according to color depth in colored parts: Generally, we often choose a suitable option from under solid, Substrate, and Spot color for white printing. DXonJet VPJet4.0 Wall Printer User Guide V1.0...
- Page 61 Keep the parameters of these 6 options as default, then click Send, and save the prt file. At position A, you can change the location where the file is saved. Please remember the file's location. At position B, you can change the file's name. Please remember the file's name. DXonJet VPJet4.0 Wall Printer User Guide V1.0...
-
Page 62: Maintenance
1. Turn on the machine power and computer 2. Turn on the ink pump box switch 3. Click the "Travel mode" button DXonJet VPJet4.0 Wall Printer User Guide V1.0... -
Page 63: Regular Maintenace
1. Make sure the ink pump box is connected with the print head, and turn on the switch 2. Click the pump button in the control software. PUMP starts to work, when the ink comes out, wait for 5 seconds, then click the button again and stop PUMP. DXonJet VPJet4.0 Wall Printer User Guide V1.0... -
Page 64: Check The Condition Of The Print Head
9. Waiting for 20 seconds, then remove the Ink PUMP BOX 5 Check the condition of the print head 1. Take down the ink pump box. Locled Unlocked 2. Prepare the Lint-free cloth and Distilled water DXonJet VPJet4.0 Wall Printer User Guide V1.0... - Page 65 DXonJet.com WARNING ! Only use Distilled or de-lonized water or cleaning liquid from DXonJet for cleaning the printhead, Never use any chemicals or alcohol for cleaning/wiping the printhead. Chemicals and alcohol are damaging the printhead nozzles. 3. Use distilled water or cleaning liquid and make a piece of lint-free cloth wet:...
- Page 66 6. Print a Test Put a piece of paper in front of the print head, click the test button. Keep the paper still, and let the printhead move and print on that paper. DXonJet VPJet4.0 Wall Printer User Guide V1.0...
- Page 67 If the print test results are unsatisfactory, the reason might be a blockage in the printhead. In this case, the ink pump and spry process should be repeated to remove any particles inside the nozzles. DXonJet VPJet4.0 Wall Printer User Guide V1.0...
- Page 68 DXonJet.com The End of The Guide Book DxonJet.com Buyue Road,117,#4, 3rd Floor Qiaolin Street, Pukou District, Nanjing City, China Email: support@dxonjet.com Phone +86 159 5205 1055 DXonJet VPJet4.0 Wall Printer User Guide V1.0...
Need help?
Do you have a question about the VPJet4.0 and is the answer not in the manual?
Questions and answers