
Summary of Contents for IMDK MY HEALTHSTYLE C101A2
- Page 1 PULSE OXIMETER - FINGERTIP INSTRUCTION MANUAL Model No: C101A2 Version: V1.2 Release Date: Sept 2021...
- Page 2 Responsibility of the Manufacturer IMDK is responsible for the safety, reliability and performance of the device provided no assembly, extensions, re-adjustments, modi cations or repairs are carried out by individuals not authorised by IMDK. The electrical installation complies with international standards, provided the instrument is used in accordance with the instructions for use.
-
Page 3: Safety Information
1.1 Safety information Carefully read the manual regarding safety information, operation and speci cations before using this pulse oximeter. • Do not leave this device unattended in the vicinity of children or pets. • Do not attempt to open or service the pulse oximeter. Only quali ed service personnel should attempt any servicing required. - Page 4 1.2 Warnings WARNING: EXPLOSION HAZARD - Do not use the pulse oximeter in a ammable atmosphere where concentrations of ammable anaesthetics or other materials may occur. WARNING: Degraded sensors and electrodes may a ect performance or cause other issues. WARNING: Do not attempt to recharge normal dry-cell batteries, they may leak, cause a re or even explode.
-
Page 5: Maintenance
There are several reasons for a weak signal: • Low perfusion. • Dirty sensor or LED light. • Incorrect positioning of the pulse oximeter. • Cold temperatures and general health can cause low blood pressure. 6. The images and diagrams in this manual are for reference purposes only. 7. -
Page 6: Section 2 - Introduction
Recommendation: Wipe down the rubberised area inside the pulse oximeter with a 70% alcohol swab before each test and wipe, clean and air dry the tested nger with alcohol before and after each test. (The rubber inside the pulse oximeter is hypoallergenic and contains no harmful toxins). Install two AAA batteries into battery cassette before closing. - Page 7 Symbols De nition of symbols Follow instructions for use No alarm Type BF Applied Part Battery indication Oxygen saturation of arterial haemoglobin Pulse Rate The symbol indicates that the device should be disposed responsibly according to local regulations when no-longer required or not working. The symbol indicates that the device complies with the European Council Directive 93/42/EEC concerning medical devices.
- Page 8 2.4 Speci cations 1. Type of protection against electric shock: Internally powered equipment 2. Degree of protection against electric shock: Type BF 3. Protection Against Ingress of Liquids: IP22 (protected against ingress of water when the water is dripping vertically and the device is tilted up to 15°) 4.
-
Page 9: Section 3 - Installation, Setup And Operation
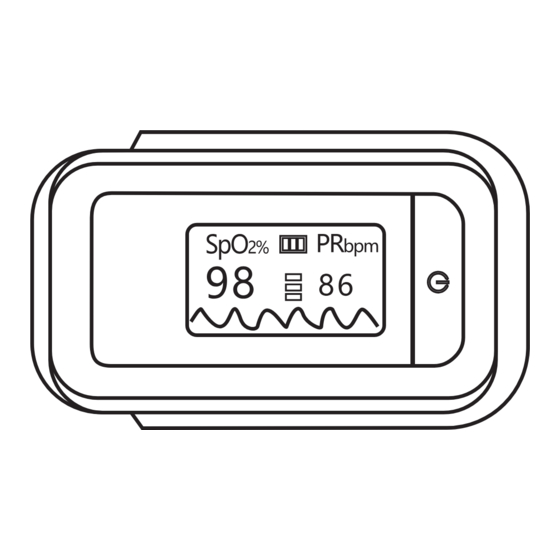
Section 3 - Installation, Setup and Operation 3.1 Description of the Front Panel (as gure3.1.1) Figure 3.1.1 Functions on Front Panel Table 3.1.1 Function Name and Description Item Name Description Turns on the device as well as changes Power button the display screen orientations Displays the SPO2/PR data OLED display panel... - Page 10 3.3 Parameter settings To adjust the parameters, turn on the device by pressing the power button. Press and hold the power button for 2 seconds and the setting functions will appear. Identify the symbol '*' and press the power button to change between the settings options.
- Page 11 3.4.2 Turning the Pulse Oximeter ON/OFF: Insert the nger fully into the rubberised hole of the pulse oximeter with the nail surface facing upwards. Release the clamp and press the power button to turn the device on. The oximeter will automatically power o when there is no nger inserted into the device after 8 seconds.
- Page 12 Features • Two colour OLED display screen with di erent orientation modes. • Low-power consumption. • Low voltage indicator. • Automatically powers o after 8 seconds when there is no signal. • Small in volume, light in weight and convenient to carry. Section 4 - Maintenance and Solutions 4.1 Maintenance and Preservation: •...
-
Page 13: Troubleshooting
4.3 Troubleshooting Problem Probable Reason Solution 1. Finger not inserted 1. Try reinserting the nger. correctly or deep enough. 2. Try other ngers for SPO2 or PR 2. Patient’s oxyhemoglobin readings failing which not displaying. value is too low and go to hospital for an not measurable. -
Page 14: Section 6 - Contact Information
Section 6 - Contact Information If you have any question about maintenance, technical speci cations, or malfunctions of devices, contact your local distributor or manufacturer. Shenzhen IMDK Medical Technology CO. Ltd CZone,10F,Building 16,Yuanshan Industrial B Area, Gongming Street, Guangming District, Shenzhen. China Post:518106 Tel:+86-755-36637905 MedNet EC-REP GmbH, Borkstrasse 10,48163.Münster,Germany...
Need help?
Do you have a question about the MY HEALTHSTYLE C101A2 and is the answer not in the manual?
Questions and answers
I get a beep but no dis-lay. I have added new batteries
The pulse oximeter turns on with red light inside and the pulse beep is heard but no Display readings are seen