Table of Contents
Advertisement
ALDI GUARANTEES THAT OUR EXCLUSIVE BRAND PRODUCTS ARE DEVELOPED TO
OUR STRINGENT QUALITY SPECIFICATIONS. IF YOU ARE NOT ENTIRELY SATISFIED
WITH THIS PRODUCT, PLEASE RETURN IT TO THE NEAREST ALDI STORE WITHIN
60 DAYS FROM THE DATE OF PURCHASE, FOR A FULL REFUND OR REPLACEMENT,
OR TAKE ADVANTAGE OF OUR AFTER SALES SUPPORT BY CALLING THE
SUPPLIER'S CUSTOMER SERVICE HOTLINE.
AU
Made in China
FERREX® is a registered trademark of ALDI Stores
DISTRIBUTED BY:
ALDI STORES
1 SARGENTS ROAD
MINCHINBURY NSW 2770
www.aldi.com.au
5
AFTER SALES SUPPORT
828141
1300 855 831
AU
support@scheppach.com.au
YEARS
MODELL:
WARRANTY
F-APS3000
10/2023
User Manual
PAINT SPRAY STATION
F-APS3000
Translation of original instruction manual
Contents
Content .............................................................................................3
Package contents/part list ........................................................... 6
Introduction .................................................................................... 9
Layout .............................................................................................10
Scope of delivery ............................................................................11
Intended use ...................................................................................11
General safety warnings ...............................................................11
Technical data ................................................................................19
Unpacking ...................................................................................... 21
Working procedures ..................................................................... 21
Before use ..................................................................................... 23
Use .................................................................................................. 24
Cleaning and care .........................................................................27
Electrical connection ................................................................... 29
Disposal and recycling ................................................................. 31
Troubleshooting ............................................................................32
3
Advertisement
Table of Contents

Subscribe to Our Youtube Channel
Related Manuals for FERREX F-APS3000


Summary of Contents for FERREX F-APS3000
-
Page 1: Table Of Contents
Cleaning and care .................27 SUPPLIER’S CUSTOMER SERVICE HOTLINE. Electrical connection ..............29 Disposal and recycling ..............31 Troubleshooting ................32 Made in China FERREX® is a registered trademark of ALDI Stores DISTRIBUTED BY: ALDI STORES 1 SARGENTS ROAD MINCHINBURY NSW 2770 www.aldi.com.au... -
Page 2: Package Contents/Part List
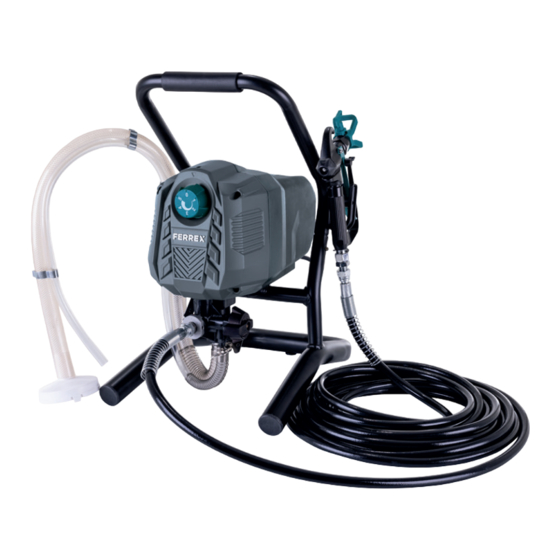
Package contents/part list 1 x Paint Spray Station (Main Unit) 1 x High Pressure Pipe 1 x Gun Body 1 x Filter Element (1 x pre-assembled) 2 x Nozzle (311/517) 2 x Screw (3,5/9,5 mm) 1 x Instruction Manual 1 x Warranty card... - Page 3 Explanation of the symbols on the device Caution - Read the operating instructions to reduce the risk of inquiry! Wear ear-muffs. The impact of noise can cause damage to hearing. Wear a breathing mask. Dust which is injurious to health can be generated when working on wood and other materials.
- Page 4 Complies with the Australian norms and standards. Made in China...
-
Page 5: Introduction
Introduction 1. Introduction Congratulations on choosing to buy a FERREX product. ® All products brought to you by FERREX are manufactured to the highest standards ® of performance and safety, and as part of our philosophy of customer service and satisfaction, are backed by our comprehensive 5 Years Warranty. -
Page 6: Layout
Layout (Fig. A) In addition to the safety notes contained in the present operating instructions and the special regulations of your country, the generally recognised technical rules for the operation of identically constructed machines must be observed. 2. Layout (Fig. A) Return hose Suction hose Pressure regulator... -
Page 7: Scope Of Delivery
Scope of delivery 3. Scope of delivery • 1x Paint Spray Station (Main Unit) • 1x High Pressure Pipe • 1x Gun Body • 1x Filter Element (1 x pre-assembled) • 2x Nozzle (311/517) • 2x Screw (3,5/9,5 mm) • 1x Instruction Manual •... - Page 8 General safety warnings 1. Work area safety a) Keep your work area clean and well-lit. Cluttered or dark areas invite accidents. b) Do not operate power tools in explosive atmospheres, such as in the presence of flammable liquids, gases or dust. Power tools create sparks which may ignite the dust or fumes.
- Page 9 General safety warnings b) Wear personal protective equipment and always safety goggles. Protective equipment such as a dust mask, non-skid safety shoes, hard hat or hearing protection used for appropriate conditions will reduce personal injuries. c) Prevent unintentional starting. Ensure the switch is in the off-po- sition before connecting to power source and/or rechargeable battery, picking up or carrying the tool.
- Page 10 General safety warnings d) Store idle power tools out of the reach of children and do not al- low persons unfamiliar with the power tool or these instructions to operate the power tool. Power tools are dangerous in the hands of untrained users.
- Page 11 General safety warnings • Do not spray yourself, other people or animals. Keep your hands and other body parts out of the spray jet. If the spray jet pierces your skin, seek medical assistance immediately. The sprayed mate- rial can even penetrate through a glove and into the skin and thus into your body.
- Page 12 General safety warnings • Do not spray near ignition sources such as static electric sparks, open flames, ignition flames, hot items, motors, cigarettes or sparks caused by plugging in/unplugging power cables or by operating switches. These kinds of ignition sources could ignite a fire in the environment.
- Page 13 General safety warnings • The appliance must be connected via a properly earthed safety socket (Schuko). The connection must be equipped with a residual current device INF ≤ 30 mA. • Make sure that the mains supply being connected corresponds to the values indicated on the type plate.
- Page 14 General safety warnings • Do not use a solvent container with a small opening to clean the ap- pliance. An explosive atmosphere could form. Earth the container beforehand. Safety instructions for the high-pressure hose • Caution: Risk of injury from injection! Leaks can develop in the high-pressure hose due to wear, kinking and improper use.
-
Page 15: Technical Data
Technical data WARNING! HAZARDS CAUSED BY MATERIALS AND SUBSTANCES • There is a risk of coming into contact with or absorbing coating ma- terials and/or cleaning fluids. There is also a risk of inhaling vapours from liquids. This can cause permanent damage under certain con- ditions. - Page 16 Technical data Noise data sound pressure level L 78,4 dB uncertainty K 2,5 dB sound power level L 91,2 dB uncertainty K 2,5 dB m Warning: Noise can have serious effects on your health. If the machine noise ex- ceeds 85 dB, please wear suitable hearing protection. Wear hearing protection.
-
Page 17: Unpacking
Unpacking Try to keep the vibration load as low as possible. Measures to reduce the vibration load are, e.g. wearing gloves and limiting the working time. Wherein all states of operation must be included (e.g. times when the power tool is switched off and times where the power tool is switched on but running without load). - Page 18 Working procedures The following materials and paints can be used: • Water based paints • Wood preservatives • Oil based paints • Primers • Enamel paint • Wash primer • Varnish • • Stains Materials and paints which cannot be used The use the following materials and paints will cause premature wear and block the spray tip.
-
Page 19: Before Use
Before use • Cover any surfaces around the spray area extensively and thoroughly. Any surface that is not masked could become contaminated. • Make sure that the spray surface is clean, dry and free of grease. • Polished surfaces should be lightly sanded and the sanding dust removed. Spraying technique •... -
Page 20: Use
Selecting/changing the nozzle (Fig. G) Nozzle 311: low viscosity spray material Nozzle 517: viscous spray material Insert the corresponding nozzle (5) with the arrow tip in the spraying direction into the nozzle chamber (20). Replacing HEA filter (Fig. C) WARNING! The system must be depressurised in order to carry out the following work. - Page 21 10. Unlock the paint spray gun (7) by turning the safety catch (6) so that its tip is facing down 11. Pull the trigger (9) until the paint comes out in a straight stream. 12. Lock the paint spray gun (7) by turning the safety catch (6) with the tip as far back and up as possible.
- Page 22 Depressurising the appliance Always depressurise the appliance when you want to take it out of operation. De- pressurise the system as follows: Turn the pressure regulator (3) to position 0 (off). Turn the function switch (13) to the horizontal position (PRIME). Unlock the paint spray gun (7) by turning the safety catch (6) so that its tip is facing down.
-
Page 23: Cleaning And Care
Cleaning and care 11. Cleaning and care m WARNING! RISK OF INJURY! Before carrying out any work on the appliance, switch it off, disconnect the mains plug and depressurise the appliance! m ATTENTION! • Do not use flammable materials such as nitro thinners for cleaning. •... - Page 24 Cleaning and care 12. Unlock the paint spray gun (7) by turning the safety catch (6) so that its tip is facing down. 13. Drain off the remaining paint by pulling the trigger (9). Hold the paint spray gun (7) over the detergent container while doing so. 14.
-
Page 25: Electrical Connection
Electrical connection Remove the inlet valve (26) using an adjustable spanner. Remove the O-ring (25), ball (24), washer (23) and spring (22). 4. Clean the parts thoroughly using suitable cleaning agents. Replace them, if necessary. 5. Grease the O-ring (25). 6. - Page 26 Electrical connection When working with spray attachments and during temporary use outdoors, the de- vice must be connected to a residual current circuit breaker with a trigger current of 30 mA or less. Damaged electrical connection cable The insulation on electrical connection cables is often damaged. This may have the following causes: •...
-
Page 27: Disposal And Recycling
Disposal and recycling 13. Disposal and recycling Notes for packaging The packaging materials are recyclable. Please dispose of packaging in an environmentally friendly manner. Do not throw old equipment away with household waste! Notes on the electrical and electronic equipment act [ElektroG] Waste electrical and electronic equipment does not belong in household waste, but must be collected and disposed of separately! •... -
Page 28: Troubleshooting
Troubleshooting • These statements only apply to devices installed and sold in the countries of the European Union and which are subject to the European Directive 2012/19/EU. In countries outside the European Union, different regulations may apply to the disposal of waste electrical and electronic equipment. 14. - Page 29 Troubleshooting Nozzle guard is loose. Tighten the nozzle guard. Spray tip is worn. Replace the spray tip. Seal inside the nozzle Material Replace the sealing. guard is worn. leaking Material building up Clean spray tip and nozzle guard by using spray tip and nozzle the appropriate cleaning solution depend- guard.
- Page 30 Troubleshooting The pressure control dial Increase the pressure control dial to a high- is set too low. er setting. Mesh filter handle, the Clean mesh filter handle, the spray tip, and spray tip, or the suc- the suction hose mesh filter. tion hose mesh filter is clogged.
- Page 31 You are also entitled to have the goods repaired or replaced if the goods fail to be of acceptable quality and the failure does not amount to a major failure. YEARS WARRANTY AFTER SALES SUPPORT support@scheppach.com.au MODEL: F-APS3000 / PRODUCT CODE: 828141 10/2023 1300 855 831...
- Page 32 Please telephone us on "1300 855 831" or write to us at: RossMac Pty. Ltd. Unit 6, 4 Ovata Drive, Tullamarine, Victoria, 3043 Telephone: 1300 855 831 (Monday - Friday 8:30am-6:00pm) Email: support@scheppach.com.au YEARS WARRANTY AFTER SALES SUPPORT support@scheppach.com.au MODEL: F-APS3000 / PRODUCT CODE: 828141 10/2023 1300 855 831...
- Page 33 Please provide your email address and advise the supplier, if you wish to obtain a repair and refurbished goods or parts notice via email. YEARS WARRANTY AFTER SALES SUPPORT support@scheppach.com.au MODEL: F-APS3000 / PRODUCT CODE: 828141 10/2023 1300 855 831...
- Page 34 (as shown on this card) at hand so that we are able to respond as quickly and efficiently as possible. RossMac Pty. Ltd. Unit 6, 4 Ovata Drive, Tullamarine, Victoria, 3043, Australia Telephone: 1300 855 831 Email: support@scheppach.com.au YEARS WARRANTY AFTER SALES SUPPORT support@scheppach.com.au MODEL: F-APS3000 / PRODUCT CODE: 828141 10/2023 1300 855 831...
Need help?
Do you have a question about the F-APS3000 and is the answer not in the manual?
Questions and answers