Table of Contents
Advertisement
Quick Links
Advertisement
Table of Contents

Subscribe to Our Youtube Channel
Related Manuals for Ariens 986057


Summary of Contents for Ariens 986057
- Page 1 OWNER’S MANUAL INVERTER GENERATOR MODEL 986057 Read this manual carefully before operating this machine. Do not use E15, E20, and E85 (or fuel containing greater than 10% ethanol) in this product. It is a violation of federal law and will damage the unit and void your warranty.
- Page 2 FOREWORD Thank you for purchasing our generator. ●The copyright of this Manual is reserved by our company. ●No part of this publication may be reproduced, transmitted, distributed or stored without prior written permission of our company. ●Our company adheres to a strategy of sustainable development, so we reserve the right to make changes or improvements without notice to any product described in this publication.
- Page 3 Safety Warnings Personal and property safety of you and others are very important. Please carefully read these messages which are preceded by a symbol . You WILL be SERIOUSLY HURT if you don’t follow instructions. You CAN be SERIOUSLY HURT if you don’t follow instructions.
-
Page 4: Table Of Contents
CONTENTS SAFETY INFORMATION................6 LOCATION OF IMPORTANT LABELS............10 DESCRIPTION...................12 Control panel …..................12 CONTROL FUNCTIONS................13 3 in 1 switch knob (including start/stop switch, fuel valve and choke) ....................13 Oil warning light (Red)................13 Overload indicator light (Red)..............13 AC pilot light (Green) ................14 DC protector..................14 ESC switch....................15 Fuel tank cap..................15... - Page 5 Spark plug inspection................35 Carburetor adjustment................36 Engine oil replacement................36 Air filter ....................38 Muffler screen and spark arrester............39 Fuel tank filter..................40 Fuel filter …....................41 TRANSPORTING AND STORAGE.............39 Transporting………………………………………………………………….42 Drain the fuel..................42 Engine ....................43 TROUBLESHOOTING ................44 Engine won’t start ................. 44 Generator won’t produce power ........
-
Page 6: Safety Information
SAFETY INFORMATION Read and understand this owner’s manual before operating your generator. Becoming familiar with your generator’s safe operation procedures will help you avoid accidents. Never use it indoors. Never use it near windows when operated outside. Generator exhaust contains high level carbon monoxide.This is a poison you cannot see or smell. - Page 7 Keep it at least 1m (39 in.) away from flammables. Never smoke when fueling. Don’t spill when fueling. 7 ...
- Page 8 Stop the engine before fueling. Connections to a Home Power RIGHT Supply If the generator is to be connected to a home power supply as a standby, connection shall be performed by a professional electrician. When the loads are connected to the WRONG generator, please carefully check whether electrical connections are safe and reliable.
- Page 9 Generator Ground Circuit To reduce the risk of shock or electrocution, generator must be properly grounded. The nut and ground terminal on the frame must always be used to connect the generator to a suitable ground source. The ground path should be made with #8 size wire.
-
Page 10: Location Of Important Labels
LOCATION OF IMPORTANT LABELS Please read the following labels carefully before operating this machine. Maintain or replace safety and instruction labels as necessary. ① 10 ... - Page 11 ② ③ ④ 11 ...
-
Page 12: Control Panel
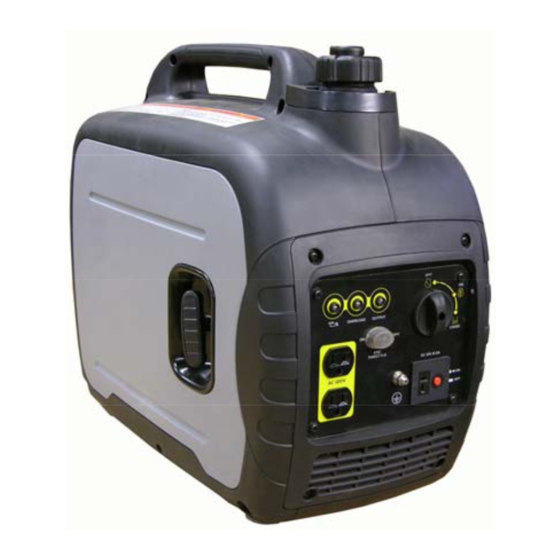
DISCRIPTION ① Carrying handle ② Fuel tank cap air vent knob ③ Fuel tank cap ④ Control panel ⑤ Recoil starter ⑥ Oil filler cap ⑦ Louver ⑧ Muffler ⑨ Spark plug maintenance cover Control panel ① Oil warning light ②... -
Page 13: Control Functions
CONTROL FUNCTIONS 3 in 1 switch knob ① Engine switch \fuel valve “OFF”; Ignition circuit is switched off. Fuel is switched off. The engine will not run. ② Engine switch \fuel valve \ choke “ON” Ignition circuit is switched on. Fuel is switched on.choke is switched on. -
Page 14: Ac Pilot Light (Green)
turn off and the overload indicator light (Red) will stay on, but the engine will not stop running. When the overload indicator light comes on and power generation stops, proceed as follows: 1. Turn off any connected electric devices and stop the engine. -
Page 15: Fuel Tank Cap
Reduce the load of the connected electric device below the specified rated output of the generator if the DC protector turns off. If the DC protector turns off again, stop using the device immediately and consult your dealer. Engine smart control (ESC) “ON”... -
Page 16: Fuel Tank Cap Air Vent Knob
Fuel tank cap air vent knob The fuel tank cap ② is provided with an air vent knob ① to stop fuel flow. The air vent knob must be turned to “ON”. This will allow fuel to flow to the carburetor and the engine to run. -
Page 17: Preparation
PREPARATION Fuel ·Fuel is highly flammable and poisonous. Check “SAFETY INFORMATION” (See page 1) carefully before filling. ·Do not overfill the fuel tank, otherwise it may overflow when the fuel warms up and expands. ·After filling the fuel, make sure the fuel tank cap is tightened securely. -
Page 18: Engine Oil
Using fuel stabilizer Fuel gets old, oxidizes, and breaks down over time. Adding a fuel stabilizer (not included) extends the usable life of fuel and helps prevent deposits from forming that can clog the fuel system. Follow fuel stabilizer manufacturer’s directions for correct ratio of stabilizer to fuel. - Page 19 Recommended engine oil: SAE 10W -30 Recommended engine oil grade: API Service SE type or higher Engine oil quantity: 0.35 L (0.42 US qt) 19 ...
-
Page 20: Pre-Operation Check
PRE-OPERATION CHECK If any item in the Pre-operation check is not working properly, have it inspected and repaired before operating the generator. The condition of a generator is the owner’s responsibility. Vital components can start to deteriorate quickly and unexpectedly, even if the generator is unused. -
Page 21: Operation
OPERATION Carbon Monoxide. Using a generator indoors CAN KILL YOU IN MINUTES. Generator exhaust contains high levels of carbon monoxide (CO), a poisonous gas you cannot see or smell. If you can smell the generator exhaust, you are breathing CO. But even if you cannot smell the exhaust, you could be breathing CO. -
Page 22: Starting The Engine
The environmental requirements of the generator: ·Suitable temperature: -15°C - 40°C (-13°F - 104°F); ·Suitable humidity: lower than 95%; ·Suitable altitude: 1,000 meters (3280 feet)(Engine power will be lower at altitudes higher than 1,000 meters (3280 feet). NOTE: The generator can be used with the rated output load at standard atmospheric conditions. - Page 23 NOTE:The choke is not required to start a warm engine. Push the choke knob in to the position “ON”. 4. Pull slowly on the recoil starter until it is engaged, then pull it briskly. NOTE: Grasp the carrying handle firmly to prevent the generator from falling over when pulling the recoil starter.
-
Page 24: Stopping The Engine
Stopping the engine NOTE:Turn off any electric devices. 1. Turn the ESC to “OFF” . 2. Disconnect any electric devices. 3. Turn the 3 in 1 switch to “OFF” , a. Ignition circuit is switched off. b. Fuel is switched off. 4. -
Page 25: Alternating Current (Ac) Connection
Alternating Current (AC) connection Be sure any electric devices are turned off before plugging them in. Be sure all electric devices including the lines and plug connections are in good condition before connection to the generator. Be sure the total load is within generator rated ... - Page 26 3. Connect the black battery charger lead to the negative (-) battery terminal. 4. Turn the ESC “off” to start battery charging. · Be sure the ESC is turned off while charging the battery. · Be sure to connect the red battery charger lead to the positive (+) battery terminal ,and connect the black lead to the negative (-) battery terminal.
-
Page 27: Ac Parallel Operation
KEEP OUT OF REACH OF CHILDREN. AC parallel operation Before connection an appliance to either generator, make sure that it is in good working order and that its electrical rating does not exceed that of the receptacle. Most motorized appliances require more than their electrical rating for startup. -
Page 28: Application Range
AC Parallel Operation Applications NOTE Make sure that it is in good working order. A faulty appliance or power cord can create a potential for electrical shock. If an appliance begins to operate abnormally, becomes sluggish, or stops ... - Page 29 Power 0.4-0.75 0.8-0.95 factor (Efficiency 0.85) Inverter ~1,600 Rated voltage 12v ~1,280W ~544W Generator Rated current 8.3A NOTE · “~” means below. · Application wattage indicates when each device is used by itself. · The simultaneous usage of AC and DC power is possible but total wattage should not exceed the rated output.
-
Page 30: Electrical
· Do not overload. The total load of all electrical appliances appliances must not exceed the supply range of the generator. Overloading will damage the generator. · When supplying precision equipment, electronic controllers, computers, microcomputer based equipment or battery chargers, keep the generator a sufficient distance away to prevent electrical interference from generator. - Page 31 Electric motor loads It is characteristic of common electric motors in normal operation to draw up to six times their running current while starting. This table may be used to estimate the watts required to start electric motors; however, if an electric motor fails to start or reach running speed, turn off the appliance or tool immediately to avoid equipment damage.
- Page 32 Example: Tool or Appliance Running Watts* Additional Starting Watts* Refrigerator 1350 Portable Fan Laptop 46 in. Flat Panel Television Light (75 Watts) 1255 Total Running Watts 1350 Highest Starting Watts Total Running Watts 1255 Highest Starting Watts +1350 Total Starting Watts Needed 2605 Power management To prolong the life of the generator and attached devices, it is important to take...
- Page 33 Estimated* Estimated Additional Application/Equipment Starting Starting Watts* Watts Emergency / Home Standby Lights (qty. 4 x 75 W) Refrigerator 1350 46 in. Flat Panel Television Satelite Receiver Portable Fan Heater 1300 Laptop Slow Cooker Radio Job Site 1000 Electric Drill -3/8 in. 1000 1000 Quartz Halogen Work Light...
-
Page 34: Periodic Maintenance
PERIODIC MAINTENANCE Safety is an obligation of the owner. Periodic inspection, adjustment and lubrication will keep your generator in the safest and most efficient condition possible. The most important points of generator inspection, and lubrication are explained on the following pages. If you are not familiar with maintenance work, have your dealer do it for you. - Page 35 necessary. ·Check condition. ○ Spark arrester ·Clean and replace if necessary. ·Clean and replace if ○ Fuel filter necessary. Crankcase ·Check breather hose ○ breather hose for cracks or damage. ·Replace if necessary ·Decarbonize cylinder head ★ Cylinder head ·More frequently if necessary Valve...
-
Page 36: Spark Plug Inspection
Spark plug inspection The spark plug is an important engine component which should be checked periodically. 1. Remove the cap and spark plug cap and Insert the tool through the hole from the outside of the cover. 2. Insert the handlebar into the tool and turn it counterclockwise to remove the spark plug. -
Page 37: Carburetor Adjustment
NOTE If a torque wrench is not available when installing the spark plug, a good estimate of the correct torque is 1/4-1/2 turn past finger tight. However, the spark plug should be tightened to the specified torque as soon as possible. 6. -
Page 38: Air Filter
5. Return the generator to the level surface. Do not tilt the generator when adding engine oil. This could result in overfilling and damage to the engine. 6. Add engine oil to the upper level. Recommended engine oil: SAE 10W -30 Recommended engine oil grade: API Service SE type or higher Engine oil quantity:... -
Page 39: Muffler Screen And Spark Arrester
3. Remove the foam element . 4. Wash the foam element in solvent and dry it. 5. Oil the foam element and squeeze out excess oil. The foam element should be wet but not dripping Do not wring out the foam element when squeezing it. - Page 40 with any part of your body or clothing during inspection or repair. 1. Remove the screws , and then pull outward on the areas of the cover shown. 2. Loosen the bolt and remove the muffler cap , the muffler screen spark arrester .
-
Page 41: Fuel Tank Filter
Fuel tank filter Never handle gasoline while smoking or in the vicinity of an open flame. 1. Remove the fuel tank cap and filter. 2. Rinse the filter with gasoline. 3. Wipe the filter and install it. 4. Install the fuel tank cap. Be sure the fuel tank cap is tightened securely. -
Page 42: Transporting And Storage
fuel valve to check for leaks. 7. Install the cover and tighten the screws. Carburetor Modification for High Altitude Operation At altitudes above 5,000 feet (1,500 meters), the standard carburetor air-fuel mixture will be too rich. Performance will decrease, and fuel consumption will increase. -
Page 43: Drain The Fuel
from the generator beforehand. Long term storage of your machine will require some preventive procedures to guard against deterioration. Drain the fuel 1. Turn the 3 in 1 switch to “OFF” . 2. Remove the fuel tank cap and remove the filter. -
Page 44: Engine
6. Turn the 3 in 1 switch to “OFF”. 7. Tighten the drain screw 8. Install the cover and tighten the screws. 9. Turn the fuel tank cap air vent knob to “OFF” after the engine has completely cooled down. Engine Perform the following steps to protect the cylinder, piston ring, etc. -
Page 45: Troubleshooting
TROUBLESHOOTING Engine won’t start 1. Fuel system No fuel supplied to engine chamber. No fuel in tank…Fill fuel tank. Fuel in tank….Fuel tank cap air vent knob and fuel cock knob to “ON”. Clogged fuel filter …. Clean fuel filter. ... -
Page 46: 11. Specifications
11. SPECIFICATIONS ARIENS 986057 Model No. Type Inverter Rated frequency /Hz 50/60 Rated voltage /V 230/120 Max. output power /kVA Rated output power /kVA Power factor Generator AC output quality ISO8528 G2 THD /% ≤5 63.5 Noise Level dB/Lpa (3/4 load、7m) DC Output / V-A 12-8.3... - Page 47 E6TC/E6RTC Spark Model No. Engine Starting mode Recoil starter Generator set Length Width Height /mm 499×285×455 Net Weight 21 kg / 46 lb. ★ 1...The factory set AC voltage range: 115VAC to 125VAC. ★ 2...The factory set DC voltage range: 12VDC to 17.5VDC. 47 ...
-
Page 48: 12. Wiring Diagram
12. WIRING DIAGRAM 60Hz,120V With Parallel Receptacle 48 ... - Page 49 Sno-Thro , Sno-Tek and Chore Performing Equipment Limited Warranty Ariens Company (Ariens) warrants to the original purchaser that Ariens, Gravely, Parker, and Countax brand chore ® ® performing equipment (including Sno-Thro and Sno-Tek equipment) purchased on or after 1/1/2013 will be free from defects in material and workmanship for the time period noted in the chart below.
- Page 50 Register the product immediately at the time of sale. If the dealer does not register the product, the customer must complete the product registration card in the literature package and return it to the Ariens Company, or register the unit online at www.ariens.com, www.gravely.com, www.countax.com, www.parkersweeper.com.
- Page 51 Exclusions – Items Not Covered by This Warranty • Parts that are not genuine Ariens, Gravely, Parker or Countax service parts are not covered by this warranty and may void the warranty. • Damages resulting from the installation or use of any part, accessory, or attachment which is not approved by the Ariens Company for use with product(s) identified herein are not covered by this warranty.
- Page 52 Ariens 655 West Ryan Street Brillion, WI 54110 920-756-4688 Fax 920-756-2407 www.ariens.com...
Need help?
Do you have a question about the 986057 and is the answer not in the manual?
Questions and answers