
Summary of Contents for MOULDPRO Precision Balance MPB410
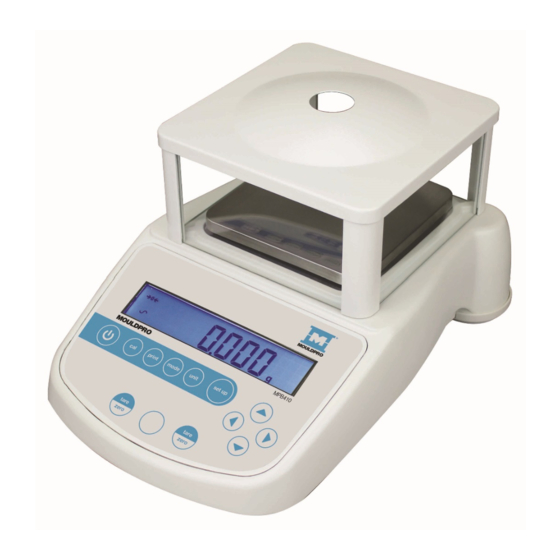
- Page 1 ____________________________________________________________ User Guide Precision Balance MPB410...
-
Page 2: Table Of Contents
Contents INTRODUCTION ....................... 4 2.0 TECHNICAL SPECIFICATIONS ..................5 3.0 UNPACKING THE BALANCE ..................6 4.0 LOCATING THE BALANCE ................... 7 5.0 SETTING UP THE BALANCE ..................8 5.1 ASSEMBLING THE BALANCE ..................8 5.2 LEVELLING THE BALANCE ..................9 5.3 WARM-UP TIME ...................... - Page 3 13.1 ENABLE WEIGHING UNITS ..................26 13.2 ENABLE WEIGHING MODES ................... 26 13.3 ENABLE SERIAL INTERFACE PARAMETERS ............27 13.4 SETUP PARAMETERS ..................... 29 13.5 CALIBRATION SETUP ....................30 13.6 PASSCODES ......................31 13.6.1 Forgotten Passcodes ....................31 14.0 SAFETY AND MAINTENANCE ................. 32 15.0 TROUBLE-SHOOTING ....................
-
Page 4: Introduction
1.0 INTRODUCTION Thank you for selecting the Precision Balance. This Instruction Manual will familiarise you with the installation, troubleshooting, general maintenance of the balance, etc. and will guide you through the various applications. Please read this Manual thoroughly before starting the operation. If you need any clarifications, feel free to contact your supplier. -
Page 5: Technical Specifications
2.0 TECHNICAL SPECIFICATIONS MPB410 Maximum 410g capacity Readability 0.001g Typical 0.002g Repeatability Linearity (±) 0.002g Tare range Full Units of grams, milligrams, kilograms, carats, pennyweights, grains, troy measure ounce, ounces Interface RS-232 bi-directional Operating 10°C - 40°C temperature Power supply 12 VDC, 50/60 Hz, 800 mA Calibration External... -
Page 6: Unpacking The Balance
3.0 UNPACKING THE BALANCE Remove the balance from the packing by carefully lifting it out of the box. Inside the box you will find everything needed to start using the balance. AC adapter Plastic sub-pan Stainless Steel Top Pan ... -
Page 7: Locating The Balance
4.0 LOCATING THE BALANCE • The balance should not be placed in a location that will reduce the accuracy. • Avoid extremes of temperature. Do not place in direct sunlight or near air conditioning vents. • Avoid unsuitable tables. The table or floor must be rigid and not vibrate. -
Page 8: Setting Up The Balance
5.0 SETTING UP THE BALANCE 5.1 ASSEMBLING THE BALANCE • Locate the balance on a solid surface, free from vibration • For the low capacity scales (0.001g) remove the shipping protection screw and transit disc from the top of the balance and place the plastic top pan support on the balance. Do not use excessive force when removing and installing the screw. -
Page 9: Levelling The Balance
• For best performance, let the balance warm up for 15 minutes and calibrate before using. 5.2 LEVELLING THE BALANCE After placing the balance in a suitable place, level it by using the spirit level on the rear of the balance. -
Page 10: Display
A stable sign ~ is shown when the balance is instable condition. It will turn off if the balance is not stable. Exact zero is shown when the “0“ symbol is on to the left of the display area. 6.0 DISPLAY The LCD has several areas- A large 7 digit area to display the weight with symbols for common weighing units on its right and symbols for zero, tare (Net) and stability on... - Page 11 SYMBOLS AND INDICATORS The LCD has unique symbols to indicate the following: 0 Zero Stable g, oz, ozt, GN, dwt, Text is shown for the weighing units ct, Kg, mg, Pcs, % and modes When calibration is occurring or about “...
-
Page 12: Keypad
7.0 KEYPAD The keypad has the following keys to operate the balance. Keys Primary function Secondary function To turn the balance to ON or Standby [0/T] or A combined zero and To escape from setup tare function functions and modes [Esc] [Unit] / Selects weighing units... -
Page 13: Input/Output
8.0 INPUT/OUTPUT The rear panel has connectors for RS-232 serial and a power input socket. Required power input is a low-voltage external supply, 12VDC @ 800mA. -
Page 14: Operations
9.0 OPERATIONS 9.1 INITIALISATION When the balance is first switched on, it will display the balance serial number (if set), software revision, model capacity and then all segments on the display will be shown. Overall the time taken is usually 5 -10 seconds. If an operator passcode has been set, the display will show “PASSCODE”... -
Page 15: Weighing
9.3 WEIGHING • Press [Tare] to zero the balance, if required “0“ will be displayed • Place a mass on the pan and the weight will be displayed • If a container is used press [Tare] to tare the balance when the stable symbol “~” is on. “Net”... -
Page 16: Functions
9.4 FUNCTIONS When weighing, the user can access the applications that have been enabled (see section 13.2). The following applications are available in this version (2.43 & above): • Parts counting • Percent weighing • Check Weighing The functions can be enabled or disabled using a similar method to the Units above by turning the functions to on or off. -
Page 17: Percent Weighing
• To count another item press [Mode] and continue as before • Checks will be made to determine that the weight of the reference parts is large enough for reasonably accurate counting (weight of each piece should be > 1d) •... -
Page 18: Check Weighing
• Enter the weight using the numeric entry method (see section 7.1). • Place unknown sample to display the percentage weight • To perform percent weighing with another sample press [Mode] and continue as before • To return to normal weighing, press [Esc] Note: Percentage will be displayed to the maximum number of decimal places based on the resolution of the balance. - Page 19 • Press [Enter] to proceed. If the “LOW LIMIT” was set to “On” the display will show the current low limit in the unit last used in the weighing mode. You may change the limit using the numeric entry method (see section 7.1). •...
-
Page 20: Calibration
10.0 CALIBRATION The balances are calibrated using an external mass. • Press the [Cal] key to start calibration. • Pressing [Esc] will abort the calibration at any time • Press the [Cal] key • The display will show the balance setting a new Zero condition by showing “LOAD 0”. Make sure the pan is empty then press the [Enter] key to continue •... -
Page 21: Rs-232 Interface
The user will know a calibration is asked for from flashing of the “CAL” symbol on the display. The display will show a 5 second countdown when calibration will start. If the user presses the [Esc] key the calibration will be delayed by one minute to allow for a process in progress to be finished. - Page 22 Parity: NONE (=8N1), EVEN (=7E1) or ODD (=7 O 1) All lines are terminated with carriage return and line feed (<CR><LF>). In continuous output mode, or if single-line output on demand is selected, the serial output format will be a single line in the form “1234.567 g<CR><LF>”. The format of the single-line output will change depending on the mode in which the balance is operating, as described below.
- Page 23 STANDARD FORMAT The balance will print the following data as the standard form. The standard form cannot be changed. The format of forms #1 and #2 will be the same as the standard until modified by the user. Line 1 Date Line 2 Time...
- Page 24 the Enter key of the PC after each command (the action of Carriage Return is denoted as <CR> as shown below). Basic Input Commands: !KT<CR> Tares the balance to display the net weight. This is the same as pressing the [Zero / Tare] key when the balance is in the normal weighing mode. !KS<CR>...
-
Page 25: Error Checking
12.0 ERROR CHECKING During weighing the balance is constantly checking to see if the balance is operating within the limited parameters. The errors likely to occur are: A/D counts below lowest allowed value A/D counts above highest allowed value A/D not operating Maximum capacity exceeded Other errors may be detected during special functions or operations. -
Page 26: Supervisor Menus
13.0 SUPERVISOR MENUS Pressing the [Setup] key while in normal weighing gives access to the menus. • When [Setup] is pressed and passcodes are not enabled the display will show the Supervisor menus. If passcodes are enabled, the balance will ask for it by displaying “PASSCODE 0”... -
Page 27: Enable Serial Interface Parameters
[Enter] will confirm the setting and will advance to the next weighing mode. Repeat for each mode in turn • Press [Mode] to advance to setting of the next menu or press [Esc] to return to normal weighing 13.3 ENABLE SERIAL INTERFACE PARAMETERS The parameters affecting the serial setup are set in a similar manner to the other parameters. - Page 28 Format of custom forms #1 and #2 If FORM1 or FORM2 is selected, it can be changed by the user using a selection of available data. By default the 2 forms are the same as the standard form unless changed by the user as below.
-
Page 29: Setup Parameters
Press [Mode] to advance to setting of the next menu or press [Esc] to return to normal weighing. 13.4 SETUP PARAMETERS The user parameters that control the balance are shown under the SETUP. When “SETUP” is displayed, press the [Setup]/Enter key. The options for each parameter can be scrolled through by using the [Up] or [Down] key. -
Page 30: Calibration Setup
• Press [Mode] to advance to setting of the next menu or [Esc] to return to normal weighing 13.5 CALIBRATION SETUP This menu allows the user to set the calibration parameters. • Press [Enter] when “CAL SETUP” is displayed to select the calibration parameters •... -
Page 31: Passcodes
13.6 PASSCODES To enable the security features in this balance it is necessary to set passcodes. There are 2 passcodes called Operator Passcode and Supervisor Passcode. The Operator Passcode allows an authorised user to operate the basic weighing functions of the balance but will not allow access to the Supervisor Menus if the Supervisor Passcode has been set. -
Page 32: Safety And Maintenance
14.0 SAFETY AND MAINTENANCE CAUTION Use the AC adapter designed by the manufacturer for the balance. Other adapters may cause damage to the balance. Avoid overloading or dropping material onto the platform which could damage the balance. Do not spill liquids on the balance as it is not water-resistant. Liquids may damage the case and if it gets inside the balance it may cause damage to the electronics. - Page 33 Electronic Problems: These are the rarest of the problems affecting balances. If an electronic problem is suspected make sure the mechanical problems that can cause similar symptoms have been eliminated before attempting electronic repairs. With the exception of cables most electronic repairs are solved by board replacement.
- Page 34 BALANCE WORKS BUT IS NOT STABLE Noise or vibration Check whether the Balance is unstable by a few divisions from environment temperature is stable. Friction in mechanics Check the balance is positioned correctly to avoid vibration, wind or air movement, it is on a solid table, It is not near sources of heat or cool air, Check balance with weights if...
- Page 35 BALANCE IS NOT ACCURATE You must have accurate and trusted weights to test a balance. If you suspect that the balance is not accurate then you must know your weights are accurate. A balance calibrated using a bag of flour is not accurate even if it works OK otherwise. Balance is not accurate Repeatability Verify the balance shows the same...
-
Page 36: Balance Menu Structure
Poor Linearity Usually a mechanical Re-check repeatability problem. *Inspection of the flexures for damage or loose hardware may be required *Use the Linearity Function in the service menu to reset linearity *A problem in the analogue circuit board or power supplies can cause poor linearity. -
Page 39: Manufacturer's Declaration Of Conformity
Manufacturer’s Declaration of Conformity This product has been manufactured in accordance with the harmonised European standards, following the provisions of the below stated directives: Electro Magnetic Compatibility Directive 2004/108/EC Low Voltage Directive 2006/95/EC FCC COMPLIANCE This equipment has been tested and found to comply with the limits for a Class A digital device, pursuant to Part 15 of the FCC Rules. - Page 40 Change log Date of change Change Version 07-11-2019 New manual...
Need help?
Do you have a question about the Precision Balance MPB410 and is the answer not in the manual?
Questions and answers