
Summary of Contents for Avitec Sequoia 4K60
- Page 1 User Manual Sequoia 4K60 Flexible 4K60 KVM-Multiview for Multi-Monitor User Workstations Revision 0.0.4, (March, 2023)
-
Page 2: About This Manual
To assist us in making improvements to this user manual, we welcome any comments and constructive criticism. Please email us at: sales@avitechvideo.com. WARNING Do not attempt to disassemble the Sequoia 4K60. Doing so may void the warranty. There are no serviceable parts inside. Please refer all servicing to qualified personnel. TRADEMARKS All brand and product names are patented or registered trademarks of their respective companies. -
Page 3: Table Of Contents
2. System Configuration ....................14 2.1 Display Mode: Workstation (Default) ................14 2.1.1 Example 1: Four Operators at Four Independent Workstations ......14 Four Computer Source Connections to Sequoia 4K60 ............14 Connections to Workstation 1 ....................15 Connections to Workstation 2 ....................15 Connections to Workstation 3 .................... - Page 4 Powering Up the Devices ......................24 3. Basic Operations ...................... 25 Host Mode ..........................25 Remote Mode ......................... 25 Tips on Navigating the Sequoia 4K60 ..................25 3.1 Host Mode .......................... 26 3.1.1 Pop-up Selections ....................26 3.1.2 Functions ........................27 Available Functions in Host Mode of the Monitor Connected to First HDMI Out Port .....
- Page 5 B.2 Basic Operation for Using Touch Screen(s) ..............100 Host Mode ..........................100 Remote Mode ........................100 Tips on Navigating the Touch Screen Monitor Using the Sequoia 4K60 ....... 101 B.2.1 Pop-up Selection ....................101 B.2.2 Audio Tally ......................102 B.2.3 Move/Resize/Close/Open Window ................
- Page 6 Appendix C Resetting to the Factory Default State ..........105 C.1 Using Web Browser-based GUI ..................105 C.2 Using the Dip Switch on Rear Panel ................106 Appendix D Serial Port Pin Out .................. 107 Appendix E Dimensions ..................... 108...
-
Page 7: Warranty
Warranty Regulatory Information Avitech International Corporation (herein after referred to as “Avitech”) Marking labels located on the exterior of the device indicate the warrants to the original purchaser of the products manufactured in its regulations that the model complies with. Please check the marking labels on the device and refer to the corresponding statements in this facility (the “Product”), that these products will be free from defects in chapter. -
Page 8: Getting Started
This chapter introduces the features and specifications, as well as the external components of the Sequoia 4K60. To get the best results from Sequoia 4K60, we recommend when using your mouse with a 4K display, select a mouse that has a 2000 dpi setting. -
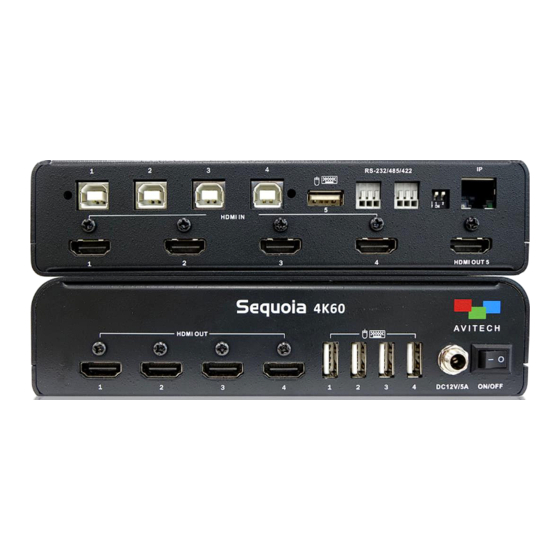
Page 9: Product Features
Product Features Four HDMI 2.0/1.4 input ports for 4K UHD/FHD sources with USB-B ports for KM operation Five HDMI 2.0/1.4 output at 4:4:4 along with five USB-A ports for KM or touch operation Plug and play, no software program setup required ... - Page 10 Table 1.3.2 Supported HDMI Output Format If the monitor’s EDID is not detected, the output resolution of Sequoia 4K60 will automatically configure to 3840×2160p at 60Hz (default setting). Others...
- Page 11 3. For best results with HDMI/DVI, use cables under 5 meters long, or shorter if you use connection adapters. If you need to place your Sequoia 4K60 more than 5 meters away from your sources, use a signal extender that supports 4K60 resolution.
-
Page 12: Connections To The Sequoia 4K60
Note: 1. The Sequoia 4K60 can provide a total maximum current of 500mA for both of USB Type-A port 1 and port 2; and another total maximum current of 500mA for both of USB Type-A port 3 and port 4. - Page 13 1. Non-standard keyboards i.e. keyboards require manually installation of drivers are not supported. 2. Compatibility between the computer and the Sequoia 4K60 may depend on the computer’s BIOS Setup. Refer to the computer’s BIOS Setup and make sure “USB port” is enabled if this item exists in the...
-
Page 14: System Configuration
The following figure shows a typical setup with a single Sequoia 4K60 for four independent workstations operation for controlling four computer systems. DO NOT block the vents on the front and side panels of the Sequoia 4K60. Doing so may impair its internal components and/or its heat dissipation. -
Page 15: Connections To Workstation 1
HDMI OUT 1 on the front panel of Sequoia 4K60 to the monitor using appropriate signal cable. Step 2. Connect the port marked HDMI OUT 2 on the front panel of Sequoia 4K60 to the monitor using the appropriate signal cable. -
Page 16: Connections To Workstation 4
The following figure shows another typical setup with a single Sequoia 4K60 for two operators at two independent workstations with one shared large 4K UHD screen for controlling four systems. DO NOT block the vents on the front and side panels of the Sequoia 4K60. Doing so may impair its internal components and/or its heat dissipation. -
Page 17: Four Computer Source Connections To Sequoia 4K60
4K UHD screen. Connections to Workstation 1 Step 1. Connect the port marked HDMI OUT 2 on the front panel of Sequoia 4K60 to the monitor using the appropriate signal cable. Step 2. Connect the port marked HDMI OUT 3 on the front panel of Sequoia 4K60 to the monitor using the appropriate signal cable. -
Page 18: Connections To Workstation 2
The following figure shows another typical setup with a single Sequoia 4K60 for four users at four independent workstations operation for controlling four systems. DO NOT block the vents on the front and side panels of the Sequoia 4K60. Doing so may impair its internal components and/or its heat dissipation. -
Page 19: Four Computer Source Connections To Sequoia 4K60
Connections to Workstation 1 Step 1. Connect the port marked HDMI OUT 2 on the front panel of Sequoia 4K60 to the monitor using an appropriate signal cable. Step 2. Connect a short USB extension cable or a USB hub to the USB Type-A port marked 2 on the front panel of Sequoia 4K60 for connection to a set of wireless keyboard/mouse;... -
Page 20: Connections To Workstation 2
Connections to Workstation 2 Step 1. Connect the port marked HDMI OUT 3 on the front panel of Sequoia 4K60 to the monitor using the appropriate signal cable. Step 2. Connect a short USB extension cable or a USB hub to the USB Type-A port marked 3 on the front panel of Sequoia 4K60 for connection to a set of wireless keyboard/mouse;... -
Page 21: Display Mode: Projector (Pip)
(PiP) images. DO NOT block the vents on the front and side panels of the Sequoia 4K60. Doing so may impair its internal components and/or its heat dissipation. -
Page 22: Connection To Multiview 4K Uhd Screen
Connections to Projector 1 – Projector 4 Step 1. Connect the port marked HDMI OUT 2 on the front panel of Sequoia 4K60 to the HDMI port of projector 1 using an appropriate signal cable. -
Page 23: Display Mode: Projector (Fullscreen)
(fullscreen) images. DO NOT block the vents on the front and side panels of the Sequoia 4K60. Doing so may impair its internal components and/or its heat dissipation. Figure 2.4.1 Projector (Fullscreen) Display Mode Connection Diagram Four Computer Source Connections to Sequoia 4K60 Step 1. -
Page 24: Connections To Projector 1 - Projector 4
Connections to Projector 1 – Projector 4 Step 1. Connect the port marked HDMI OUT 2 on the front panel of Sequoia 4K60 to the HDMI port of projector 1 using an appropriate signal cable. -
Page 25: Basic Operations
This chapter discusses these operating modes, their functions, and hotkeys in detail. Host Mode When the Sequoia 4K60 is in Host mode, the Host cursor appears on the monitor corresponding to the USB-A port marked of Sequoia 4K60 which the keyboard/mouse is connected to. The cursor will be controlled by this connected mouse. -
Page 26: Host Mode
To switch back to Host mode, use the keyboard “Pause/Break” hotkey, or double-click the mouse scroll button. The Sequoia 4K60 will return to Host mode and the Host cursor will reappear. Host Mode In Host mode, users can monitor images of the connected computers and adjust the four windows using the provided selections and menu. -
Page 27: Functions
Remote mode to the corresponding computer. The icon will be disabled if the USB Type-B port of Sequoia 4K60 is not connected to a computer's USB port. Switching input Move the Host cursor to the top-right corner of a window; click source icon and then the corresponding input source will display on screen. -
Page 28: Hotkeys
5 HDMI Out Ports 3.1.3 Hotkeys Hotkeys are available when utilizing the Sequoia 4K60 under the Host operation mode. Details below are the Host operation mode hotkeys. Keys To route an input source to display (in fullscreen mode) on the monitors connected to Ctrl –... -
Page 29: Basic Operation For Workstation (Default) Configuration
3.3.1 Basic Operation of the First HDMI Out Port Host Mode When the monitor connected to HDMI port marked OUT 1 of Sequoia 4K60 is in Host mode, the Host cursor appears on the display upon connecting a mouse device to USB Type-A port marked 1 of Sequoia 4K60. - Page 30 Double-click the mouse left button any area within that specific window to enter the Remote mode (or move the Host cursor to the top-right corner of the targeted window and then click the Enter remote mode icon). To switch back to Host mode, use keyboard Pause/Break hotkey, or double-click the mouse scroll “...
-
Page 31: Remote Mode
Use keyboard “Pause/Break” hotkey or double-click the mouse scroll button connected to Sequoia 4K60 to return keyboard and mouse control to Host mode. The Host cursor will reappear. Your Sequoia 4K60 can only enter Remote mode to take control of a computer when the correct USB –... -
Page 32: Basic Operation For Hdmi Out Port 2 To Hdmi Out Port 5
3.3.2 Basic Operation for HDMI Out Port 2 to HDMI Out Port 5 Host Mode The monitors connected to HDMI port marked OUT 2 to 5 of Sequoia 4K60 will display in fullscreen Host mode, the Host cursor appears on the display upon connecting mouse devices to the corresponding USB Type-A ports marked 2 to 5 of Sequoia 4K60. - Page 33 2. When the INPUT # icon is greyed out, that means its source is currently displaying on the monitor. 3. When the icon is greyed out, that means the USB Type-B port of Sequoia 4K60 is not connected to a computer's USB port.
-
Page 34: Remote Mode
Your Sequoia 4K60 can only enter Remote mode to take control of a computer when the correct USB Type-B port (marked 1 to 4) on the rear panel of Sequoia 4K60 is properly connected to the USB Type-A port of that computer (using a standard USB A/B cable). In addition, only windows corresponding to computer systems (as opposed to pure video systems) can be accessed through Remote mode. -
Page 35: Basic Operation For Workstations (Quad + 4 Singles) Configuration
3.4.1 Basic Operation of the First HDMI Out Port Host Mode When the monitor connected to HDMI port marked OUT 1 of Sequoia 4K60 is in Host mode, the Host cursor appears on the display upon connecting a mouse device to USB Type-A port marked 1 of Sequoia 4K60. - Page 36 To route an input source to display on the monitor, use keyboard “Ctrl – 1 – 3” hotkey will load input source 3 to display on the monitor in fullscreen mode; “Ctrl – 1 – 2” hotkey will load input source 2 to display on the monitor in fullscreen mode.
-
Page 37: Remote Mode
4K60 to return keyboard and mouse control to Host mode. The Host cursor will reappear. Your Sequoia 4K60 can only enter Remote mode to take control of a computer when the correct USB Type-B port (marked 1 to 4) on your Sequoia 4K60's rear panel is properly connected to the USB Type-A port of that computer (using a standard USB A/B cable). -
Page 38: Basic Operation Of Hdmi Out Port 2 To Hdmi Out Port 5
3.4.2 Basic Operation of HDMI Out Port 2 to HDMI Out Port 5 Host Mode When the monitors connected to the HDMI ports marked OUT 2 – OUT 5 of Sequoia 4K60 is in Host mode, the Host cursors appears on its corresponding display upon connecting a mouse device to one of 2 –... -
Page 39: Basic Operation For Projector Configuration
1. The last switched or routed video source is automatically saved after five seconds by the Sequoia 4K60; until the next change in video routing. This means that if you will be powering off the Sequoia 4K60, but still wish to retain the last configured video routing, please wait five seconds or more before turning off power to your Sequoia 4K60 in order to retain the last configured video routing in system memory, and it will be automatically recalled upon the next power-on. - Page 40 Step 1. Select the target video source by holding the mouse left button on its input source icon. Figure 3.5.1.1 Web Browser-based GUI: Select Input Source Step 2. Drag the selected source (the output icon will change to a two windows icon for input source can be easy to be routed) to the target output icon.
- Page 41 Step 3. Drop the selected input source to the target window of the output. Figure 3.5.1.3 Web Browser-based GUI: Drag-and-Drop Source to Target Window Step 4. The window label in output icon will show the newly routed input source’s name. Figure 3.5.1.4 Web Browser-based GUI: Source “Drag-and-Drop”...
-
Page 42: Source Seamless Switching For The Projector (Fullscreen) Display Mode
3.5.2 Source seamless switching for the Projector (Fullscreen) Display Mode When in Projector (fullscreen) display mode, the Sequoia 4K60 offers seamless switching of the input sources to any of the single-view fullscreen outputs. The web browser-based GUI comprises an input source bar and output displaying ports in subsequent order. - Page 43 Step 2. Drag-and-Drop the selected source to the target output icon. “Drag-and-Drop” the source icon to target output icon Figure 3.5.2.2 Web Browser-based GUI: Drag Source to Target Output Icon Step 3. The label of output icon will show the newly routed input source’s name. Figure 3.5.2.3 Web Browser-based GUI: Source “Drag-and-Drop”...
-
Page 44: Optional) Basic Operation Of The Multiview 4K Uhd Screen
Depending on the application requirement, if only for video monitoring you may skip this section. Host Mode When the monitor connected to HDMI port marked OUT 1 of Sequoia 4K60 is in Host mode, the Host cursor appears on the display upon connecting a mouse device to USB Type-A port marked Sequoia 4K60. -
Page 45: Remote Mode
You can then control the computer as you regularly would within the window on the display. Your Sequoia 4K60 can only enter Remote mode to take control of a computer when the correct USB Type-B port (marked 1 to 4) on your Sequoia 4K60's rear panel is properly connected to the USB Type-A port of that computer (using a standard USB A/B cable). -
Page 46: Setup Using The Web Browser-Based Gui
It also allows easy and intuitive control from computers and handheld touch devices. 1. The IP address of the controlling computer must be in the same network mask as the Sequoia 4K60. 2. The default IP address of Sequoia 4K60 is 192.168.0.5, if more than two Sequoia 4K60 devices are on the same network, please make sure each Sequoia 4K60 must have a unique IP address and all the Sequoia 4K60 devices must be connected to the same network mask. - Page 47 In this way, only the administrator has the privileges to assign the input signal sources and output ports to a specific user. Reserved for future option. Allows users to select a specific Sequoia 4K60 in the list that you would like to connect Device List and control.
-
Page 48: Layout & Routing
Layout & Routing provides an interface for user to adjust the multiview (window) layout, output resolution, OSD setting, fullscreen control and other features of Sequoia 4K60 directly from the web browser-based GUI. The table below provides information on each component of Layout & Routing. -
Page 49: Multiview Layout
4.1.1 Multiview Layout To adjust the multiview layout, perform the following steps: Step 1. Locate Layout & Routing icon on the main page and click it, the Layout & Routing page will appear. Figure 4.1.1.1 Web Browser-based GUI: Layout & Routing Step 2. - Page 50 Figure 4.1.1.4 Multiview Layout Control Interface and Components for HDMI OUT 2 – HDMI OUT 5 Multiview Layout Show the quad-view layout of Sequoia 4K60. Supports free-scaling position and size adjustment for each window (layer adjustment is only available when OSD is off) via Window Layout drag-and-drop operation.
- Page 51 Source 1 – 4 for Visible (default) or Hidden the window on the display connected to the Sequoia 4K60. X and Y adjust the window’s starting position (top-left corner). Use the up/down icons on the right-edge to adjust.
- Page 52 Load. Top Bar Latest allows you to quickly load the latest saved layout after rebooting the Sequoia 4K60. Click the triangle on the right part of icon, a pull-down menu will appear and you click Save to store the present layout as the latest.
- Page 53 Step 3. To rearrange any window’s position, click and hold the mouse left button on the window and move to the desired position. To resize a window, move the cursor to the border of the window and drag to the desired size when the directional arrow appears. The window layout can also be configured by adjusting the individual window’s position, width and height utilizing the Property menu.
- Page 54 Figure 4.1.1.10 Multiview Layout: Save User Preset When load a user-icon or latest preset with OSD turn Off and window overlay configuration, upon turning On the OSD feature, the Sequoia 4K60 will automatically return to factory default quad-view multiview layout due to hardware limitation.
-
Page 55: Setup The Output Resolution
Figure 4.1.1.11 Multiview Layout: Latest Setup the Output Resolution When set the output resolution to Auto, the Sequoia 4K60 will automatically detect the EDID of the connected monitors and display the optimum resolution. The Sequoia 4K60 also allows you to manually set the output resolution by selecting 3840×2160p 50/60Hz, or 3840×2160p 25/30Hz, or 1920×1080p... -
Page 56: Set Fading Level
Upon completing the OSD Option adjustment, click Apply on the top-left corner. This will apply the OSD options to the entire system of Sequoia 4K60. Click Default to reset all the setting in OSD Option return to default. -
Page 57: Fullscreen Control
K/M switching, window layout and maintain aspect ratio functions when set a particular window to fullscreen display. Upon completing the Fullscreen Control setting, click Apply on the top-left corner. This will apply the Fullscreen Control options to the Sequoia 4K60. Enter Remote Mode ... -
Page 58: Edit Label
Step 1. Locate Edit Label on the web GUI menu and click it. The Edit Label page will appear displaying all input ports of the Sequoia 4K60 and their default names. Figure 4.2.1 Web Browser-based GUI: Edit Label Default Names Step 2. -
Page 59: Change Icon
4. When use Change Icon feature, the changed icons only appears on Input source control bar in Web-browser GUI. To replace the input signal icon, perform the following steps: Step 1. Save the image file(s) into the computer controlled the Sequoia 4K60. - Page 60 Step 2. Click Change icon. Figure 4.2.1.1 Edit Label: Change Icon Step 3. The Change Icon window appears. Click the input signal that you wish to replace, and then click Browse. Figure 4.2.1.2 Click Browse Belonging to an Input Signal Icon Step 4.
- Page 61 Notice that the image will now be shown in the frame of right. Figure 4.2.1.4 Browse Image Window Step 5. Click the image then click Apply to continue. Figure 4.2.1.5 Apply Icon Notice that the selected image will now replace the default input port image shown in the input control bar.
-
Page 62: System
Display If any of the fan modules fail, the Sequoia 4K60 can detect the failure and display alert: A “System fan failure detected!” alert appears on top-left portion of monitor. -
Page 63: Display Active Window Border
Failure to address this problem immediately may cause irreparable damage to system components. When the Sequoia 4K60 is processing a lot of data it can become hot. If the environment around the module is too warm, or the fans cannot do their job properly, or the filters are blocked or clogged, the module can overheat. -
Page 64: Mac Address
Mac address The MAC address is an assigned and burned-in address by Avitech to the network interface chip in your Sequoia 4K60. 4.3.3 Configuration Configuration provides an interface for user to switch among five display modes. Select one of the display modes from drop-down menu, locate Apply and click to take effect the display mode. - Page 65 Configuration Shows the current display mode of system. Workstation (Default): supports simultaneous display of four signal sources in multiview layout on the 1 output. Freely switch single-view fullscreen image, or duplicated multiview layout image on the 2 to 4 outputs.
-
Page 66: System Information
“192.168.0.5/fw_update.html” directly in the web browser URL bar (replace the numbers with the current IP address of your Sequoia 4K60 if the default IP address be changed), or click Update to be able to update the firmware through the web browser-based GUI on your local computer. - Page 67 Step 2. On the System Information page, click Update. Figure 4.3.4.3 System: System Information Update Step 3. A new Sequoia 4K60 Firmware Update tab will appear on your web browser. Click Select file. Figure 4.3.4.4 Sequoia 4K60 Firmware Update Page: Select File Step 4.
-
Page 68: Export System Information
Figure 4.3.4.8 Message for Reboot to Complete Firmware Upgrade DO NOT at any time unplugs the power cable connected to the Sequoia 4K60 during firmware upgrade. Export System Information Export System Information allows you to export important Sequoia 4K60 system information and send this information back to Avitech for debug purpose. - Page 69 Step 2. When the below screen appears, then click OK to close the message window. (Using Google Chrome as example) Figure 4.3.4.10 Message for Export System Information Successfully Step 3. Click icon, then select Show in folder. Figure 4.3.4.11 Sequoia 4K60 Firmware Update Page: Open Folder Contain “System.bin” File...
-
Page 70: Factory Default
Figure 4.3.4.12 Select “System.bin” File Factory Default If your Sequoia 4K60 has become unstable, or you have repeated errors that you cannot fix, you can reset your Sequoia 4K60 to its factory default settings. Click Factory Default to reset the Sequoia 4K60 to its factory default state. -
Page 71: Backup
1. When you reset the Sequoia 4K60 to factory default settings, all of your settings and configurations will be deleted. 2. Before you reset the Sequoia 4K60, you may back up your system file first. When you finished resetting your Sequoia 4K60 to factory default state, you can restore the system backup file to the Sequoia 4K60. - Page 72 Step 1. From the System tab, under System Information page, click Backup. Figure 4.3.4.16 System Page: System Information Backup Step 2. The web browser will automatically download to your computer. Click Show in folder. (Using Google Chrome as example) Figure 4.3.4.17 System Page: Click and Select Show in folder Step 3.
-
Page 73: Restore
Restore function allows you to restore system settings using the previously saved Backup.bin file in your computer. See the previous section Backup for the saved system settings. To restore the system settings to the Sequoia 4K60, perform the following steps: Step 1. From the System tab, under System Information page, click Select file. -
Page 74: About
Step 4. Reboot Sequoia 4K60 when the prompt appears onscreen to complete the process of restoring the system setting. Figure 4.3.4.22 Reboot to Complete the Restore Process 4.3.5 About Click About to view the web browser-based GUI copyright page. Figure 4.3.5.1 System → About... -
Page 75: Video Wall Configuration And Management
Accessed from the Web browser-based GUI, video wall(s) can be created and managed resource through Video Wall page. The Sequoia 4K60 supports a 2x2 video wall or video walls with 1 row and 2 to 4 columns with PiP feature and seamless transition in switching between presets. -
Page 76: Video Wall Connection
The following figure shows a typical setup with a single Sequoia 4K60 that supports 4K UHD in a 2x2 PiP Video Wall. DO NOT block the vents on the front and side panels of the Sequoia 4K60. Doing so may impair its internal components and/or its heat dissipation. -
Page 77: Powering Up The Devices
Step 2. Connect power to the monitors and turn on the monitors. Step 3. Connect the power adapter to the DC 12V/5A power in jack on the Sequoia 4K60, and press the power switch so that the Sequoia 4K60 is turned on. -
Page 78: Powering Up The Devices
Step 2. Connect power to the monitors and turn on the monitors. Step 3. Connect the power adapter to the DC 12V/5A power in jack on the Sequoia 4K60, and press the power switch so that the Sequoia 4K60 is turned on. - Page 79 Step 3. The initial screen appears on the webpage. Locate System on the main page and click it; the System page will appear. Figure 5.2.2 Web Browser-based GUI Main Page Click Configuration to setup up display mode of Sequoia 4K60. Figure 5.2.3 Web Browser-based GUI System Page...
- Page 80 Step 4. Select Video wall from the drop-down menu. Figure 5.2.4 System Page Configuration Step 5. Click Apply then click to start setting the video wall. Figure 5.2.5 System Page Apply Video Wall Configuration...
- Page 81 Figure 5.2.7 Video Wall Initial Page Components Function HDMI Output Shows the detected HDMI OUT ports of Sequoia 4K60. List Allows user to instantly: New = click New to create the video wall in the video wall design area.
- Page 82 Function Allows user to add/remove/move HDMI OUT port in this area. Examples: A 2×2 wall display is comprised of a 2×2 screen for a maximum of two windows for each screen and a maximum of eight windows for a 2×2 wall. ...
- Page 83 Step 8. Drag the HDMI 1 to an empty block. This video wall configuration must correspond to the actual HDMI cables connection from Sequoia 4K60 to the screens. Figure 5.2.9 Assign HDMI 1 to Empty Block The name HDMI 1 will be display at the upper left of the block.
- Page 84 Step 9. Drag the HDMI 2 to the empty block next to HDMI 1. Figure 5.2.11 Assign HDMI 2 to Empty Block The name HDMI 2 will be display at the upper left of the block. Figure 5.2.12 The Second HDMI OUT Assigned...
- Page 85 Step 10. Drag the HDMI 3 to the empty block under the HDMI 1. Figure 5.2.13 Assign HDMI 3 to Empty Block The name HDMI 3 will be display at the upper left of the block. Figure 5.2.14 The Third HDMI OUT Assigned...
- Page 86 Step 11. Drag the HDMI 4 to the empty block under the HDMI 2. Figure 5.2.15 Assign HDMI 4 to Empty Block The name HDMI 4 will be display at the upper left of the block. Figure 5.2.16 The Fourth HDMI OUT Assigned...
- Page 87 Step 12. Upon completing the video wall configuration, Figure 5.2.17 Video Wall Configuration Completed Click Reset to clear the currently video wall configuration in the design area. Click Exit to leave the video wall design area window with designed wall configuration. ...
- Page 88 Resolution Set a desire display resolution from the drop-down menu to the video wall. Figure 5.2.20 Set Video Wall Display Resolution Refresh Rate Select a refresh rate from the drop down menu to match the display devices of video wall. Figure 5.2.21 Set Video Wall Display Refresh Rate...
- Page 89 Bezel Gap Carefully measure the Horizontal (width) and Vertical (height) bezel gap between displays, and then enter the values to compensate for the width/height of the display bezels. Both of the Horizontal (width) and Vertical (height) values of bezel gap compensation must be even. Figure 5.2.22 Bezel Defined See the effect of the source display on the wall screen.
- Page 90 2. The Bezel setting need be performed only once unless the monitors have been replaced. Lock to Source Allows the video input of one source (coming from the INPUT ports of Sequoia 4K60) to be used to synchronize another source(s) together, or None (free-running) to be used to synchronize another source(s) together.
- Page 91 (default disable) Mac PC function for the video source display correctly. List When connect a MacBook or Mac-mini source to the input port of Sequoia 4K60 and the video source display a white noise or black image on-screen, enable Mac PC to have the video source display normally.
- Page 92 Function Allows user to instantly: Auto bring to top = click to auto set a selected window display in the front of the display. Bring to front = click to move the selected window to the front of the display so that it overlays with other window or hides other window.
- Page 93 Step 16. Click and holding the mouse left button and drag to select the display window size on the wall canvas. The new window already contains the corresponding input source image will display on the video wall instantly. Figure 5.2.27 Add a New Window in Video Wall Canvas Click to expand the title menu for position and size adjustment.
-
Page 94: To Switch Preset On Created Video Wall
To Switch Preset on created video wall: 1. Lock the video wall layout editor by clicking the Edit Mode switch to slide it to the right (turns green). This completes setup of the video wall configuration. Figure 5.2.29 Enable Lock Video Wall Edit Mode The video wall controlling page will be changed to locked edit mode. -
Page 95: Appendix A Using The "Surfer" Feature
Sequoia’s keyboard and mouse to control that computer. By default, the “Surfer” feature is enabled upon starting up the Sequoia 4K60. For computers hosting Linux, or Android, or Embedded Operating System, you will need to switch off “Surfer” feature by using keyboard “Ctrl + Alt + Shift + F8”... - Page 96 Below figure shows the allowed “Source” window control switching action upon moving the mouse to the window sides (“shaded area” indicators). Moving the mouse from one “Source” window to another transfers control from the former window to the target window. No “Source”...
-
Page 97: Surfer" Feature On Non-Uniform Quad Layout
“Surfer” Feature on Non-uniform Quad Layout Below figure shows possible “Source” window control switching actions. By moving the mouse from one “Source” window to the other transfers control from the former window to the target window. No “Source” window control switching action will occur upon moving the mouse to the window sides without arrow and shaded area indicators. -
Page 98: Appendix B Using Touch Screen(S)
Appendix B Using Touch Screen(s) The Sequoia 4K60’s five HDMI 2.0 outputs and five USB-A ports can connect to up to five 4K UHD multi-touch screens. On the single-view fullscreen monitors, the operator can use touch to quickly and easily switch between the different input sources, with touch control of the source computers. On the multiview, tap and drag to freely move the windows around and make them larger or smaller, and double-tap on a window to switch touch control to a different source computer. - Page 99 1. The Sequoia 4K60 can provide a total maximum current of 500mA for both of USB Type-A port marked 1 and 2; and another total maximum current of 500mA for both of USB Type-A port marked and 4. 2. Please be advised when using wireless mouse/keyboard, signal interference may occur with other 2.4 GHz devices in close proximity, leading to slow mouse movement or other issues.
-
Page 100: Basic Operation For Using Touch Screen(S)
Host Mode When a window in Sequoia 4K60 with touch screen function is in Host mode, the cursor will be controlled by the tap of your finger on the window. Host mode provides a monitoring solution for the incoming computer/video signals. -
Page 101: Tips On Navigating The Touch Screen Monitor Using The Sequoia 4K60
Tips on Navigating the Touch Screen Monitor Using the Sequoia 4K60 A maximum of four computers can be connected to a single Sequoia 4K60. The Sequoia 4K60 puts the images of four computers onto four windows and simultaneously displays them on the touch screen. -
Page 102: Audio Tally
To switch source while in fullscreen Host operation mode, tap on icon for approximately one (1) second. Figure B.2.1.2 Touch Screen: Pop-up Selection (When in Fullscreen Mode) B.2.2 Audio Tally To enable audio output on any window, tap once on the audio tally (the audio is in off state), then it will turn to (the audio is playing through HDMI to monitor) showing that audio output is coming from... -
Page 103: Exit From Remote Operation Mode To Host Operation Mode
B.2.4 Exit from Remote Operation Mode to Host Operation Mode To exit from Remote operation mode to Host operation mode, press within half inch of the upper or lower edges of the touch screen and hold for approximately two (2) seconds. Figure B.2.4.1 figure indicates these areas with the yellow rectangles. -
Page 104: Switch Control (Cycle) Between Windows
B.2.5 Switch Control (Cycle) Between Windows To switch Source (cycle) while in fullscreen Remote operation mode, press within half inch of the left or right edges of the touch screen and hold for approximately two (2) seconds. Note: Figure B.2.5.1 indicates these areas with the blue rectangles. ... -
Page 105: Appendix C Resetting To The Factory Default State
Figure C.1.2 Warning Message Window to Confirm the Factory Default Process Step 3. Reboot Sequoia 4K60 (power OFF, and then power ON) when the prompt appears onscreen to complete the process of resetting to its factory default state. -
Page 106: Using The Dip Switch On Rear Panel
1. When you reset the Sequoia 4K60 to factory default settings, all of your settings and configurations are deleted. 2. Before you reset the Sequoia 4K60, it is recommended to first back up your configuration, When you finish resetting your Sequoia 4K60 to factory default state, you can restore the configuration to the Sequoia 4K60. -
Page 107: Appendix D Serial Port Pin Out
Avitech proprietary commands to control the Sequoia 4K60. Terminal block (1) indicate the left screwless 3-pin terminal block on the rear panel of Sequoia 4K60. Terminal block (2) indicate the right screwless 3-pin terminal block on the rear panel of Sequoia 4K60. -
Page 108: Appendix E Dimensions
Appendix E Dimensions Unit: mm Front View Bottom View... - Page 109 Side View...
Need help?
Do you have a question about the Sequoia 4K60 and is the answer not in the manual?
Questions and answers