Table of Contents
Advertisement
Quick Links
Advertisement
Table of Contents

Related Manuals for Wisi WA 8000C


Summary of Contents for Wisi WA 8000C
- Page 1 User’s Manual WA 8000C...
-
Page 3: Table Of Contents
CONTENTS Safety use ............Danger warning ..........Note ..........Chapter 1 Overview ........ 1.1 Features..............1.2 Accessories............Chapter 2 Introduction of panel function ..2.1 Remote Control............2.2 Front panel introduction.......... 2.3 Top panel introduction........2.4 Rear panel introduction........Chapter 3 Detail operation guide .... -
Page 4: Safety Use
Safety use: ①. Consumers who using the product for the first time should read this manual carefully. ②. Don not touch the LCD screen. ③. Don not place heavy items on the device. ④. Don not lay the device closes to heating source, in the sunshine, in place with strong mechanical vibration or full of dust. - Page 5 (3). Charge temperature range:Recommended charge temperature range is 0~45. Charging in the environment beyond this range may cause a decrease in battery performance and reduce the life span. (4). Charging mode:Please use the special charger and the use of the recommended charging mode, in the recommended environment to the battery charge.
-
Page 6: Features
Chapter 1 Overview The is a HD digital signal meter and portable device for installation and adjustment of satellite and terrestrial receiving antenna. 1.1 Features: ■Combo of DVB-S2 and DVB-T2 DVB-C ■High resolution 5’’TFT LCD ■Multi-lingual OSD and use-friendly UI ■Support Spectrum function ■Real time constellation display ■Support TP search and blindly search... -
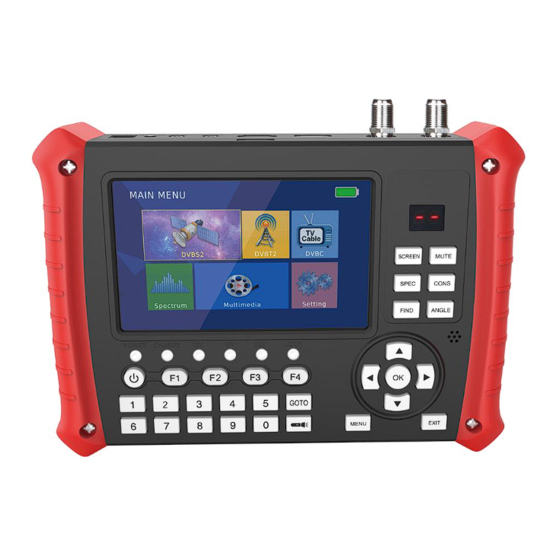
Page 7: Chapter 2 Introduction Of Panel Function
Chapter 2 Introduction of panel function 2.1 Remote Control 1.Power 2.Show the teletext content if teletext is transmitted 3.Subtitle Language 4.Sleep 5.Find 6.Play Stop and Pause 7.Main Menu 8.Confirm the highlighted menu item. Open the channel list 9.Left and Right 10.EPG 11.Fast Backward and Fast Forward 12.Numeric Key(0-9) -
Page 8: Front Panel Introduction
2.2 Front panel introduction 1. Power switch: press it for 3~4 seconds to switch the device power on/off 2.Power indicator 3.Battery indicator(Red light for charging, green light for fully charged) 4.13V indicator 5.18V indicator 6.22KHz indicator 7.Signal Locked indicator 8.F1~F4: shortcut keys 9.Numeric keys 10. -
Page 9: Top Panel Introduction
23.LCD screen 24.Remote Control Input 2.3 Top panel introduction 1. F connector male for LNB IN 2. F connector male for ANT IN 3.USB connector 4.HDTV OUT connector 5.AV OUT connector(3.5 PHONE JACK) 6.AV IN connector(3.5 PHONE JACK) 7.Reset key 8.DC jack(for charger) 9. -
Page 10: Chapter 3 Detail Operation Guide
Chapter 3 Detail operation guide When you turn on the device, you can see the main menu which consists of DVB-S2, DVB-T2, DVB-C, Compass, Spectrum, Multimedia and Setting. 3.1 DVB-S2 3.1.1 Satellite Finding Move cursor to“Satellite Finding ’’and press“OK’’, then you can enter the“Satellite Finding’’... - Page 11 ■Press“OK’’ on the LNB Type option, then you can see the following window. Press[▲/▼]to select the LNB Type and you can press“OK’’ to confirm. ■Press“OK’’ on the Freq、 Symbol Rate、 Polarity option, then you can see the following window. ■Use the digital button to input the Frequency, Symbol Rate and Polarity manually, then you can press“...
- Page 12 after the search (if there is a program on the Transponder). 3.1.2 Dish Setting Move cursor to“Dish Setup’’ and press“OK’’, then you can enter the“Dish Setup’’ interface. ■Under the Satellite list page, you can press[▲/▼]to select the satellite. ■Press [F1] to add a new satellite through setting Satellite Name, Longitude Direction, Longitude Angle or Band.
- Page 13 ■Press [F3] to delete existed satellite. If you press OK , the satellite will be deleted or you can press“EXIT’’ to exit. ■Press[F4]to Begin Scan, with Default, Blind Scan, Network these three scan modes. ■Press [GOTO] to get into the TP list, you can also use [F1] [F2] [F3] [F4] to add, edit, delete or begin to scan the selected TP, and Press [GOTO] to return to the satellite list.
-
Page 14: Angle Calculation
■Selete one of the satellites and press[◀ / ▶]to get into the LNB Type setting. ■LNB Type: Press[▲/▼]to choose LNB Type between 9750/10600, 9750/10750, 05150, 05750, 09750, 10600, 10750, 11300 and 11475. ■LNB Power: Press[◀ / ▶]to choose between Off/13V/ (13V/18V)/18V. ■22K: Choose AUTO/ON/OFF. -
Page 15: Constellation Analyzer
■Press[▲/▼]on Sat Longitude option, then you can use the digital button to input the satellite longitude you want. ■If you select Manual, then you can move cursor to the Local Longitude and the Local Latitude and use the digital button to input the number you want. ( Press[◀... -
Page 16: Dvbc
3.2 DVB-T2 Move cursor to“DVB-T2’’and press“OK’’, then you can enter the“DVB-T2’’interface. ■Press[▲/▼]on Manual Search and press“OK’’ , then you can see the following menu. 3.3 DVB-C Move cursor to“DVB-C’’and press“OK’’, then you can enter the“DVB-C’’interface. ■Press[▲/▼]on Manual Search and press“OK’’ , then you can see the following menu. -
Page 17: Spectrum
3.4 Spectrum Move cursor to“Spectrum’’ and press“ OK’’ , then you can enter the“Parameter Setting’’ interface. ■Press [F1] to switch SPAN of spectrum frequency, FULL as default, The smaller span will show clearer signal status of frequencies. ■Press [F4] to pause current status. ■Press [▲/▼] to move vertical coordinate's position. -
Page 18: Setting
■Press[▲/▼]on Multimedia and press“OK’’ , then you can see the following menu. ■Press[◀ / ▶] to select the item you want to get into and press“OK ’’to select the file you want to play Music, Photo, Movie and PVR. ■Press[◀ / ▶]to select PVR and press“OK’’ , press[▲/▼] to select the [HBPVR] file and press“OK’’ , then you can see the program you have recorded. -
Page 19: Program
3.6.1 Program Move cursor to“Program” and press“OK”, then you can enter the“program”interface. ■Press [▲/▼] on Program Edit option and press“OK ’’, enter password: 000000 then you can see all the TV list. ■Move 1.Press [▲/▼] on channel list, select the channels which you want to edit in channel list by press [Red/F1] Key. - Page 20 ■Lock (Password: 000000) 1.Press [▲/▼] on channel list, select the channel which you want to edit in channel list by press [Yellow/F3] Key. 2.Press [Yellow/F3] Key to lock or unlock the channel. 3.Press [EXIT] Key to save the settings. ■Delete 1.Press [▲/▼] on channel list, select the channels which you want to edit in channel list by press [Blue/F4] Key.
-
Page 21: Epg
3.Press [EXIT] Key to save the settings. ■Skip and rename Follow the same way you can set the channel’s Skip or give the new name. ■Press[▲/▼]on Sort option, here you can Press [◀ / ▶] to select“By Freq ’’ , “By Service Name ’’, “Default ’’or“By Encrypt ’’. -
Page 22: System
can see the following menu. ■Press[▲/▼]on Keypad backlight, Keypad Tone, or Led Display option, then press[◀ / ▶]to choose backlight, Keypad Tone or Led Display between“On’’&“Off’’. 3.6.4 System ■Press[▲/▼]on “System” and press“OK ’’, then you can see the following menu. ■Press“OK’’... -
Page 23: Picture
■Press“OK ’’on Restore Factory Default to Factory Reset. ■Press“OK ’’on information option to get the hardware or software version. 3.6.5 Picture ■Press[▲/▼]on “Picture” and press“OK ’’, then you can see the following menu. Here you can set the Aspect Ratio, Resolution, TV Format, PQ Level and so on... -
Page 24: Time
3.6.6 Option ■Press[▲/▼ ]on Option and press“OK’’ ,then you can see the following menu. ■Press[▲/▼]to choose OSD Language, Subtitle Language or Audio Language you want. 3.6.7 Time ■Press[▲/▼]on Time option and press“OK’’ , then you can see the following menu. ■Press[◀... -
Page 25: Usb Upgrade
3.6.8 USB Upgrade Put the SW into USB, and move cursor to“USB Upgrade ’’ and press“OK’’, then you can enter the“Software Update ’’ interface to choose the correct SW to upgrade. Chapter 4 Technical Specifications System Resources Main Processor 600M Hz based CPU Flash Memory 64M Bits DDR SDRAM... - Page 26 Voltage measurement range DC 0~110V Antenna power supply +5V 150MA maximum current +12V 350MA +24V 350MA Power Supply Input Voltage Adapter Free Voltage (100~240V AC 50/60Hz) Power Consumption 11W MAX Power charger output 12V DC 3.0A Battery 12.6V/4000mAh Battery charging time 3~6H Battery standard discharging >5H...
Need help?
Do you have a question about the WA 8000C and is the answer not in the manual?
Questions and answers