Advertisement
Quick Links
Tools Required:
3/4" Standard Socket
3/8" Drive Ratchet
3/4" Combination End Wrench
ULTRA PRO™
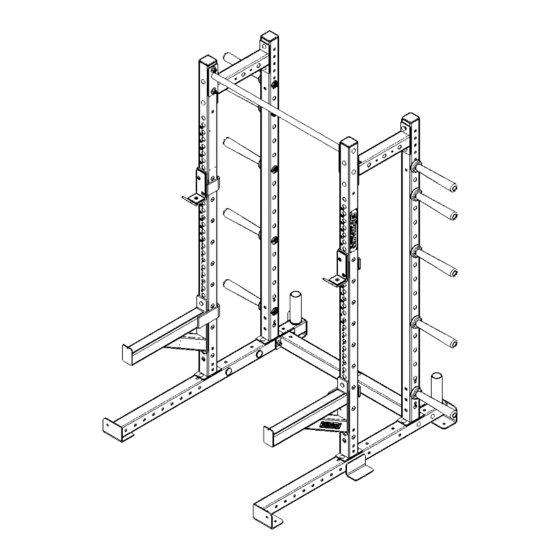
HALF RACK ASSEMBLY INSTRUCTIONS
Use the 5" carriage bolts
to mount chin station
on ULTRA PRO™ Models
844-678-7447
TITAN G2
www.MyDynamicFitness.com
Models:
400112
400112SB
400212
400212SB
700102
700102SB
700112
700112SB
700152
700202
700202SB
700212
700212SB
5
Advertisement

Related Manuals for Dynamic ULTRA PRO

Summary of Contents for Dynamic ULTRA PRO
- Page 1 3/4” Standard Socket 400112 3/8” Drive Ratchet 400112SB 3/4” Combination End Wrench 400212 400212SB 700102 Use the 5” carriage bolts 700102SB to mount chin station on ULTRA PRO™ Models 700112 700112SB 700152 700202 700202SB 700212 700212SB ULTRA PRO™ TITAN G2 844-678-7447...
- Page 2 Before Assembling this rack: Before Assembling this rack: Before assembling this rack: Consider how much space will be Consider how much space will be Consider how much space will be The mounting access for bar The mounting access for bar The mounting access for bar required around the unit to access weights required around the unit to access weights...
- Page 3 Install carriage bolt heads as shown with all bolt heads Install carriage bolt Install carriage bolt heads facing the front of the rack as shown with all bolt heads heads as shown with facing the front of the rack all bolt heads facing the front of the rack DETAIL A SCALE 1:6...
- Page 4 Use 5" bolt on ULTRA PRO Use 5” bolt on ULTRA PRO™ Use 4" bolt on TITAN G2 Use 4” bolt on TITAN G2 Step Five Step 5 A Step 4 Step Four Attach horizontal chinup bar between left and Attach horizontal chin up bar between left and right uprights as shown.
- Page 5 Use 5" bolt on ULTRA PRO Use 4" bolt on TITAN G2 Additional band/belt storage Additional band/belt storage included on some models included on some models Step Five Step 5 B Step 6 Step Six Attach horizontal chinup bar between left and Attach horizontal chin up bar between left and right uprights as shown.
- Page 6 Mount with 1/2” floor anchors at all four corners using holes provided. (Anchors not provided) Step 7 Step 8 Step Eight Step Eight Step Seven Step Seven Mount bar catch and safety assemblies Position rack in final position and anchor to Position rack in final position and anchor to Position rack in final position and anchor to Mount bar catch and safety assemblies...
-
Page 7: Maintenance
End of bolt MUST End of bolt MUST Maintenance Maintenance extend beyond nut face extend beyond nut face at all locations at all locations Preventative actions will keep your Preventative actions will keep facility safe and productive for all your facility safe and productive users for all users 1) Wipe Down Equipment... - Page 8 HARDWARE PACK CONTENTS *QUANTITIES VARY BY MODEL* HALF RACK INSTRUCTION SHEET 1.50 5.00 4.00 LKNT-500-002 FLW-500-001 CAIR-500-002 CAIR-500-001...
- Page 9 TITAN PRO HALF RACK ASSEMBLY INSTRUCTIONS 400512 (2) 1/2” Hex Key Wrench (2) 1/2" HEX KEY WRENCH 400512 For installation and assembly questions please contact 844-678-7447 www.MyDynamicFitness.com Twitter@DynamicFandS DYNAMIC technical services at 844-678-7447 Facebook@DynamicfitnessandStrength Instagram@Dynamic_fitness_and_strength See the complete line of products at MYDYNAMICFITNESS.COM...
- Page 10 SINGLE BOLT SINGLE BOLT FLANGE FACING FLANGE FACING Single Bolt Flange UPWARDS UPWARDS Facing Upwards NUMBERED NUMBERED Numbered upright UPRIGHT FACING UPRIGHT FACING facing inward NUMBERED NUMBERED Numbered upright INWARD INWARD UPRIGHT FACING UPRIGHT FACING facing inward INWARD INWARD Step 1 Install the upright with laser cut number, and rear STEP ONE: STEP ONE:...
- Page 11 STEP THREE: STEP THREE: STEP FOUR: STEP FOUR: INSTALL CHIN UP BAR ONTO CENTER OF THE UPPER CENTER INSTALL CHIN UP BAR ONTO CENTER OF THE UPPER CENTER INSTALL SAFETIES, J-CUPS AND WEIGHT PEGS AT THE DESIRED LOCATION. INSTALL SAFETIES, J-CUPS AND WEIGHT PEGS AT THE DESIRED LOCATION. CONNECTOR AS SHOWN.
Need help?
Do you have a question about the ULTRA PRO and is the answer not in the manual?
Questions and answers