Advertisement
Quick Links
Advertisement

Summary of Contents for Shiantech SA1200P II
- Page 1 CO2 Monitor- SA1200P Ⅱ Instruction Manual...
- Page 2 This operation manual is only for your reference. For further information, please contact us. contact us Web: www.shiantech.com Tell:86-10-89498895 E-mail:shian@shiantech.com...
-
Page 3: Table Of Contents
Getting Started Thanks for purchasing our CO2 Monitor 1200P with memory and storage. Developed to detect CO2 concentration, temperature and relative humidity in ambient air, this device is smart, compact and easy to use. It automatically records data and can be easily exproted to a computer into an Excel file format. -
Page 4: Tips
Tips Icons description: Relevant information Normally on and flashing press button and page number explain: The button only works when the backlight is on. Click any key to light the backlight. Please press quickly and gently, don't press hard, or hold for long. -
Page 5: Attention
Attention Please read this manual carefully and keep it properly for future reference. This device is not intended for workplace hazard CO2 monitoring, nor is it intended as a definitive monitor for human or animal health institutions, life sustenance, or in any medically-related situation. warning In order to avoid and reduce risks and equipment damage, please:... -
Page 6: Product Introduction
Product introduction 1 Packing list (a) CO2 Monitor Unit (b) USB Cable for Power (c) User’s Manual (d) AC Power Adapter... - Page 7 2 Name Power indicator light (Green LED) ENTER Button It is always on when the power is Determine the menu items and set on and flickers when charging values in the selection Tricolor indicator Hole for Buzzer LCD Display Hole for Rope Use for hanging the device on the wall UP/DOWN Buttons Hole for Screws...
-
Page 8: How To Use
How to use Initial setup When first unboxing, plug the included USB cable into the unit and the other end into USB power source, then press the switch on the back. Switch on Switch off If successfully connected, three things will happen while booting up: 1. - Page 9 Once the countdown is complete, your product is ready to use. No initial setup or calibration is needed. (Detecting interface) Power supply: 1. Direct power from power adapter and USB cord. 2. Built-in battery power. 3. Computer USB port and purchased regular and qualified cell phone charger.
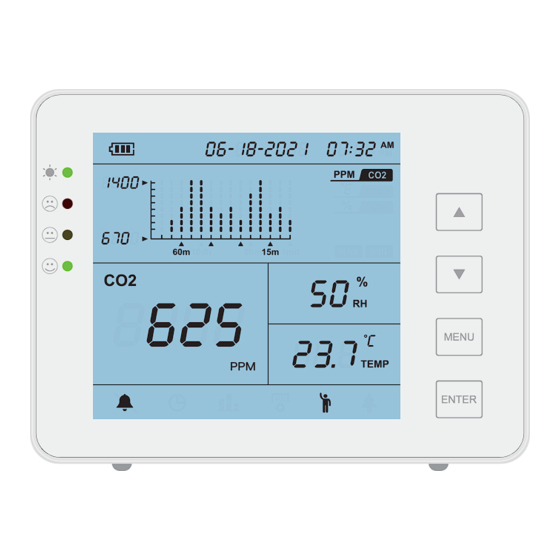
- Page 10 2 LCD display (a) Battery icon Display battery level and battery status (b) Date/time Displays the current date and time (c) Chart Display the curve of CO2, temperature and humidity Humidity Reading area Displays the current humidity Ordinate value Table object Display , indicating low / high alarm point...
- Page 11 3 battery Battery indicator Low battery : steady green indicator (Charge ..the device within 20 minutes to ......avoid battery damage) Charging : flashing green indicator Fully charged: steady green indicator Battery recharging When the device is ON, plug in USB cable power Charging time: 2.5 hours (Charge extra 30 minutes after the indicator turning from ......red to green) Working time : 8-10 hours...
- Page 12 4 Alarm (1)Buzzer sounds When the buzzer icon displays an audible alarm will sound if the CO2 level exceeds preset CO2 alarm value; means MUTE. (2)Light tips Human model Red LED on : CO2 reading > High alarm point Yellow LED on : Low alarm point <...
- Page 13 5 Trend Chart Display (a) Switching table objects CO2 chart Temperature chart Humidity chart If necessary, you can press to toggle table display objects. The instrument default CO2 chart, when switching to temperature or humidity chart, no operation for a period of time will automatically jump back to CO2 chart.
- Page 14 (b) Switching the timeline and view the max/min value m: minute; h: hour; d: day On this timeline, one column represents 3 minutes. Indicates the data within 5 minutes from the current time Indicates the data generated within the last 5 to 10 minutes based on the current time If necessary, you can press to switch the timeline.
-
Page 15: How To Set Up
How to set up 1 Restore factory defaults In detection panel , hold until an audible beep is heard. ENTER 2 The menu Settings Press once to activate the menu bar, press to cycle and switch MENU function options.(Blinking Indicates the selection status) When blinks, press to exit the menu bar. - Page 16 (b) Set the time When blinks, press to enter the choice, press to switch ENTER Options. Example: ENTER When an item blinks, press to enter the setting, press to adjust ENTER the value, press to switch to the next item, press to exit.
- Page 17 (c) View the data in each column of the table When blinks, press to view the table, press to select the ENTER columns of the chart and to toggle the timeline. Data for each column of the chart will be displayed in the CO2, temperature and humidity display area.
- Page 18 (e) Human/Plant model Check interface menu bar displays human mode or plant mode When blinks, press to set this mode, then set high/low alarm ENTER point. Example: ENTER ENTER ENTER Set a high alarm point or press to exit MENU...
-
Page 19: Specifications
Specifications CO2 Measurement Measuring range (0-5000)ppm Display resolution 1ppm (0-1000); 5ppm (1000-2000); 10ppm (>2000) Sensor lifetime 10-15 years (0~3000)ppm: ± ( 50ppm + 5% of reading ) Accuracy (>3000)ppm: ± 7% of reading Repeatability 20ppm at 400ppm Temp compensation ±0.1% of reading per ℃ ±2 ppm per ℃, referenced to 25℃ Response time <2 min for 63% of step change or <... - Page 20 RH Measurement Measuring range 5~95% Accuracy ±5% Display resolution 1% Main interface display, 1% Max/Min display Data storage capacity Operating Temperature 32°F ~ 122°F (0°C ~ 50°C) Storage Temperature -4°F ~ 140°F (-20°C ~ 60°C) Operating & storage RH 0-95%(non-condensing) Operating Voltage DC(5±0.25)V Dimension...
-
Page 21: Operation Mode
Operation mode You can log in to http://www.shiantech.com/dash/dash-board/ to learn more Set the time and date of the CO2 Monitor and synchronise it with your computer. This step is important in order for your CO2 Monitor to be able to correctly record when each sample is received. - Page 22 To check the recorded data, connect the CO2 Monitor to your computer with the provided USB cable.
- Page 23 Double-click ‘My computer’ and select the USB drive (DATA). DATA(F:) 可移动设备(D) 1.58GB free of 1.87GB...
- Page 24 Find the file, copy it to a folder on your computer, open it and re-save it in Excel format, now you can analyse and edit the file. Name Date modified Type Size ,csv DATALOG Microsoft Excel,csv 180KB...
- Page 25 Open the file. The file is shown in the figure below...
- Page 26 (a): Select time range for chart display (b): Select time precision for chart display (c): Upload the copied files from the instrument (d): View the instructions...
Need help?
Do you have a question about the SA1200P II and is the answer not in the manual?
Questions and answers