
Related Manuals for Toro eTimeMaster eTM76


Summary of Contents for Toro eTimeMaster eTM76
- Page 1 Form No. 3461-709 Rev A eTimeMaster™ eTM76 76cm 60V Lawn Mower Model No. 21876—Serial No. 400000000 and Up Model No. 21876T—Serial No. 400000000 and Up *3461-709* Register at www.Toro.com. Original Instructions (EN)
-
Page 2: Safety-Alert Symbol
It is designed to use Toro 60V lithium-ion battery packs. These battery packs are designed to be charged only by Toro 60V The safety-alert symbol appears above information lithium-ion battery chargers. Using these products for... -
Page 3: Table Of Contents
Replace any damaged or unreadable labels. Use only the battery pack specified by Toro. Using other accessories and attachments may increase the risk of injury and fire. Plugging the battery charger into an outlet that... - Page 4 Charge the battery pack with only the battery Do not use a battery-operated lawn mower in charger specified by Toro. A charger suitable for rain. 1 type of battery pack may create a risk of fire when used with another battery pack.
- Page 5 Replace the battery pack with a genuine Sharpen a dull blade on both edges to maintain Toro battery pack only; using another type of balance. Clean the blade and ensure that it is battery pack may cause a fire or risk of injury.
-
Page 6: Safety And Instructional Decals
Safety and Instructional Decals Safety decals and instructions are easily visible to the operator and are located near any area of potential danger. Replace any decal that is damaged or missing. decal145-1454 145-1454 1. Warning—read the 4. Thrown object Operator’s Manual. hazard—keep bystanders away;... - Page 7 Model 81805 decal144-6035 144-6035 1. Do not dispose improperly 3. For indoor use 2. Read the Operator’s Manual. 4. Double insulated decal145-3129 145-3129 1. The battery pack is charging. 3. The battery pack is over or under the appropriate temperature range.
-
Page 8: Setup
Setup Important: The battery pack is not fully charged when it is purchased. Before using the machine for the first time, refer to Charging the Battery Pack (page 17). Important: Remove and discard the protective plastic sheet that covers the motor and any other plastic or wrapping on the machine. -
Page 9: Installing The Blade-Control Bar
Installing the Blade-Control Mounting the Battery Charger (Optional) No Parts Required Parts needed for this procedure: Mounting hardware (not included) Procedure Procedure If desired, mount the battery charger securely on a wall using the wall-mount key holes on the back of the charger. -
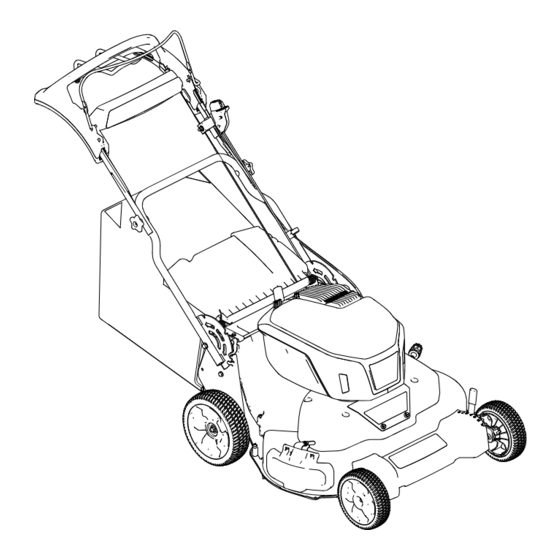
Page 10: Product Overview
Product Overview g426502 Figure 9 1. Battery charger Model 2. Battery pack Model 68810 81805 (included with (2 included with Model Model 21876) 21876) Specifications Model Model Weight Length Width Height 21876 and 59.4 kg 81 cm (32 cm (65 cm (45 21876T (131 lb) -
Page 11: Attachments/Accessories
Attachments/Accessories A selection of Toro approved attachments and accessories is available for use with the machine to enhance and expand its capabilities. Contact your Authorized Service Dealer or authorized Toro distributor or go to www.Toro.com for a list of all approved attachments and accessories. -
Page 12: Adjusting The Handle Height
Adjusting the Handle Height You may raise or lower the handle to a position comfortable for you. Pull the handle-lock lever rearward to disengage the handle-lock pins, move the handle to 1 of 4 positions, and release the handle-lock lever to secure the handle in place (Figure 11). -
Page 13: During Operation
During Operation Starting the Machine Ensure that the battery pack(s) are installed in the machine; refer to Installing the Battery Pack (page 11). Insert the electric-start button into the electric-start switch (A of Figure 13). Squeeze the blade-control bar and hold it to the handle for 2 seconds (B of Figure 13). -
Page 14: Shutting Off The Machine
Shutting Off the Machine Recycling the Clippings Release the blade-control bar (A of Figure 16). This machine comes from the factory ready to recycle grass and leaf clippings back into the lawn. To prepare Remove the electric-start button from the the machine to recycle, do the following: electric-start switch (B of Figure... -
Page 15: Side-Discharging The Clippings
g426289 Figure 18 Removing the Grass Bag DANGER The machine can throw grass clippings and other objects through an opening in the machine housing. Objects thrown with enough force could cause serious personal injury or death to you or to bystanders. •... -
Page 16: Operating Tips
• For best performance, install new Toro blades before the cutting season begins or when necessary. Cutting Grass •... -
Page 17: After Operation
After Operation Slide the battery pack into the charger until it is fully seated (Figure 20). To remove the battery pack, slide the battery Removing the Battery Pack backward out of the charger. from the Machine Refer to the following table to interpret the LED indicator light on the battery charger. - Page 18 Attach a hose to the washout fitting, and turn the water on high (Figure 21). Note: Spread petroleum jelly on the washout fitting O-ring to make the coupling slide on easier and protect the O-ring. g003934 Figure 21 1. Washout fitting 3.
-
Page 19: Folding The Handle
Folding the Handle WARNING Folding or unfolding the handle improperly can damage the cables, causing an unsafe operating condition. • Do not damage the cable(s) when folding or unfolding the handle. • Ensure that the cable(s) are routed to the outside of the handle. •... -
Page 20: Maintenance
Maintenance Recommended Maintenance Schedule(s) Maintenance Service Maintenance Procedure Interval • Check the cutting blades. Before each use or daily • Clean grass clippings and dirt from under the machine. After each use • Service the blade-drive system. Every 50 hours •... -
Page 21: Servicing The Blades
Hold a 0.25 mm (0.010 inch) feeler gauge, a WARNING piece of paper, or a note card against the wall When servicing the blade, the blade can still and slide it down behind the belt tension spring. move even though the power source is off. Note: If there is a visible gap between the The blade is sharp;... -
Page 22: Checking For Bent Blades
Replace the blades when the machine hits a solid object or when a blade is out of balance or bent. Use only genuine Toro replacement blades. Use a block of wood to hold each blade steady and turn the blade bolt counterclockwise as... -
Page 23: Installing The Blades
the other side of each blade driver with the holes in its corresponding blade. Steady each blade with a board and turn the blade bolt clockwise with a torque wrench as shown in Figure 31; torque the blade bolt to 82 N∙m (60 ft-lb). -
Page 24: Preparing The Battery Pack For Recycling
Storage WARNING Incorrectly installing the blades could damage Important: Store the machine, battery pack, and the machine or cause an injury to you or charger only in temperatures that are within the bystanders. appropriate range; refer to Specifications (page Use care when installing the blades. 10). -
Page 25: Troubleshooting
Troubleshooting Perform only the steps described in these instructions. All further inspection, maintenance, and repair work must be performed by an authorized service center or a similarly qualified specialist if you cannot solve the problem yourself. Problem Possible Cause Corrective Action The machine does not start. - Page 26 Problem Possible Cause Corrective Action The LED indicator light on the battery 1. There is an error in the communication 1. Remove the battery pack from the charger is blinking red. between the battery pack and the battery charger, unplug the battery charger.
- Page 27 Notes:...
Need help?
Do you have a question about the eTimeMaster eTM76 and is the answer not in the manual?
Questions and answers