Table of Contents
Advertisement
Available languages
Available languages
Quick Links
Advertisement
Chapters
Table of Contents

Related Manuals for Warm-On AC20N

Summary of Contents for Warm-On AC20N
- Page 1 Portable Air Conditioner Local air conditioners Portable air conditioner AC20N white Portable air conditioner AC26N white Owner’s Manual Original instructions Cooling & Heating (With R290 refrigerant) 0305 R290...
- Page 2 READ AND SAVE THESE INSTRUCTIONS CONTENTSNEVER 1. BEFORE YOU BEGIN 2. FOR YOUR SAFETY 3. PRODUCT OVERVIEW 4. INSTALLATION 5. OPERATION 6. CLEANING AND CARE 7. TROUBLESHOOTING 8. DECOMMISSIONING...
- Page 3 1. BEFORE YOU BEGIN 1.1 PRODUCT DESCRIPTION Our powerful portable air conditioners are great cooling solutions for single rooms, creat- ing a comfortable atmosphere in your space. It also has ventilation and dehumidifying func- tion for circulating air and removal of moisture. They’re self-contained systems that do not require any permanent installation allowing you to move to the space in which it is most needed.
- Page 4 THE FOLLOWING SHOULD ALWAYS BE OBSERVED FOR SAFETY • This appliance is intended to be used by expert or trained users in shops, in light indus- try and on farms, or for commercial use by lay persons. • This appliance can be used by children aged from 8 years and above and persons with reduced physical, sensory or mental capabilities or lack of experience and knowledge if they have been given supervision or instruction concerning use of the appliance in a safe way and understand the hazards involved.
- Page 5 2. FOR YOUR SAFETY YOUR SAFETY IS THE MOST IMPORTANT THING WE CONCERNED! PLEASE READ THIS MANUAL CAREFULLY AND FULLY UNDERSTAND BEFORE OPERATING YOUR APPLIANCE. WARNING 2.1 OPERATIONAL PRECAUTIONS WARNING- TO REDUCE THE RISK OF FIRE, ELECTRIC SHOCK OR INJURY TO PERSONS OR PROPERTY: •...
- Page 6 • Ensure the unit is far away from fire, inflammable, or explosive objects. • The unit shall be installed in accordance with national wiring regulations. • Do not use means to accelerate the defrosting process or to clean, other than those recommended by the manufacture.
- Page 7 2.2 SAFETY PRECAUTIONS ON SERVICING Please follow these warnings when to undertake the following when servicing an appliance with R290. 2.2.1 Checks to the area Prior to beginning work on systems containing flammable refrigerants, safety checks are necessary to ensure that the risk of ignition is minimized. For repair to the refrigerating system, the following precautions shall be complied with prior to conducting work on the system.
- Page 8 2.2.8 Checks to the refrigeration equipment Where electrical components are being changed, they shall be fit for the purpose and to the correct specification. At all times the manufacturer’s maintenance and service guidelines shall be followed. If in doubt consult the manufacturer’s technical department for assistance.
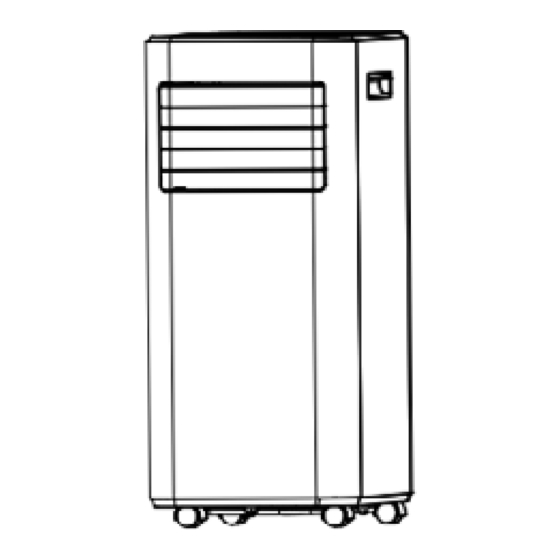
- Page 9 3. PRODUCT OVERVIEW 3.1 PRODUCT DIAGRAM Control panel Air outlet with adjustable louver Handle Air inlet with air filter Caster Drainage Hole Air Exhaust Note: The appearance is only for reference. Please see the real product for detailed information.
- Page 10 3.2 FEATURES • High Capacity in a compact size with fan, cooling and dehumidifying function. • Temperature setting and display • LED Digital display • Electronic control with built-in timer, sleep mode • Self-evaporating system for better efficient • Auto shut off when tank full •...
- Page 11 4. INSTALLATION UNPACKING • Unpack the carton and take the appliance and accessories out. • Check the device after unpacking for any damage or scratches on it. • Accessories: • 1. Exhaust hose • 2. Hose connector • 3. Window kit adapter •...
- Page 12 4.2 CHOOSE YOUR LOCATION • If tipped more than 45°, allow the unit to set upright for at least 24 hours before start up. • Place the unit on a firm, level surface in an area with at least 50cm of free space around it to allow for proper air circulation.
- Page 13 4.3 ATTACH THE EXHAUST HOSE The air conditioner requires being vented outside so that the exhaust air can escape the room which coming from the appliance contains waste heat and moisture. Do not replace or extend exhaust hose which will result in decreased efficiency, even worse shut down the unit due to low backpressure.
- Page 14 Step 4: Close your window to secure the kit in place. It needs to hold the windows kit firmly in place, secure the window kit with duct tape if required. It is recommended that the gap between the adapter and the sides of the window should be sealed off for maximum efficiency.
- Page 15 5. OPERATION 5.1 CONTROL PANEL AND DISPLAY The air conditioner requires being vented outside so that the exhaust air can escape the room which coming from the appliance contains waste heat and moisture. Do not replace or extend exhaust hose which will result in decreased efficiency, even worse shut down the unit due to low backpressure.
- Page 16 5.2 REMOTE CONTROL 5.3 SETTINGS 5.3.1 Start-up and Shutdown → Press POWER to turn the unit on. → Press MODE button to select the desired operation mode. → Press POWER again to turn off the power. 5.3.2 Operation mode The unit has five operation modes: Fan, Cool, Heat, Dehumidifier, sleep.
- Page 17 D. DRYING YOUR ROOM → Press MODE button on the control panel or remote control, the dry indicator lights up. The fan speed is unable to select. User should connect the hose to the drain outlet at the bottom of the unit. Note: In this mode, the fan speed switches over to low speed and cannot be selected.
- Page 18 5.4 DRAINAGE Manual drainage: 1 When the machine stops after the water is full, please unplug the power plug. Notes: Please move the machine carefully, so as not to spill the water in the water pan at the bottom of the body. 2 Place the water container below the side water outlet behind the body.
- Page 19 • Switch off the unit before operating. • Remove the plug of the water outlet opening, and keep it in safe area. • Securely and properly connect the drain hose and make sure it is not kinked and clear of ob- struction.
- Page 20 6. CLEANING AND CARE 6.1. CLEANING THE AIR FILTER (every two weeks) Dust collects on the filter and restricts the airflow. The restricted airflow reduces the efficiency of the system and if it becomes blocked it can cause damage to the unit. The air filter requires regular cleaning.
- Page 21 7. TROUBLESHOOTING SYMPTOM INSPECTION SOLUTION → Check the power connection Insert the power cord securely into the wall Outlet. in securely. → Empty the drain pan by re- Check if the water level The unit is not operating. move the rubber plug. indicator lights up? →...
- Page 22 8. DECOMMISSIONING 8.1. STORAGE Long-Term Storage - If you will not be using the unit for an extended period of time (more than a few weeks) it is best to clean the unit and dry it out completely. Please store the unit per the following steps: 1.
- Page 23 This is why electrical appliances are marked with this symbol. Dispose of the packaging according to type. Put cardboard and carton in the waste paper collection, foils in the recyclables collection. IMPORTER: warm-on GmbH, i_Park Tauberfranken 18, D-97922 Lauda-Königshofen, Germany Tel. +49 (0)9343-9809061 (Customer Support) MANUFACTURER: Zhejiang Oulun Electronic Co.
- Page 25 Climatiseur Portable Climatiseur d’appoint Climatiseur portable AC20N blanc Climatiseur portable AC26N blanc Manuel d’Utilisation Instructions d’origine Refroidissement & Chauffage) (avec réfrigérant R290) 0305 R290...
-
Page 26: Table Of Contents
LISEZ ET CONSERVEZ CES INSTRUCTIONS SOMMAIRE 1. INTRODUCTION 2. POUR VOTRE SÉCURITÉ 3. VUE D’ENSEMBLE DU PRODUIT 4. INSTALLATION 5. FONCTIONNEMENT 6. NETTOYAGE ET ENTRETIEN 7. DÉPANNAGE 8. MISE HORS SERVICE... -
Page 27: Introduction
1. INTRODUCTION 1.1 DESCRIPTION DU PRODUIT Nos puissants climatiseurs portables sont d’excellentes solutions de rafraichissement pour les pièces individuelles, créant une atmosphère confortable dans votre espace. Ils dispo- sent également d’une fonction de ventilation et de déshumidification pour faire circuler l’air et éliminer l’humidité. - Page 28 POUR DES RAISONS DE SÉCURITÉ, IL CONVIENT DE TOUJO- URS RESPECTER LES POINTS SUIVANTS • Cet appareil est destiné à être utilisé par des utilisateurs experts ou formés dans des magasins, dans l’industrie légère et dans des fermes, ou pour un usage commercial par des personnes non initiées.
-
Page 29: Pour Votre Sécurité
2. POUR VOTRE SECURITE VOTRE SÉCURITÉ EST CE QUI NOUS PRÉOCCUPE AVANT TOUTE CHOSE! VEUILLEZ LIRE ATTENTIVEMENT CE MANUEL ET LE COMPRENDRE PARFAITEMENT AVANT D’UTI- LISER VOTRE APPAREIL. WARNING 2.1 PRÉCAUTIONS D’EMPLOI AVERTISSEMENT - POUR RÉDUIRE LES RISQUES D’INCENDIE, D’ÉLECTROCUTION OU DE BLESSURES AUX PERSONNES OU AUX BIENS: •... - Page 30 • Ne pas toucher l’entrée d’air ou les ailettes en aluminium de l’appareil. • N’utilisez pas l’appareil s’il est tombé, s’il est endommagé ou s’il présente des signes de dysfonctionnement. • Ne nettoyez pas l’appareil avec des produits chimiques. • Veillez à...
- Page 31 2.2 PRÉCAUTIONS DE SÉCURITÉ POUR L’ENTRETIEN Please follow these warnings when to undertake the following when servicing an appliance with R290. 2.2.1 Contrôle de la zone de travail Avant de commencer à travailler sur des systèmes contenant des réfrigérants inflammables, des contrôles de sécurité...
- Page 32 2.2.8 Contrôles de l’équipement de refrigeration Lorsque des composants électriques sont remplacés, ils doivent être adaptés à l’usage prévu et répondre aux spécifications requises. Les directives d’entretien et de maintenance du fabricant doivent être respectées à tout moment. En cas de doute, consultez le service technique du fabricant pour obtenir de l’aide.
- Page 33 3. APERÇU DU PRODUIT 3.1 SCHÉMA DU PRODUIT Panneau de commande Sortie d’air avec filtre Poignée Entrée d’air avec filtre à air Roulettes Sortie de vidange Extraction d’air Remarque : l’apparence n’est donnée qu’à titre indicatif. Veuillez consulter le produit réel pour obtenir des informations détaillées.
- Page 34 3.2 CARACTERISTIQUES • Grande capacité dans un format compact avec ventilateur, fonction de refroidissement et de déshumidification. • Réglage et affichage de la température • Affichage numérique LED • Contrôle électronique avec minuterie intégrée, mode veille • Système d’auto-évaporation pour une meilleure efficacité. •...
-
Page 35: Installation
4. INSTALLATION DEBALLAGE • Ouvrez le carton et sortez l’appareil et les accessoires. • Après le déballage, vérifiez que l’appareil n’est pas endommagé ou rayé. • Accessoires : 1. Tuyau d’évacuation 2. Connecteur de tuyau 3. Adaptateur pour kit de fenêtre 4. - Page 36 4.2 CHOIX DE L’EMPLACEMENT • Si l’appareil est incliné à plus de 45°, laissez-le reposer à la verticale pendant au moins 24 heures avant de le mettre en marche. • Placez l’appareil sur une surface dure et plane, dans un endroit où il y a au moins 50 cm d’espace libre autour de l’appareil pour permettre une bonne circulation de l’air.
- Page 37 4.3 FIXATION DU TUYAU D’EVACUATION DE L’AIR L’air chaud produit par le climatiseur doit être évacué vers l’extérieur de la pièce où se trouve l’appareil. Ne remplacez pas ou ne rallongez pas le tuyau d’évacuation, ce qui entraînerait une diminution de l’efficacité, voire l’arrêt de l’appareil en raison d’une faible contre-pression. Étape 1: Branchez le raccord de tuyau à...
- Page 38 Étape 4: Fermez votre fenêtre pour fixer le kit en place. Il doit maintenir le kit de fenêtre fermement en place. Fixez le kit de fenêtre avec du ruban adhésif si nécessaire. Il est recommandé d’obturer l’espace entre l’adaptateur et les côtés de la fenêtre pour une efficacité...
-
Page 39: Fonctionnement
5. FONCTIONNEMENT 5.1 PANNEAU DE COMMANDE ET AFFICHAGE The air conditioner requires being vented outside so that the exhaust air can escape the room which coming from the appliance contains waste heat and moisture. Do not replace or extend exhaust hose which will result in decreased efficiency, even worse shut down the unit due to low backpressure. - Page 40 5.2 TÉLÉCOMMANDE 5.3 RÉGLAGES 5.3.1 Démarrage et arrêt → Appuyez sur POWER pour mettre l’appareil en marche. → Appuyez sur la touche MODE pour sélectionner le mode de fonctionnement souhaité. → Appuyez à nouveau sur POWER pour éteindre l’appareil. 5.3.2 Mode de fonctionnement L’appareil dispose de cinq modes de fonctionnement: Ventilation, refroidissement, déshumidification, chauffage.
- Page 41 doit raccorder le tuyau de vidange à la sortie d’évacuation située au bas de l’appareil. Remarque: dans ce mode, la vitesse du ventilateur passe en vitesse lente et ne peut pas être sélectionnée. . E. MODE VEILLE Le mode veille peut être activé en mode froid →...
- Page 42 5.4 VIDANGE DE L’EAU Evacuation manuelle: 1. Quand l’eau atteint le niveau maximal du bac, l’appareil s’arrête, vous devez alors débrancher la prise d’alimentation. Remarques : Déplacer l’appareil avec précaution afin de ne pas renverser l’eau contenue dans le bac à eau situé au bas de l’appareil 2.
- Page 43 • Eteignez l’appareil avant de procéder • Retirez le bouchon d’évacuation de l’eau et conservez-le dans un endroit sûr. • Raccordez le tuyau de vidange et assurez-vous qu’il n’est pas plié et qu’il n’est pas obstrué. • Placez la sortie du tuyau au-dessus d’un récip- ient et assurez-vous que l’eau peut s’écouler librement de l’appareil.
-
Page 44: Nettoyage Et Entretien
6. NETTOYAGE ET ENTRETIEN 6.1. NETTOYAGE DU FILTRE À AIR (toutes les deux semaines) La poussière s’accumule sur le filtre et restreint le flux d’air. La limitation du flux d’air réduit l’efficacité du système et, s’il se bloque, il peut endommager l’appareil. Le filtre à... -
Page 45: Dépannage
7. DEPANNAGE SYMPTÔME INSPECTION SOLUTION → Insérez fermement le cordon Vérifiez que la connexion électrique d’alimentation dans la prise est bien branchée . murale. L’appareil ne fonctionne → Vérifiez si l’indicateur de niveau Videz le bac de vidange en reti- pas. -
Page 46: Mise Hors Service
8. MISE HORS SERVICE 8.1. STOCKAGE Stockage à long terme - Si vous n’utilisez pas l’appareil pendant une période prolongée (plus de quelques semaines), il est préférable de le nettoyer et de le sécher complètement. Veuillez stocker l’appareil en suivant les étapes suivantes: 1. - Page 47 CONFORMITÉ Le produit est conforme à la Directive 2014/35/EU La déclaration de conformité peut être consultée sur le lien suivant : https://warm-on.fr/media/pdf/31/24/82/50305330_019_ AN_50566167_0001cert_extsigned.pdf Instructions d’élimination conformément à la DIRECTIVE 2002/96/CE Les anciens appareils ne doivent pas être jetés avec les ordures ménagères ! Si le climatiseur n’est plus utilisé, chaque consommateur est tenu par la loi d’éliminer les...
- Page 49 Mobile Klimaanlage Portable air conditioner AC20N weiß Portable air conditioner AC26N weiß Benutzerhandbuch Original-Anleitung Kühlen und Heizen (Mit Kühlmittel R290) 0305 R290...
- Page 50 Lesen Sie diese Betriebsanleitung und halten Sie diese griffbereit. INHALT 1. BEVOR SIE BEGINNEN 2. ZU IHRER SICHERHEIT 3. ÜBERBLICK ÜBER DAS PRODUKT 4. INSTALLATION 5. BETRIEB 6. REINIGUNG UND PFLEGE 7. FEHLERSUCHE 8. STILLLEGUNG...
-
Page 51: Bevor Sie Beginnen
1. BEVOR SIE BEGINNEN 1.1 PRODUKTBESCHREIBUNG Unsere leistungsstarken tragbaren Klimageräte sind hervorragende Kühllösungen für einzelne Räume und schaffen eine angenehme Atmosphäre in Ihrem Raum. Sie verfügen außerdem über eine Belüftungs- und Entfeuchtungsfunktion für die Luftzirkulation und den Abtransport von Feuchtigkeit. Es handelt sich um eigenständige Systeme, die keine feste Installation erfordern, so dass Sie sie an den Ort bringen können, an dem sie am meis- ten benötigt werden. - Page 52 AUS SICHERHEITSGRÜNDEN SOLLTEN SIE IMMER FOLGENDE PUNKTE BEACHTEN • Dieses Gerät ist für die Verwendung durch fachkundige oder geschulte Benutzer in Geschäften, in der Leichtindustrie und in landwirtschaftlichen Betrieben oder für die gewerbliche Verwendung durch Nichtfachleute bestimmt. • Dieses Gerät kann von Kindern ab 8 Jahren und darüber sowie von Personen mit verrin- gerten physischen, sensorischen oder mentalen Fähigkeiten oder Mangel an Erfahrung und Wissen benutzt werden, wenn sie beaufsichtigt oder bezüglich des sicheren Geb- rauchs des Geräts unterwiesen wurden und die daraus resultierenden Gefahren verste-...
-
Page 53: Zu Ihrer Sicherheit
2. ZU IHRER SICHERHEIT IHRE SICHERHEIT IST UNSER GRÖSSTES ANLIEGEN! Bitte lesen Sie die Gebrauchsanleitung vor Inbetriebnahme sorgfältig und verstehen diese vollständig. WARNING 2.1 VORSICHTSMASSNAHMEN FÜR DEN BETRIEB WARNUNG- UM DAS RISIKO EINES BRANDES, EINES ELEK- TRISCHEN SCHLAGES ODER EINER VERLETZUNG VON PER- SONEN ODER SACHEN ZU VERRINGERN, BEACHTEN SIE FOLGENDE HINWEISE: •... - Page 54 • Berühren Sie nicht den Lufteinlass oder die Aluminiumrippen des Geräts. • Nehmen Sie das Gerät nicht in Betrieb, wenn es heruntergefallen oder beschädigt ist oder Anzeichen einer Fehlfunktion aufweist. • Reinigen Sie das Gerät nicht mit Chemikalien. • Achten Sie darauf, dass das Gerät weit entfernt von Feuer, brennbaren oder explosiven Gegenständen steht.
- Page 55 2.2 SICHERHEITSVORKEHRUNGEN BEI DER WARTUNG Bitte beachten Sie diese Warnhinweise, wenn Sie bei der Wartung eines mit R290 betriebenen Gerätes folgende Arbeiten durchführen 2.2.1 Überprüfungen des Arbeitsbereiches Vor Beginn von Arbeiten an Anlagen, die entflammbare Kältemittel enthalten, sind Sicherheitsüberprüfungen erforderlich, um sicherzustellen, dass das Brandrisiko minimiert wird.
- Page 56 2.2.8 Prüfungen am Klimagerät Wenn elektrische Bauteile ausgetauscht werden, müssen die Austauschkomponenten für den Zweck geeignet sein und den geforderten Spezifikationen entsprechen. Die Wartungs- und Instandhaltungsrichtlinien des Herstellers sind stets zu beachten. Im Zweifelsfall ist die technische Abteilung des Herstellers um Hilfe zu bitten. Bei Anlagen, die entflammbare Kältemittel verwenden, sind die folgenden Kontrollen durchzuführen: - Die Füllmenge ist auf die Raumgröße abgestimmt, in der die kältemittelhaltigen...
- Page 57 3. PRODUKTÜBERSICHT 3.1 PRODUKTDIAGRAMM Bedienfeld Luftauslass mit einstellbarer Jalousie Griff Lufteinlass mit Luftfilter Lenkrolle Kondensatauslass Luftauslass Hinweis : Die Darstellung dient nur als Referenz. Bitte sehen Sie sich das echte Produkt für detaillierte Informationen an.
- Page 58 3.2 EIGENSCHAFTEN • GLeistungsfähiges Gerät in kompakter Größe mit Ventilator, Kühl- und Entfeuchtungs- funktion. • Temperatureinstellung und -anzeige • Digitale LED-Anzeige • Elektronische Steuerung mit eingebautem Timer, Schlafmodus • Selbstverdampfendes System für bessere Effizienz • Automatische Abschaltung bei vollem Tank •...
-
Page 59: Installation
4. INSTALLATION AUSPACKEN • Packen Sie den Karton aus und nehmen Sie das Gerät und das Zubehör heraus. • Überprüfen Sie das Gerät nach dem Auspacken auf eventuelle Schäden oder Kratzer. • Zubehör: 1. TAbluftschlauch 2. Schlauchanschluss 3. Fenster-Kit-Adapter 4. Fernbedienung 5. - Page 60 4.2 WÄHLEN SIE DEN MONTAGEORT • Wenn das Gerät um mehr als 45° gekippt wurde, lassen Sie es mindestens 24 Stunden lang aufrecht stehen, bevor Sie es in Betrieb nehmen. • Stellen Sie das Gerät auf eine feste, ebene Fläche mit einem Freiraum von mindestens 50 cm um das Gerät herum, um eine gute Luftzirkulation zu gewährleisten.
- Page 61 4.3 ANBRINGEN DES ABLUFTSCHLAUCHES Das Klimagerät muss nach außen entlüftet werden, damit die Abluft, die aus dem Gerät kommt und Abwärme und Feuchtigkeit enthält, den Raum verlassen kann. Tauschen Sie den Abluftschlauch nicht aus und verlängern Sie ihn nicht, da dies zu einem geringeren Wirkungsgrad oder sogar zur Abschaltung des Geräts aufgrund eines zu geringen Gegendrucks führt.
- Page 62 Schritt 4: Schließen Sie Ihr Fenster, um den Einbau-Satz zu installieren. Der Einbausatz muss stabil und gemäss Anleitung an seinem Platz fixiert sein. Fixieren Sie ihn bei Bedarf mit Klebeband. Es wird empfohlen, den Spalt zwischen dem Adapter und den Seiten des Fensters abzudichten, um eine maximale Effizienz zu erzielen.
- Page 63 5. OPERATION 5.1 BEDIENFELD UND DISPLAY The air conditioner requires being vented outside so that the exhaust air can escape the room which coming from the appliance contains waste heat and moisture. Do not replace or extend exhaust hose which will result in decreased efficiency, even worse shut down the unit due to low backpressure.
- Page 64 5.2 FERNBEDIENUNG 5.3 EINSTELLUNGEN 5.3.1 Einschalten und Ausschalten: → Drücken Sie POWER, um das Gerät einzuschalten. → Drücken Sie die MODE-Taste, um den gewünschten Betriebsmodus auszuwählen. → Drücken Sie erneut POWER, um das Gerät auszuschalten. 5.3.2 Betriebsmodus Das Gerät verfügt über vier Betriebsmodi: Gebläse, Kühlen, Entfeuchter, Schlafmodus.
- Page 65 D. TROCKNEN IHRES ZIMMERS → Drücken Sie die MODE-Taste auf dem Bedienfeld oder der Fernbedienung, die Trockenanzeige leuchtet auf. Die Gebläsegeschwindigkeit kann nicht gewählt werden. Der Benutzer sollte den Schlauch an den Abfluss an der Unterseite des Geräts anschließen. Hinwei: In diesem Modus schaltet die Gebläsegeschwindigkeit auf niedrige Geschwindigkeit um und kann nicht ausgewählt werden.
- Page 66 5.4 ENTLEERUNG Manuelle Entleerung: 1. Wenn die Maschine anhält, nachdem der Kondensatbehälter voll ist, ziehen Sie bitte den Netzstecker. Hinweise: Bewegen Sie das Gerät vorsichtig, damit das Wasser in der Kondensatwanne am Boden des Gehäuses nicht verschüttet wird. 2. Platzieren Sie den Kondensatbehälter unterhalb des seitlichen Kondensatauslasses hinter dem Gehäuse.
- Page 67 • Schalten Sie das Gerät vor dem Betrieb aus. • Entfernen Sie den Stopfen der Wasser- auslassöffnung und bewahren Sie ihn an einem sicheren Ort auf. • Schließen Sie den Abflussschlauch sicher und ordnungsgemäß an und vergewissern Sie sich, dass er nicht geknickt und frei von Hindernis- sen ist.
-
Page 68: Reinigung Und Pflege
6. REINIGUNG UND PFLEGE 6.1. REINIGUNG DES LUFTFILTERS ( ALLE ZWEI WOCHEN ) Staub sammelt sich auf dem Filter und behindert den Luftstrom. Der eingeschränkte Luftstrom verringert die Effizienz des Systems, und wenn er verstopft, kann dies zu Schäden am Gerät führen. Der Luftfilter muss regelmäßig gereinigt werden. - Page 69 7. FEHLERBEHEBUNG SYMPTOM INSPECTION PRÜFUNG SOLUTION LÖSUNG → Überprüfen Sie, ob der Stroman- Stecken Sie das Netzteil fest in schluss richtig angeschlossen ist. die Wandsteckdose. → Entleeren Sie die den Kon- Das Gerät funktioniert Sie, ob die Wasserstandsanzeige densatbehälter, indem Sie den nicht.
-
Page 70: Stilllegung
8. AUSSERBETRIEBNAHME 8.1. LAGERUNG Wenn Sie das Gerät über einen längeren Zeitraum (mehr als ein Paar Wochen) nicht benutzen, ist es am Besten, das Gerät zu reinigen und vollständig zu trocknen. Bitte lagern Sie das Gerät gemäß den folgenden Schritten: 1. - Page 71 Anspruch auf Schadenersatz. Für die Haftung gelten ausschließlich unsere allgemeinen Geschäftsbedingungen. Technische Änderungen behalten wir uns ohne entsprechende Vorankündigung vor. www.warm-on.com I www.bodenheizung-24.de IMPORTER: warm-on GmbH, i_Park Tauberfranken 18, D-97922 Lauda-Königshofen, Germany Tel. +49 (0)9343-9809061 (Customer Support) HERSTELLER:: Zhejiang Oulun Electronic Co. Ltd. , No.17, Tangmei Road, Economic...
Need help?
Do you have a question about the AC20N and is the answer not in the manual?
Questions and answers