Table of Contents
Advertisement
Quick Links
Remote Control
Model# DIAL01
PRODUCT SPECIFICATION
1. Model:DIAL01
2. Dimensions:OD 67.6mm x H 21.2mm
3. Weight (including battery):74.5g ± 20g
4. Battery/Voltage:CR2032 3V x 2
5. Radio Frequency: proprietary 2.4 GHz
6. Operation Temperature :
0°C - 50°C / 32°F - 122°F
FCC ID: Q3V-DIAL01
IC: 28542-DIAL01
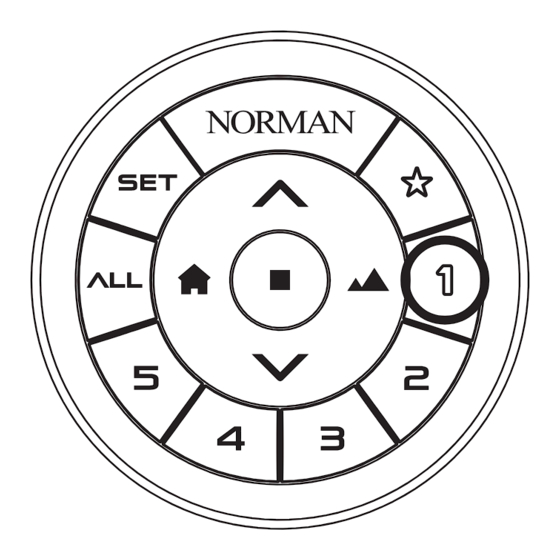
BUTTON OVERVIEW
Move Shade to Fully Open
Setup
Best Privacy
Control All Channels
Stop
The function of buttons may vary depending on the shade type, please refer to section "OPERATION".
REPLACE BATTERY
Color
Battery
CR2032 3V
Ring
Cover
Batteries
Step 1: Remove the Color ring.
Step 2: Remove the Battery Cover.
Step 3: Replace CR2032 3V batteries.
Step 4: Put the battery cover and Color ring back.
Step 5: Remote lights will illuminate after proper
installation.
FCC Information
This device complies with Part 15 of the FCC Rules.
Operation is subject to the following two conditions:
(1) This device may not cause harmful interference, and
(2) This device must accept any interference received,
including interference that may cause undesired operation.
Unauthorized modifications may void the user's authority to
operate this equipment.
This equipment has been tested and found to comply with
the limits for a Class B digital device, pursuant to Part 15 of
the FCC Rules. These limits are designed to provide
reasonable protection against harmful interference in a
residential installation. This equipment generates uses and
can radiate radio frequency energy and, if not installed and
used in accordance with the instructions, may cause
harmful interference to radio communications. However,
there is no guarantee that interference will not occur in a
particular installation. If this equipment does cause harmful
interference to radio or television reception, which can be
determined by turning the equipment off and on, the user is
encouraged to try to correct the interference by one of the
following measures:
- Reorient or relocate the receiving antenna.
- Increase the separation between the equipment and
receiver.
- Connect the equipment into an outlet on a circuit different
from that to which the receiver is connected.
- Consult the dealer or an experienced radio/TV technician
for help.
CAUTION:
Any changes or modifications not expressly approved by the
grantee of this device could void the user's authority to
operate the equipment.
CHANNEL BUTTON INTRODUCTION
GROUP CONTROL
IC Information
Innovation, Science and Economic Development
Canada (ISED) Notices
This device contains licence-exempt transmitter(s)/receiver(s)
that comply with Innovation, Science and Economic
Development Canada's licence-exempt RSS(s). Operation is
subject to the following two conditions:
1. This device may not cause interference.
2. This device must accept any interference, including
interference that may cause undesired operation of the
device.
Canada, avis d'Industry Canada (ISED)
Cet appareil contient un ou des émetteurs/récepteurs
exempts de licence conformes aux RSS exempts de licence
d'Innovation, Sciences et Développement économique
Canada. Le fonctionnement est soumis aux deux conditions
suivantes:
1. Cet appareil ne doit pas causer d'interférences.
2. Cet appareil doit accepter toutes les interférences, y
compris les interférences pouvant entraîner un
fonctionnement indésirable de l'appareil.
CAN ICES-003(B) / NMB-003(B)
RF Exposure Warning
The equipment complies with FCC/ISED RF exposure limits set
forth for an uncontrolled environment.
The equipment must not be co-located or operating in
conjunction with any other antenna or transmitter.
Shade Channel
(There are 5 channels)
Move Shade to Fully Closed
SELECT ONE CHANNEL
When you select a channel (1~5), the
selected channel will light up, and you can
then operate the shade(s) that are
programmed to this channel.
When pressing "ALL" button, the button
will light up and you can then operate
all shades that are programmed to the
remote at once.
N301502
My Favorite
Best View
Advertisement
Table of Contents

Summary of Contents for Nien Made DIAL01
- Page 1 - Consult the dealer or an experienced radio/TV technician The equipment must not be co-located or operating in for help. conjunction with any other antenna or transmitter. FCC ID: Q3V-DIAL01 CAUTION: Any changes or modifications not expressly approved by the IC: 28542-DIAL01 grantee of this device could void the user's authority to operate the equipment.
- Page 2 OPERATION Bottom Up Lift Feature Top Down (Cellular Shade / Day & Night Bottom Up Pefect Sheer Roller Shade / (Cellular Shade) (Cellular Shade) Roman Shade) Button Function Best Privacy Fully close for best privacy. Fully close for best privacy. Fully close for best privacy.
-
Page 3: Table Of Contents
Catalogue • PAIRING REMOTE WITH SHADE • CLEAR PAIRING REMOTE WITH SHADE • SET MY FAVORITE POSITION • CLEAR MY FAVORITE POSITION • SET UPPER LIMIT • CLEAR UPPER LIMIT • SET LOWER LIMIT • CLEAR LOWER LIMIT • SET VANE OPEN POSITION(ONLY FOR PERFECT SHEER) •... -
Page 4: Pairing Remote With Shade
PAIRING REMOTE WITH SHADE Shades are pre-programmed to the designated channel / group according to your order details. If you want to change the pre-setting, please CLEAR pre-setting first (please refer to page 2) , then follow the below steps to set up a new pairing. -
Page 5: Clear Pairing Remote With Shade
CLEAR PAIRING REMOTE WITH SHADE Step 1: On Shade Step 1: On Shade Press SHADE BUTTON 3 times. The green light will start blinking, while shade is ready for pairing. SHADE BUTTON Honeycomb Shade Roman Shade, Roller Shade: Roman Shade, Roller Shade &... -
Page 6: Set My Favorite Position
SET MY FAVORITE POSITION Please press "My Favorite" to check the default position setting, if you would like to change My Favorite position, you could follow below procedures. CAUTION! To avoid an accidental setup with other shades: Please power off other shades first, or pair the designated shade in a separate channel. -
Page 7: Clear My Favorite Position
CLEAR MY FAVORITE POSITION If you clear My Favorite position, and do not set a new one, My Favorite position will reset back to default position which is 1/2 the length of the shade. CAUTION! To avoid an accidental setup with other shades: Please power off other shades first, or pair the designated shade in a separate channel. -
Page 8: Set Upper Limit
SET UPPER LIMIT Shades upper limit has been set before shipping out from factory. If you want to change the pre-setting, please CLEAR the upper limit first (please refer to page 6) , then follow below steps to set up new upper limit. CAUTION! To avoid an accidental setup with other shades: Please power off other shades first, or pair the designated shade in a separate channel. -
Page 9: Clear Upper Limit
CLEAR UPPER LIMIT If the upper limit hasn't been set successfully, the Best View, Best Privacy, and My Favorite function can't work optimally. CAUTION! To avoid an accidental setup with other shades: Please power off other shades first, or pair the designated shade in a separate channel. -
Page 10: Set Lower Limit
SET LOWER LIMIT Shades lower limit has been set before shipping out from factory. If you want to change the pre-setting, please CLEAR the lower limit first (please refer to page 8) , then follow below steps to set up new lower limit. CAUTION! To avoid an accidental setup with other shades: Please power off other shades first, or pair the designated shade in a separate channel. -
Page 11: Clear Lower Limit
CLEAR LOWER LIMIT If the lower limit hasn't been set successfully, the Best View, Best Privacy, and My Favorite function can't work optimally. CAUTION! To avoid an accidental setup with other shades: Please power off other shades first, or pair the designated shade in a separate channel. -
Page 12: Set Vane Open Position(Only For Perfect Sheer)
SET VANE OPEN POSITION(ONLY FOR PERFECT SHEER) Vane open position has been set before shipping out from factory. If you want to change the pre-setting, please CLEAR the vane open position first (please refer to page 10) , then follow below steps to set up vane open position. CAUTION! To avoid an accidental setup with other shades: Please power off other shades first, or pair the designated shade in a separate channel. -
Page 13: Clear Vane Open Position(Only For Perfect Sheer)
CLEAR VANE OPEN POSITION(ONLY FOR PERFECT SHEER) CAUTION! To avoid an accidental setup with other shades: Please power off other shades first, or pair the designated shade in a separate channel. Then proceed to set up or clear your desired settings. Step 1: Using a pin (not provided), press and hold the RESET button for 1 second. -
Page 14: Copy Remote
COPY REMOTE Copy all settings from the existing remote to a new remote. New Remote Press and hold RESET button for 1 second by pin (not provided), center buttons will start blinking. Press RESET button 3 times, center buttons will flash quickly. Existing Remote Press and hold SET button for 3 seconds, the center buttons will start blinking. -
Page 15: Factory Reset For Copy Remote
FACTORY RESET FOR COPY REMOTE CAUTION! By performing FACTORY RESET, your copied remote will be erased. The connection between your existing remote and hub will be disconnected. But you can still use the existing remote to operate the paired shades. Step 1: Press and hold RESET button for 1 second by pin (not provided).