Table of Contents
Advertisement
Quick Links
Advertisement
Table of Contents

Related Manuals for BMPRO OdysseyControl

Summary of Contents for BMPRO OdysseyControl
- Page 1 OWNER’S MANUAL OdysseyControl OdysseyLink INCLUDING TEAMBMPRO.COM...
-
Page 2: Safety Precautions
SAFETY PRECAUTIONS Please read the Safety Precautions before installing or using the OdysseyControl and OdysseyLink. Be sure to observe all precautions without fail. Failure to observe these instructions properly may result in personal damage, or personal injury which depending on the circumstances may be serious and cause loss of life. -
Page 4: Table Of Contents
DESCRIPTION OF PARTS..... . 8 ODYSSEYCONTROL APP ..... 8 ODYSSEYLINK . - Page 5 FAQS AND TROUBLESHOOTING ....23 ODYSSEYCONTROL ..... . . 23 LOAD CONTROL .
-
Page 6: About The Odysseycontrol
With SmartConnect, you can remotely control various aspects of your caravan, such as tyre pressure, gas bottle levels and caravan temperatures through the OdysseyControl or Odyssey App by using a range of Bluetooth sensors connected to Odyssey. SmartConnect sensors are compatible only with OdysseyLink103 and OdysseyLink104. -
Page 7: Odyssey System Diagram
ODYSSEY SYSTEM DIAGRAM... -
Page 8: Description Of Parts
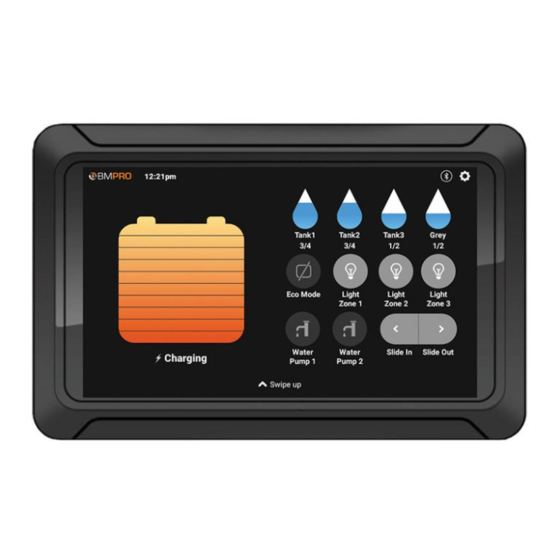
DESCRIPTION OF PARTS ODYSSEYCONTROL APP 9 1. Pairing Status Indicates the Bluetooth pairing status between the OdysseyControl and the OdysseyLink. ICON PAIRING STATUS CONNECTED DISCONNECTED WARNING When Bluetooth is disconnected, any information displayed on the OdysseyControl will be incorrect. When Bluetooth connection is re-established, the OdysseyControl... - Page 9 AUX source, you will not be able to operate slide-outs from the OdysseyControl. This safety feature prevents the caravan’s slide-out mechanism from operating while you are driving on the road. Operation of slide-outs from the OdysseyControl will become available when the towing vehicle is parked.
- Page 10 8. Battery Status Displays the battery’s power capacity and usage. BATTERY STATUS The BatteryPlus35-II is charging the battery-denoted by the CHARGING lightening symbol Indicates the caravan's battery is in use and the time remaining DISCHARGING before the battery is completely discharged Indicates that no current is flowing into or out of the caravan IDLE battery...
- Page 11 23°C 11. Battery Amps Indicates the charging/discharging current of the battery connected to the BatteryPlus35-II. 12. Battery Volts Indicates the voltage of the battery connected to the BatteryPlus35-II. 13. Input Source Indicates the power sources used for charging your battery and powering the caravan loads.
-
Page 12: Odysseylink
Used to enable Bluetooth pairing between the OdysseyLink and the OdysseyControl. 2. LED Status Indicator Indicates the operational/pairing status of the OdysseyLink. The LED will blink green if the OdysseyLink is ready to pair to the OdysseyControl. 3. Serial Number Required when pairing the OdysseyLink to the OdysseyControl. -
Page 13: Using The Odyssey
USING THE ODYSSEY PAIRING THE ODYSSEYLINK To pair the OdysseyLink to the OdysseyControl: Make sure that the OdysseyLink is connected to the BatteryPlus35-II and the BatteryPlus35-II is powered on. Press the Pairing Button on the OdysseyLink.The LED Status Indicator on the OdysseyLink will flash green, indicating you have 30 seconds to pair the OdysseyLink to the OdysseyControl. -
Page 14: Registering Your Odyssey
REGISTERING YOUR ODYSSEY If you have not registered your Odyssey, when you launch the Odyssey App you will be greeted with the registration screen. To register your Odyssey: Scroll down and press Register. - Page 15 Enter your name and email address. Select your RV brand. Choose whether your RV is new or used. Press Save. Your Odyssey is now registered with BMPRO.
-
Page 16: Configuring A New Battery
To configure a new battery: Power down the BatteryPlus35-II. Replace the battery. From the OdysseyControl, repower the BatteryPlus35-II. Press the Settings button. Scroll down to the Battery Capacity field. In the Battery Capacity field, enter your battery’s battery capacity in Ampere- hours (the default is 100 Ah). -
Page 17: Controlling Loads With The Odysseycontrol
ECO Mode, stopping power to all caravan loads connected to the BatteryPlus35-II load terminal block (except terminal 1). In ECO mode, load control from the OdysseyControl is disabled. You will still be able to monitor the battery capacity and consumption with the OdysseyControl. -
Page 18: View Customisation
VIEW CUSTOMISATION You can customise the appearance of the Odyssey App based on your RV accessories by going into Customise View in the Settings menu. By customising the view, you can disable features not available in your RV, such as slides or water tanks. -
Page 19: Updating The Odyssey App On The Odysseycontrol
UPDATING THE ODYSSEY APP ON THE ODYSSEYCONTROL The OdysseyControl is set up to automatically receive Odyssey App updates when they become available, as long as the OdysseyControl is connected to the internet and logged in to a Google account. UPDATING THE ODYSSEYLINK FIRMWARE... -
Page 20: Odysseyswitches
ODYSSEYSWITCHES OdysseySwitches (also known as SmartSwitches) communicate via Bluetooth to the OdysseyLink104, giving you additional control of RV features. OdysseySwitches are only compatible with the OdysseyLink104. They will not work with older versions of the OdysseyLink. Any OdysseySwitch you install has been paired to the OdysseyLink at the factory and is ready for immediate use. -
Page 21: Unpairing An Odysseyswitch From The Odysseylink104
UNPAIRING AN ODYSSEYSWITCH FROM THE ODYSSEYLINK104 To unpair an OdysseySwitch from the OdysseyLink104: From the App home screen, press the Settings button. Press Wall Switches. Next to Remove wall switches, press Unpair. Red Unpair buttons will appear next to the OdysseySwitch listings. Next to the OdysseySwitch you want to unpair, press Unpair. -
Page 22: Checking The Battery In Your Odysseyswitch
Insert the new battery in the holder with the positive side facing up. SERVICING Do not attempt to service the OdysseyControl or OdysseyLink yourself, OR dismantle, modify or repair the OdysseyControl or OdysseyLink yourself; this will void your warranty. If your OdysseyControl or OdysseyLink requires servicing, please consult your BMPRO dealer or visit teambmpro.com for... -
Page 23: Faqs And Troubleshooting
Select Network & Internet and then Wi-Fi, then choose and connect to your Wi-Fi network. How do I update the Odyssey App on my OdysseyControl? The OdysseyControl is set up to automatically receive Odyssey App updates.Just make sure that you are: Connected to the internet. - Page 24 The screen on my OdysseyControl is frozen. What do I do? If the screen on your OdysseyControl is frozen, reset your OdysseyControl by inserting a small thin object, such as a paper clip, into the reset pin hole located on the top of the OdysseyControl.
-
Page 25: Load Control
Status Indicator on the BatteryPlus35-II will flash a solid red. Please disconnect the faulty load from the BatteryPlus35-II. None of my loads appear to be powered and I can’t use the OdysseyControl to power the loads on again? In this situation, when you attempt to power loads from the OdysseyControl, the pop-up message that appears will help to diagnose why the loads are no longer powered. - Page 26 This pop-up message will display if the BatteryPlus35-II has entered ECO Mode, which is the first stage of a low voltage disconnection. All icons in the OdysseyControl will be dark grey. The Pairing Status Icon will indicate that the OdysseyControl is paired to the OdysseyLink.
- Page 27 3. There is No Bluetooth Connection All icons in the Odyssey App will be dark grey. The Pairing Status Icon will indicate that the OdysseyControl is not paired to the OdysseyLink. This message will display if: The switch connected to the BatteryPlus35-II Remote Switch input is activated.
-
Page 28: Pairing
PAIRING I’ve paired the OdysseyControl to the OdysseyLink, but the Pairing Status icon shows that they are not connected? Check the following: Ensure the Bluetooth on the OdysseyControl is turned on. Ensure the switch on the BatteryPlus35-II Remote Switch input is not activated. - Page 29 My OdysseySwitch isn’t working even though it is paired? The OdysseySwitch will only work if the BatteryPlus35-II has been wired as per its designated load outputs. TERMINAL DESIGNATED LOAD OUTPUT LOAD RATING Tablet / Spare Spare Spare Light 1 Light 2 Light 3 Pump 1 Pump 2...
-
Page 30: Appendices
APPENDICES SPECIFICATIONS ODYSSEYCONTROL 5V DC Input Voltage Input Current Charger Input Voltage USB to Micro-USB Communication/Charger Cable 224mm x 144mm x 17.7mm Dimensions 0.5 kg Weight ODYSSEYLINK 8-15V DC Input Voltage < 21mA Battery Drain 0-50C Ambient Temperature 0.5m Cable Length ODYSSEYSWITCH 2.2-3.0V DC... -
Page 32: Compliance
• Consult the dealer or an experienced radio/TV technician for help. Warning: Any changes or modifications not expressly approved by BMPRO could void the user’s authority to operate this equipment. This device contains licence-exempt transmitter(s) that comply with Innovation, Science and Economic Development Canada’s licence-exempt RSS(s). -
Page 34: Warranty Terms And Conditions
The warranty period of the product is two years. If, before the warranty period has ended, a fault occurs with the product and BMPRO finds the product is defective in materials or workmanship, BMPRO at its discretion will subject to further rights accorded by the Australian Consumer Law to either: • ... - Page 35 (k) the fault is a result of common wear & tear. LIMITATIONS No express warranties or representations are made by BMPRO other than what is set out in this warranty. The absolute limit of BMPRO’s liability under this express warranty is the repair or replacement of the product or part of the product.
- Page 36 BMPRO TEAM customerservice@teambmpro.com BMPRO 19 Henderson Rd, Knoxfield VIC 3180 Australia Unit 1, 821 E Windsor Ave, Elkhart IN 46514 USA .COM teambmpro.com...
Need help?
Do you have a question about the OdysseyControl and is the answer not in the manual?
Questions and answers