
Related Manuals for MADVAC PS300

Summary of Contents for MADVAC PS300
- Page 1 Operator’s General Arrangement Guide Controls Operation Optional Equipment Chapter not used PS300 Routine Maintenance Compact Pedestrian Sweeper Part No 66473-OG Revision Level 06 Print date 07/11/06...
- Page 2 Operator's Manual. This manual is applicable to all Model PS300 machines built by Allianz Madvac Inc. Use the Table of Contents or Index as a guide when searching for specific information.
- Page 3 PS300 Operator’s Guide It is important that only Genuine Madvac Spare Parts are used when servicing and main- taining the sweeper. This is especially important for consumables (filters, brooms, etc.), as the use of non-genuine parts may cause premature failure and invalidation of warranty.
- Page 4 Their location and descriptions are shown below. Water tank filler ports Hydraulic oil tank filler Fuel tank (diesel) filler Engine air cleaner instructions. Use only genuine Madvac replace- ment air cleaner elements and refer to Chapter 6 of this guide for servicing recommendations. Foreword 3...
- Page 5 PS300 Operator’s Guide Safety Symbol Descriptions Safety alert symbol Read Operator’s Guide Keep clear of brushes Release radiator cap carefully when hot to avoid scalding Keep at least 3 feet (1 meter) away from the machine Wear hearing protection when working in this area...
- Page 6 Do not risk injury or death by ignoring good safety practices. • The Madvac PS 300 is intended for use as a suction and sweeping vehicle only. The vehicle must not be used for any other purpose than that described. The vehicle can cause serious injury if utilized improperly.
- Page 7 PS300 Operator’s Guide 5. Have a fire extinguisher available for use should the need arise and know how to use 6. Wear appropriate protective gear. This list includes but is not limited to: • A hard hat • Protective boots with slip resistant soles •...
- Page 8 PS300 Operator’s Guide Hydraulic Safety 1. Make sure that all components in the hydraulic system are kept in good condition and are clean. 2. Replace any worn, cut, abraded, flattened or crimped hoses and metal lines. 3. Relieve pressure before working on hydraulic system.
- Page 9 4. Do not allow riders on any part of the machine during either field operation or road and highway travel. 5. Always use hazard warning flashers and the rotating beacon on the Madvac when transporting unless prohibited by law. Tire Safety 1.
- Page 10 PS300 Operator’s Guide Battery Safety 1. Keep all sparks and flames away from batteries, as gas given off by electrolyte is explosive. 2. Avoid contact with battery electrolyte: wash off any spilled electrolyte immediately. 3. Wear safety glasses when working near batteries.
- Page 11 PS300 Operator’s Guide Sign-Off Form Madvac International Inc. follows the general Safety Standards specified by the Society of Automotive Engineers (SAE) and the Occupational Safety and Health Administration (OSHA). Anyone who will operate or maintain the Madvac pedestrian sweeper must read and clearly understand all the safety, operating and maintenance information presented in this manual.
- Page 12 PS300 Operator’s Guide SAFETY SIGNS The types of safety signs and locations on the equipment are shown in the illustrations below. Good safety practice requires that you familiarize yourself with the various Safety Signs, the type of warning and the area (or particular function related to that area) which requires your SAFETY AWARENESS.
- Page 13 PS300 Operator’s Guide SAFETY SIGN LOCATIONS The types of safety signs and locations on the equipment are shown in the illustrations below. Good safety practice requires that you familiarize yourself with the various Safety Signs, the type of warning and the area (or particular function related to that area) which requires your SAFETY AWARENESS.
- Page 14 PS300 Operator’s Guide Foreword 13...
- Page 15 PS300 Operator’s Guide CHAPTER General Arrangement Table of Contents Subject Page General Arrangement General Arrangement OG1 :2 OG 1:1 Chapter - General Arrangement...
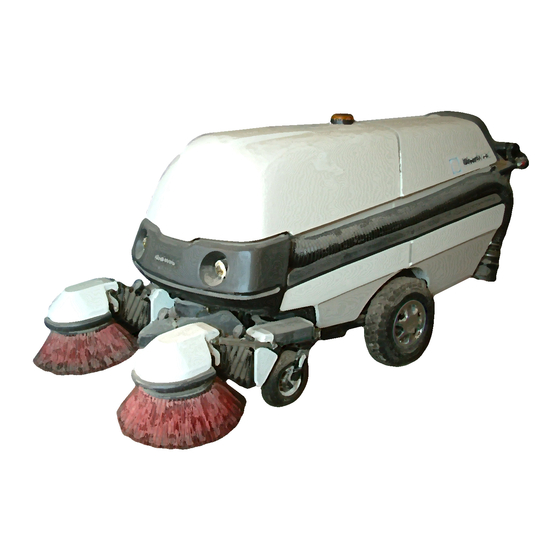
- Page 17 PS300 Operator’s Guide GENERAL ARRANGEMENT Expertly designed to meet the cleaning challenges of today’s busy streets, the Madvac PS300 pedestrian-friendly sweeper is a high-profile, cost-efficient cleaning machine that safely and effectively cleans city sidewalks, walkways and streets. The sweeper is built to withstand everyday operation as well as to sweep and pickup debris within its published ratings and specifications.
- Page 18 PS300 Operator’s Guide J. Tires Two 16-inch 4.80/8-B sawtooth tires. K. Hydraulic stabilizer wheel Keeps front brushes in contact with the surface on steep inclines up to 38% gradabil- ity. L. Ground speed Infinitely variable speed from 0 to 6.5 mph (0 to 10.5 km/h) in forward, and 0 to 3 mph (0 to 5 km/h) in reverse.
- Page 19 PS300 Operator’s Guide Pump sprays water solution directly onto the front brushes and a fine mist in the litter container. U. Water system Balanced on the center of gravity, a molded 13 US-gallon (50 L) water tank features built-in filters, water drain and automatic shutoff when low water level is reached.
- Page 21 PS300 Operator’s Guide CHAPTER Controls Table of Contents Subject Page Controls Instrument Panel OG2 :2 Operator Controls OG2 :4 OG 2:1 Chapter - Controls...
- Page 22 PS300 Operator’s Guide CONTROLS Before starting to work, all operators should familiarize themselves with the location and function of the controls. Locate the machine in a large open area to provide unobstructed maneuvering during the training period. INSTRUMENT PANEL An instrument panel is located at the back of the machine.
- Page 23 PS300 Operator’s Guide 2. Switches: Figure 6. Switches. a. High side dump (optional): This rocker switch raises and lowers the trash bas- ket. The throttle should be set to the lowest RPM and the hood must be opened before raising the trash basket.
- Page 24 PS300 Operator’s Guide OPERATOR CONTROLS 1. Operator Station Controls: Figure 7. Controls. a. Forward/Reverse Lever: This lever controls and activates the speed and direc- tion of the machine. It must be in its centered position to start the engine. Gently squeezing the lever up will move the machine in the forward direction.
- Page 25 PS300 Operator’s Guide c. Brush Speed: This rotary valve controls the speed of the two brushes. Turn the knob clockwise to increase the speed of the brushes. Turn counterclockwise to reduce the speed of the brushes. d. Brush water spray valve: This rotary valve controls the flow of water to the two (2) spray nozzles on the front brushes.
- Page 26 PS300 Operator’s Guide OG 2:6 Chapter - Controls...
-
Page 27: Table Of Contents
PS300 Operator’s Guide CHAPTER Operation Table of Contents Subject Page To the New Operator or Owner OG3 :1 How The Sweeper Works OG3 :2 Sweeper Break-In OG3 :3 Daily Check List OG3 :4 Starting and Stopping the Sweeper OG3 :5... -
Page 29: To The New Operator Or Owner
Review safety instructions with all operators annually. TO THE NEW OPERATOR OR OWNER The Madvac PS300 pedestrian sweeper is designed to sweep and vacuum up a wide variety of trash, debris and other materials from around a variety of obstructions, it has the capability to pick up virtually anything that will fit through the intake tube. -
Page 30: How The Sweeper Works
The Madvac patented straight through suction of the PS300 allows the operator to pick up virtually any litter that fits through the suction nozzle because no litter passes through the fan. -
Page 31: Sweeper Break-In
A. Before Starting: 1. Read the engine and Madvac Operator's Manual. B. At 1/2, 2, 5 and 10 Hours: 1. Check all machine fluid levels: Fuel, coolant, hydraulic oil, and engine oil. Refuel or top up fluid level as required. -
Page 32: Daily Check List
Maintenance”. DAILY CHECK LIST Efficient and safe operation of the Madvac requires that each operator reads and under- stands the operating procedures and all related safety precautions outlined in this sec- tion. A daily check list is provided for the operator. It is important for both personal safety and maintaining the good mechanical condition of the machine that this check list is fol- lowed. -
Page 33: Starting And Stopping The Sweeper
PS300 Operator’s Guide STARTING AND STOPPING THE SWEEPER Starting The Sweeper To start the sweeper: 1. Clear the area of bystanders' front and rear, especially small children, before starting. 2. Remove all foreign objects from the machine. 3. Engage the park brake. -
Page 34: Operating The Sweeper
PS300 Operator’s Guide Figure 9. Ignition Switch. Stopping The Sweeper To stop the sweeper: 1. Gradually release the speed/direction control lever to its neutral position. The hydro- static motors on the drive wheels will provide dynamic braking to the unit. When nec- essary pull up on the brake lever to help stop the machine. - Page 35 PS300 Operator’s Guide 8. Turn the water spray on, if required. 9. Move the machine into position. 10. Gather trash. 11. The machine can develop sufficient vacuum to draw water into the container and pick up the trash in the water. The water passes through the system and the trash remains in the container.
-
Page 36: Gathering Trash
To restore suction, the container should be emptied. NOTE: If your PS300 is equipped with the high side dump option, refer to Chapter 4 for operating instructions. To empty the container: 1. - Page 37 PS300 Operator’s Guide 5. Pull the collector bag out of the container and empty into a poly bag (or discard as instructed by your supervisor). 6. Shake the filters to loosen dust to the bottom drawer if necessary. 7. Replace the collector bag in the container.
-
Page 38: Transporting The Sweeper
Do not allow riders on any part of the machine during either field operation or road and highway travel. • Always use hazard warning flashers and the rotating beacon on the Madvac when transporting unless prohibited by law. TRANSPORTING THE SWEEPER To move the sweeper: 1. -
Page 39: Towing The Sweeper
Hydrostatic powered vehicles use fluid to power their drive wheels at all times. As a result, they cannot be towed unless this fluid power is bypassed. The Madvac features a dump valve on top of the pump that allows the motor drive circuit oil to be bypassed. - Page 40 PS300 Operator’s Guide 6. Allow the container to drain. 7. Place the container in its operating position and run the fan for 3 to 5 minutes to dry the system. 8. Install and secure the dust pan. 9. Check the condition of all hydraulic lines, hoses and fittings. Replace any damaged or worn components.
- Page 41 PS300 Operator’s Guide CHAPTER Optional Equipment Table of Contents Subject Page Options Using the Wanderhose OG4 :2 - with Manual Guillotine Operation OG4 :2 - with Hydraulic Guillotine Operation OG4 :2 Using the High Side Dump OG4 :3 Using the Dog Excrement Aspirator...
- Page 42 PS300 Operator’s Guide OPTIONAL EQUIPMENT USING THE WANDERHOSE The wanderhose is designed to help clean areas that are not easily reached with the sweeper, such as around trees and between cars. There are two modes of operation for the wanderhose guillotine: manual and hydraulic.
- Page 43 8. Remove the backing plate from the exhaust vent. 9. Close the hood. NOTE: Ensure that the hood is securely latched to provide a good seal. A poor seal will adversely affect the suction of the PS300. OG 4:3 Chapter - Optional Equipment...
- Page 44 PS300 Operator’s Guide USING THE DOG EXCREMENT ASPIRATOR The Dog Excrement Aspirator (DEA) option is designed to pick up dog excrement and deposit it into a disposable plastic bag. This bag is held in a separate DEA container which prevents the excrement from becoming mixed with the debris in the main container and causing unpleasant odors.
- Page 45 PS300 Operator’s Guide USING THE FOLD AND STOW SEAT The Fold and Stow Seat provides the operator with the option of riding the sweeper. Pro- cedures for unfolding and for stowing the seat are provided below. WARNING: Before starting either of these procedures, park the...
- Page 46 PS300 Operator’s Guide 2. Push on the spring blade towards the machine and push the hook towards the right side. 3. Lift up the assembly towards the machine. 4. Lift up the spring underneath the base. 5. Fold the seat assembly by pressing the spring blade down and follow through towards the machine.
- Page 47 PS300 Operator’s Guide 7. Pull up on the compensation bar latch and pull the blade forward to release the hook. 8. Let the seat slide down along the spring blade. 9. Fold the license plate and pull up on the seat latch.
- Page 48 PS300 Operator’s Guide To stow the seat: 1. Fold the seat. 2. Fold the license plate and pull up on the seat latch. OG 4:8 Chapter - Optional Equipment...
- Page 49 PS300 Operator’s Guide 3. Let the seat slide down along the spring blade. 4. Pull up on the compensation bar latch and pull the blade forward to release the hook. OG 4:9 Chapter - Optional Equipment...
- Page 50 PS300 Operator’s Guide 5. Lift up the compensation bar towards the machine. 6. Fold the seat assembly by pressing the spring blade down and follow through towards the machine. OG 4:10 Chapter - Optional Equipment...
- Page 51 PS300 Operator’s Guide 7. Lock the spring underneath the base. 8. Lift up the assembly towards the machine. OG 4:11 Chapter - Optional Equipment...
- Page 52 PS300 Operator’s Guide 9. Lock into secure position. OG 4:12 Chapter - Optional Equipment...
- Page 53 PS300 Operator’s Guide OG 4:13 Chapter - Optional Equipment...
- Page 55 PS300 Operator’s Guide CHAPTER Routine Maintenance Table of Contents Subject Page Maintenance Safety OG6 :2 Bolt Torque OG6 :3 Recommendations OG6 :5 Maintenance Service Intervals OG6 :6-8 Engine Oil & Filter Change OG6 :9 Fuel Filter OG6 :10 Air Cleaner Maintenance OG6 :11 Cleaning Engine &...
-
Page 56: Maintenance Safety
Maintenance Safety • Review the Operator's Manual and all safety items before working with, main- taining or operating the Madvac PS 300. • Place all controls in neutral, stop engine, set park brake, remove ignition key, and wait for all moving parts to stop before servicing, adjusting, repairing or unplugging. -
Page 57: Bolt Torque
PS 300 Operator’s Guide BOLT TORQUE Checking Bolt Torque The tables below give correct torque values for various bolts and capscrews. Tighten all bolts to the torques specified in the appropriate table unless otherwise noted. Check tight- ness of bolts periodically, using the appropriate bolt torque table as a guide. Replace hardware with the same strength bolt. - Page 58 PS 300 Operator’s Guide Tightening O-Ring Fittings * 1. Inspect O-ring and seat for Recommended dirt or obvious defects. Thread Size Turns to Tighten 2. On angle fittings, back the Size Across (After Finger lock nut off until washer bot- Flats Torque Value* TIghtening)
-
Page 59: Recommendations
PS 300 Operator’s Guide RECOMMENDATIONS Fluids and Lubricants 1. Grease: Use SAE multi-purpose high temperature grease or multi-purpose lithium base grease. 2. Diesel Fuel: Use Grade No. 2 fuel, as defined by ASTM Designation D975 for Diesel fuels. When operating in cold ambient temperatures, the use of a mixture of No. 1 and No. -
Page 60: Service Intervals
PS 300 Operator’s Guide GREASING Refer to the chart on page OG 6:22 for recommended grease. Use the Service Interval checklist provided on page OG 6:8 to keep a record of all scheduled maintenance. 1. Use only a hand-held grease gun for all greasing. An air-powered greasing system can damage the seals on bearings and lead to early failures. - Page 61 PS 300 Operator’s Guide 6. Clean fuel filter. 100 Hours 1. Change engine oil. (Refer to Engine manual). 2. Change engine oil filter. (Refer to Engine manual). 250 Hours 1. Change fuel filter element. (Refer to Engine manual). 2. Change hydraulic oil filter cartridge (refer to page OG 6:9). 3.
- Page 62 PS 300 Operator’s Guide PS-300 Service Intervals See Lubrication and Maintenance section for details of service. Copy this page and record all service done to the machine. Action Code: L = Lubricate C = Change CL = Clean = Checked RE = Remove X = Not Checked Hours:...
- Page 63 PS 300 Operator’s Guide MAINTENANCE Engine Oil and Filter Changing 1. Review the Operator's Manual for the engine. 2. Allow the engine to cool before changing oil. Hot oil can cause burns if it contacts exposed skin. 3. Be sure the ignition key is removed. 4.
-
Page 64: Fuel Filter
PS 300 Operator’s Guide 11. Add 6 liters (6 quarts US) of SAE 10W30 or 10W40 motor oil (see Figure 13). Figure 13. Engine Fill Cap 12. Run the engine for one minute, then check for leaks. 13. If leaks are found around the filter, tighten slightly and repeat Step 12. 14. -
Page 65: Air Cleaner Maintenance
PS 300 Operator’s Guide 2. Unscrew the Screw Ring and remove the filter bowl and rinse the inside with diesel fuel. 3. Take out the element and rinse it with diesel fuel. 4. After cleaning, reinstall the fuel filter keeping out dust and dirt. 5. -
Page 66: Cleaning Engine & Compartment
PS 300 Operator’s Guide 4. To clean, remove the cover on the canister (see Figure 16). Figure 16. Air Filter Canister 5. Remove the wing nut holding the filter in place. 6. Carefully slide the filter out of the canister. 7. -
Page 67: Hydraulic Oil Filter Change
PS 300 Operator’s Guide A clean engine runs better, stays cool and eliminates the chance of fire. Figure 17. Engine Compartment Hydraulic Oil Filter Changing There are three (3) hydraulic circuits on the machine. A variable displacement piston pump is bolted to the output end of the engine and provides fluid power to the motors on the rear wheels of the unit. -
Page 68: Changing Hydraulic Oil
PS 300 Operator’s Guide 1. Open the engine compartment door. 2. Allow oil to cool off before changing filter. Hot oil can cause burns. 3. Place a collector pan below the filter to catch any spilled oil. 4. Use a banded filter removal tool to loosen and remove the filter. 5. -
Page 69: Control Cable Lubrication
PS 300 Operator’s Guide 5. Remove, clean and replace hydraulic suction strainers. 6. Install the drain plug using Teflon tape or pipe sealant compound and fill the reservoir with ISO 36 hydraulic oil. System capacity approximately: 50 liters (16 US gallons). Fill to oil level indicator. -
Page 70: Cleaning Dust Screen
PS 300 Operator’s Guide Cleaning Dust Screen All exhaust air is routed through a filter and screen in the rear wall of the engine compart- ment. After prolonged use, the filter can fill with dirt and restrict the airflow through the system. -
Page 71: Equipment Adjustment
PS 300 Operator’s Guide 9. Install and secure the dust tray. Figure 22. Dust Tray Cleaning EQUIPMENT ADJUSTMENT Vacuum Nozzle The vacuum inlet nozzle height is adjustable. The distance between the nozzle and the ground has an influence on the amount of vacuum obtained for a given task. Figure 23. -
Page 72: Brushes
PS 300 Operator’s Guide 2. Place all controls in the Off position and set the parking brake. 3. Turn the adjusting knob on top of the nozzle counter-clockwise until the nozzle rests on the ground. 4. Turn the adjusting knob clockwise one (1) turn. Check ground clearance, the nozzle should be between 1/4 and 1 inch from the ground, this should give the proper height for most sweeping conditions. -
Page 73: Brakes
PS 300 Operator’s Guide Brakes Two standard automotive type disk brakes are used on this machine for parking brakes. Adjust the brake using the regular automotive brake adjustment procedure. Neutral Start Switch The machine is equipped with a neutral start switch that prevents the engine from starting unless the speed/direction control pedal is in its neutral position. -
Page 74: Traction Lever
PS 300 Operator’s Guide 13. Start engine. It should now start only when the traction lever is in its centered position and the unit is in neutral. Figure 25. Neutral start adjustment Traction Lever The traction lever on this machine has been ergonomically designed to limit operator fatigue. -
Page 75: Engine Speed Settings
PS 300 Operator’s Guide ENGINE SPEED SETTINGS Idle 1200 RPM High speed 3100 RPM OG 6:21 Chapter - Routine Maintenance... - Page 76 PS 300 Operator’s Guide OG 6:22 Chapter - Routine Maintenance...
- Page 77 PS 300 Operator’s Guide Allianz Madvac P/N: A68226 - Grease Points & Fluids Chart Pictograms Drawing - Rev: 00 OG 6:23 Chapter - Routine Maintenance...
- Page 78 PS 300 Operator’s Guide Allianz Madvac P/N: A68226 - Grease Points & Fluids Chart Pictograms Drawing - Rev: 00 OG 6:24 Chapter - Routine Maintenance...
-
Page 79: Troubleshooting
PS 300 Operator’s Guide TROUBLESHOOTING The Madvac PS 300 uses a hydraulically powered fan to evacuate the air from the trash container. A fabric bag in the container collects the trash as it is drawn into the intake tube, providing a simple and effective method to gather trash that requires minimum maintenance. - Page 80 PS 300 Operator’s Guide PROBLEM CAUSE SOLUTION Machine won’t move Hydrostatic pump/ Check hydrostatic components. (continued) motor defective. Check filter. Repair or replace as required. See your authorized distributor. Check and release parking brake. Brushes won’t turn. Low oil. Check oil level. Add as required. Filter plugged.
- Page 81 PS 300 Operator’s Guide PROBLEM CAUSE SOLUTION Can’t pick up trash No vacuum (continued) Hole in intake tube. Replace intake (continued) tube. Intake tube plugged. Clear obstruction from tube. Tube improperly clamped. Tighten clamps. OG 6:27 Chapter - Routine Maintenance...
- Page 82 PS 300 Operator’s Guide OG 6:28 Chapter - Routine Maintenance...
- Page 83 Maintenance Not Used Section Hydraulic System Electrical System Water System Not Used Not Used Not Used Not Used Not Used PS 300 Not Used Compact Pedestrian Sweeper Part No 66473-M Revision Level 06 Print date 09/11/2006...
- Page 84 PS 300 - Maintenance CHAPTER Hydraulic Section Table of Contents Section Page Hydraulic Schematic with all Hydraulic Options 8 : 1 Chapter - Hydraulic Section...
- Page 85 PS 300 - Maintenance Chapter -Hydraulic Systems...
- Page 86 PS 300 - Maintenance CHAPTER Electrical Section Table of Contents Section Page Complete Electrical Schematic 9 : 1 Chapter - Electrical Section...
- Page 87 PS 300 - Maintenance Chapter -Electrical System...
Need help?
Do you have a question about the PS300 and is the answer not in the manual?
Questions and answers