
Subscribe to Our Youtube Channel
Related Manuals for Magnadyne M45TC

Summary of Contents for Magnadyne M45TC
- Page 1 Installation Manual Rearview Mirror/Monitor Model: M45TC For Technical Assistance, please call (800) 638-3600, or visit www.magnadyne.com...
-
Page 2: Table Of Contents
Any alteration or modification to the product, the design or the proper instal- lation of this product in accordance with the installation instructions herein is strictly pro- hibited. Magnadyne assumes no responsibility whatsoever for any injury or accidental death resulting from the failure to properly install this equipment. -
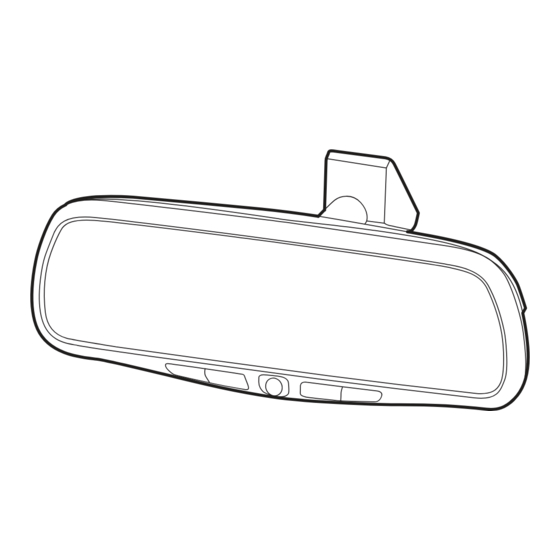
Page 3: Installation Instructions
Installation Instructions Mounting the Mirror/Monitor: Mounting Bracket Rearview Mirror 1. Remove the factory mirror (do not use excessive force). Check to make sure that the facto- ry mirror mount matches the mounting bracket on the replacement mirror/monitor. If the factory mirror mount does not fit the mirror/monitor’s mounting bracket, replace with the extra mirror mount provided. -
Page 4: Installing The Compass Sensor
Installation Instructions Installing the Compass Sensor: 1. Select a suitable mounting location for the Compass Sensor. The sensor must be mounted HORIZONTALLY and with the arrow pointing toward the front of the vehicle. Do not mount near a speaker or magnetic source. Under the dash top panel is a recommended location. 2. -
Page 5: Electrical Connections
Electrical Connections Compass Sensor Temperature Sensor Yellow RCA Video In (AVin-1) White RCA Audio In (AVin-1) Control Box Black Wire Ground Rearview Red Wire +12V Constant Camera (Optional) Yellow RCA Video In (AVin-2) White RCA Audio In (AVin-2) Black Wire Ground Interior Red Wire +12V Constant Camera... -
Page 6: Signal Input
Electrical Connections Filter Box: Blue Wire: Connect this wire to a switched +12 volt power source (a power source turned on and off by the ignition key). Red Wire (with Fuse): Connect this wire to a constant +12 volt power source (a power source that is not controlled by the ignition key). -
Page 7: Testing And Operation
Testing and Operation 1. 4.5" LCD Monitor 2. Internal Speaker 3. CAM Button (Camera Selection) a. If you have installed an optional interior view camera with microphone, press the CAM but- ton to display the image from the interior camera on the monitor and hear the audio from the internal speaker. -
Page 8: Troubleshooting
Audio Input: <=1V Resolution: 960 x 234 Audio Power Output: 0.5W x 1 (16 ) Video Format: PAL/NTSC Auto Detect Operating Temperature Range: 0 to 50 Degrees C Display Format: 16:9 © Copyright 2006 M45TC-IM Rev. A 10-12-06 Magnadyne Corporation...
Need help?
Do you have a question about the M45TC and is the answer not in the manual?
Questions and answers