Table of Contents
Advertisement
Quick Links
Advertisement
Table of Contents

Summary of Contents for DZ DZKit Saguaro
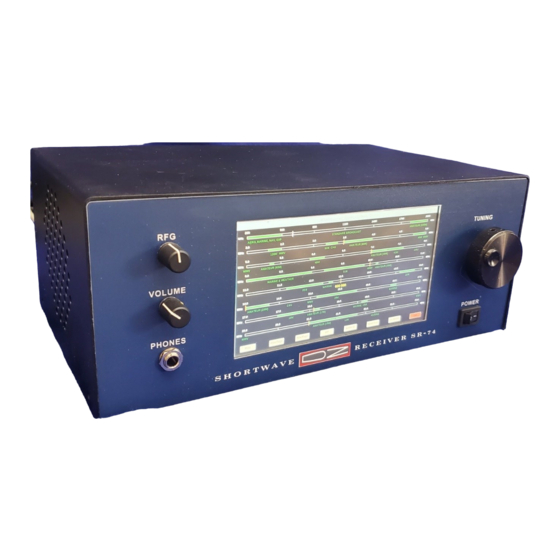
- Page 1 Page DZKit ASSEMBLY, SERVICE & USER’s MANUAL SR-74 “SAGUARO” SHORTWAVE RECEIVER...
- Page 2 You can obtain parts directly from DZ Company by writing us, emailing us or telephoning us. And we’ll pay shipping charges to get those parts to you—anywhere in the world.
-
Page 3: Table Of Contents
(1) This device may not cause harmful interference, and (2) this device must accept any Copyright © 2023 The DZ Company, LLC interference received, including All rights reserved interference that may cause unde- sired operation. -
Page 4: Introduction
Page 4 INTRODUCTION Saguaro SR-74 provides computer called the “Raspberry Pi unique twist on an old concept: 4B,” a Linux-based PC with a shortwave listening. Shortwave fast processor and either 4G or radios of yesteryear first used 8G of RAM. A DZKit-designed con- super-regenerative circuits, troller reads the pots and tuning... -
Page 5: General Assembly Notes
Page 5 General Assembly Notes 1. Most screws in this kit are www.expresspcb.com) and open Phillips Panhead Machine the board you wish to work Screws. For simplicity, we on. Press “Ctrl-F” to find a refer to them simply as part, and then enter it in “screws”... - Page 6 Page 6 poor soldering jobs. Please Your Saguaro uses mostly one take a moment to familiarize percent or better resistors, yourself with proper soldering which have 4 bands for the technique. And do not, under value. A 4.75K resistor is ANY circumstances, use corro- Yellow-Violet-Green-Brown.
- Page 7 Page 7 nent outline and a square pad which identifies the cathode. 13.Transistors have either a tab or a flat side that you can match to the silkscreened com- ponent outline. Most transis- tors will need to have their IC—pin 1 (SMT part) leads “sprung”...
- Page 8 Page 8 Abbreviations and definitions of terms used in this manual: PC = Personal Computer PCB = Printed Circuit Board PH = Panhead FH = Flathead M/S = Machine Screw (typically M2.5, M3, M5 sizes) P/L = Patch lock (material added to threads to help screws stay in) PCB-mt = Printed Circuit Board mounting AMP MTA = Tyco Electronics connector with .1”...
-
Page 9: Of The
Page 9 Kit-Building Procedures The steps involved in building a kit are listed below. Be sure to fol- low them and you will have a lot of fun building, testing and using your kit. 1. Check off parts as loaded. Each board kit contains a list of parts used on that board. -
Page 10: Safety Notes
Page 10 Safety First! Your safety is of utmost importance to us. Please read this infor- mation before you get started, and remember these rules as you contin- ue building and testing your Saguaro. 1. Always have a healthy respect for electricity. The voltages present inside the Saguaro can be as high as 260VAC, and high currents are available (up to 2 Amps DC). -
Page 11: Soldering Instructions
Page 11 SOLDERING INSTRUCTIONS Poor soldering accounts for almost all kit building problems. The pho- tographs below show examples of the most common types of bad solder connections and a good one. If you locate any of these bad solder con- nections in your kit, correct them as described. - Page 12 Page 12 STATIC PRECAUTIONS Many of the components in your static-producing material in your kit can be damaged by exposure to clothing. static electricity. Please read this page to familiarize yourself If your work area floor is car- with the causes of and solutions peted, spray fabric softener on to this problem.
-
Page 13: Chassis Parts/Cable Identification
Page 13 Chassis Parts Please check each item to make sure it is present in the right quantity. Let us know right away if it’s not so that we can ship replacements. Bag Item Description Vendor Vendor P/N Bin Qty Hardware M5 Washer 18-8 SS McMaster 98689A114... - Page 14 Page 14 Bag Item Description Vendor Vendor P/N Bin Qty 22 Knob .5in dia matte finish indicator line top/side Allied 70206941 146A 2 23 Knob 1.75in dia glossy finish finger dimple no line Heilind AMP 3-1437622-8 24 Encoder optical RPG 5V 128ppr 1/4in shaft w/nut Newark ENA1J-B28-L00128L 25 Switch on/off rocker...
- Page 15 Page 15 Item Loose/Heavy parts Vendor Vendor P/N Bin Qty 40 Transformer Triad VPS16-1600 16VCT 1.6A Mouser 553-VPS16-1600 41 Power entry module filtered Mouser 631-FN372-2/22 42 Display 7 inch TFT Resistive HDMI Matrix Orbital HTT70A-IPS 43 Fan with Heatsink for Rpi GeeekPi ZP-0110 44 Speaker 8 ohm 3W 200Hz-20kHz...
- Page 16 Page 16 Chassis Cables S0074-00101: Bag of loose wires. Cut each color wire to the noted length, strip to 3/16” and tin. Extra wire has been provided. If you make a mistake and there isn’t enough remaining of the desired color, it is OK to use a different color, but be sure to keep track of what you used where.
- Page 17 Page 17 Chassis Cables, continued S0074-00103: Controller to Display Power S0074-00104: Controller to Speaker/Headphones kit S0074-00106: Pi audio to controller S0074-00107: Controller to Pi power S0074-00105: Controller to Pi GPIO S0074-00108: Pi to HDMI display S0074-00114: Controller to Pi fan (shown with heat shrink tubing attached)
- Page 18 Page 18 Optional Parts S0074-00112-1: SDRPlay RSP1A for use inside Saguaro only. Case must be removed and board attached to standoffs inside chassis. S0074-00112-2: 8” USB-A to USB-B S0074-00115-1 or –2: Raspberry Pi 4B with either 4G (-1) or 8G (-2) of RAM .
- Page 19 Page 19 Optional parts S0074-00110/111 Touch interface S0074-00109 Ext HDMI interface S0074-00116 WiFi Keyboard/Mouse Note: Wireless USB receiver is located inside battery compartment of mouse S0074-00113-1 S0074-00113-2 18AWG Heavy AC Power cord and international adapters Duty Power Cord, 3.3ft (1m) 10 Amps 120V Black...
- Page 20 Page 20 Pots Display Headphone jack Loudspeaker On/off switch DIY expansion board DC Power In AC Power Entry Module Ground lug Raspberry Pi 4B Controller Safety shield Micro-SD card Transformer General chassis layout...
-
Page 21: Step-By-Step Assembly Chassis
Page 21 STEP-BY-STEP ASSEMBLY: Chassis IMPORTANT! Use screws without built-in lock washers to fas- ten chassis parts to each other. (Some have Nylon patches.) For simplicity, these are referred to as “screws” in the steps. Use SEMS screws (screws with built-in lock washers) ONLY for attaching circuit boards to standoffs and where instructed. - Page 22 Page 22 STEP-BY-STEP ASSEMBLY: Chassis ( ) Fasten the RPG to the front ( ) Place four M3 x 7.5mm plastic panel using the provided lock spacers over the four mount- washer and nut. Tighten se- ing studs at the corners of curely using a small wrench, the display opening.
- Page 23 Page 23 STEP-BY-STEP ASSEMBLY: Chassis the solder lug faces up. ( ) Locate the Power Entry Module Tighten the assembly to the (PEM). Remove the two wires back panel using an M5 KEPS that are already attached, nut. Place two M5 washers and being careful not to damage an M5 Wingnut over the screw, the lugs.
- Page 24 Page 24 STEP-BY-STEP ASSEMBLY: Chassis ( ) For each wire soldered in the ( ) Solder the free end of the 2” previous step, place a 1/2” Blue wire to lug H, being length of 3/16” heat shrink careful not to heat the heat tubing over the loose end of shrink tubing.
- Page 25 Page 25 STEP-BY-STEP ASSEMBLY: Chassis ( ) Place a 1/2” length of 3/16” heat shrink tubing over the 8” White, White/Gray, Black and White/Black wires. Note: When soldering wires to the switch, do not overheat the pins! The switch is susceptible to dam- age if too much heat is used.
- Page 26 Page 26 STEP-BY-STEP ASSEMBLY: Chassis ( ) Slide the four pieces of heat ( ) Solder a 1.5” Brown wire and shrink tubing over the con- a 6” Yellow wire to lug 7 on nections on the switch and the transformer. heat them until they shrink.
- Page 27 Page 27 STEP-BY-STEP ASSEMBLY: Chassis sis. Do not solder it. ( ) Stand the transformer up and mount it to the chassis using ( ) Attach a 2” green wire from two M3 x 6mm screws. Tighten the lug marked “Sleeve Termi- the screws securely.
- Page 28 Page 28 STEP-BY-STEP ASSEMBLY: Chassis ( ) Unpack the RSP1A SDR from the small wrench. Note that the SDRPlay box. Remove the rub- connector at the end of the ber feet and Unscrew the four cable, where it attaches to mounting screws that hold the the board, can be rotated.
- Page 29 Page 29 STEP-BY-STEP ASSEMBLY: Chassis ( ) Locate the loudspeaker. Sol- der the White wire of the 2- pin cable to the positive (+) terminal on the loudspeaker. ( ) Solder the White/Black wire to the negative (-) terminal on the loudspeaker. ( ) Mount the loudspeaker to the chassis using an M5 x 12mm flathead screw, two rubber...
- Page 30 Page 30 STEP-BY-STEP ASSEMBLY: Chassis ( ) Locate the small MicroSD card, which has the Linux Op- erating System and other software pre-loaded. Insert it into the connector on the bottom of the Pi on the end opposite the large connect- ors.
- Page 31 Page 31 STEP-BY-STEP ASSEMBLY: Chassis ( ) Place the fan on the Pi as and one 8-pin connector, 5 shown on the previous page. long wires without a connect- or at one end, and two loose ( ) Turn the chassis on its side. wires.
- Page 32 Page 32 STEP-BY-STEP ASSEMBLY: Chassis Black wire to the top lug on Proceed to the next section to the bottom pot. Solder both build the Controller board. wires. ( ) Solder the other end of the short Black wire and the long Green wire to the top lug on the top pot.
-
Page 33: Controller Circuit Board
Page 33 Controller Board Assembly The Controller board includes an AC power supply that converts the in- coming 100-240VAC into 12VDC, and also brings DC power directly into the radio. The microprocessor on this board reads the tuning knob and the two potentiometers and passes their digital values over the gray ribbon cable to the Raspberry Pi computer for processing. - Page 34 Page 34 STEP-BY-STEP ASSEMBLY-Controller Board Please read all notes on this 6. Resistors have been pre-sorted page before proceeding: to make it unnecessary to read color codes or to measure their 1. Check off each part on the values with an Ohmmeter. You can parts list as you load it.
- Page 35 Page 35 Note: When loading a DZKit cir- cuit board, use the free Express- PCB software to find the parts, if desired. Download ExpressPCB Classic from www.expresspcb.com, then load the file “pwr_ctl_xx.pcb” (where “xx” is the rev letter/number) from the flash drive included with your kit.
- Page 36 Page 36 Note: Solder all connections af- ( ) Load and solder the surface ter completing each step, then mount regulator, U2 (bag 7). clip excess leads. Use the parts Before loading this part, ap- list in the bag to identify the ply solder to the large parts.
- Page 37 Page 37 C1 back up so that it is up- Notch right. ( ) Bend the leads of D1 (bridge rectifier, bag 7) up 0.3” from the body of the part as Pin 1 shown below. Insert the part from the bottom of the board so that the AC symbols and ( ) Load and solder potentiome- the + and —...
- Page 38 Page 38 ( ) Bend the leads of ICs U1 and ( ) Remove the knurled nuts from U4 (LM350T voltage regula- the minijacks on the back end tors, bag 7) up 0.4” from the of the board. Insert the body of the parts.
- Page 39 Page 39 ( ) Insert a plastic shoulder ( ) Measure the following re- washer into each mounting sistances: hole. Using two M3 x 6mm screws, affix the regulators ( ) Either side of the fuse to the chassis securely. Do (F1) to ground.
-
Page 40: Voltage Tests
Page 40 STEP-BY-STEP ASSEMBLY: Voltage tests ( ) Apply 12VDC to the DC input ( ) Twist the two yellow wires jack. (You do not need to coming from the transformer press the on/off switch.) You together, two turns per inch, should hear relay K1 click, then solder the ends to the switching power from the AC... - Page 41 Page 41 ( ) Use a flat-blade screwdriver Note: There will be live AC volt- or similar tool to pop open age over 100VAC present near the the PEM using the notch at transformer, so be very careful the top of the PEM, then ro- not to touch anything in this ar- tate the voltage selector to ea in the next step.
- Page 42 Page 42 er, into its place on the controller board. Line up the mounting hole with the hole in the rear panel and attach it with an M3 x 6mm screw. Solder two end pins on the front row to hold it in place, then remove the mount- ing screw.
- Page 43 Page 43 Inside view with GPIO cable disconnected from controller board to show cable connections beneath it...
- Page 44 Page 44 Inside view of assembled unit showing cable connections with GPIO ca- ble in place. Refer to this and the previous page as you complete the wiring on the next few pages. View of back panel showing USB connections to the Raspberry Pi 4B...
-
Page 45: Final Assembly
Page 45 STEP-BY-STEP ASSEMBLY - Final Assembly Note: In the steps below, you one end (S0074-00103). Insert will insert the white or blue the 2.1mm connector into the “AMP MTA” female connectors that 2.1mm power jack on the dis- are on the cable assemblies into play. - Page 46 Page 46 nector into the SDR control like M3 x 6mm screws. Do connector on the back panel, not mix them up! and insert the USB-A connect- or into the bottom of the two ( ) Locate the 6” USB-A to USB connectors on the left USB-A cable (S0074- side of the Pi (viewed from...
- Page 47 Page 47 ( ) Attach the free end of the trol to the 9:00 position shielded cable that was at- (indicator pointing left). tached earlier to the head- phone circuit board (S0074- ( ) Affix the serial number 00104) to the controller sticker to any convenient board at the point labeled spot on the back panel.
-
Page 48: Quick Start Guide
HDMI the radio. Also be sure to disa- jack until the DZKit Saguaro pro- charge any static you may have gram is run. Instructions on how built up by touching a ground be-... - Page 49 Page 49 QUICK START GUIDE Adjust the volume control for stereo speakers into the Line Out comfortable listening. jack on the back panel. The Mode, such as AM, FM, NBFM, KEYER OPERATION USB, LSB, CW(USB) and CW(LSB), is selected automatically based on Plug a set of keying paddles into band, but each band can have a the “Paddles”...
-
Page 50: Detailed Operation
Page 50 DETAILED OPERATING GUIDE Refer to the picture on page 51. Mode: The current mode is shown in this button. As you click the The function of the buttons at button, the mode is changed to FM the bottom of the screen is as (wideband), NBFM (narrow-band), follows: USB, LSB, CW(USB) or CW(LSB). - Page 51 Page 51 Buttons on bottom of screen Refer to the picture above. When use any Linux features, such as you click the Exit button, you executing another program. are given three choices: To run other included programs Yes: Exit the program and shut such as CubicSDR, move the mouse down the computer.
- Page 52 Page 52 DETAILED OPERATING GUIDE Refer to the picture below. Phones. Stereo connection to low impedance headphones with a 1/4” RFG. This stands for “Radio Fre- stereo phone plug. Tip to Left, quency Gain,” and controls the Ring to Right, Sleeve to Ground. level of RF seen by the input Plugging in the headphones lowers stage.
- Page 53 Page 53 KEYER CONNECTIONS: Ultimatic: Whichever paddle · was pressed last dominates. Plug a set of keying paddles into So, pressing the dot paddle the “Paddles” stereo minijack will generate a stream of (dit paddle to tip, dah paddle to dots, and if you continue to ring, ground to sleeve).
- Page 54 Page 54 In this closeup, you can see that When tuning across the Citizen’s the selected frequency is 600 kHz Band frequencies (marked “CB”, (white line), and that the saved around 27 MHz), the channels are frequencies on the other bands shown when you are on one of are 3.5 MHz, 7.0 MHz, 10.0 MHz those frequencies.
-
Page 55: Linux Setup
Page 55 LINUX SETUP Although we have tried to make a USB port on a Windows PC to ed- Saguaro as easy to use as possi- it or replace the file. ble, it does use the Linux Oper- ating System (OS) underneath. MONITORS This gives you many features that you can tweak depending on your... - Page 56 Page 56 LINUX SETUP TOUCHSCREEN (CONT’D) Usually the external monitor is 4. Issue the following command: not a touchscreen. This causes xrandr Linux to get confused about where to put the cursor as you touch 5. The output from this command the screen.
- Page 57 Page 57 LINUX SETUP DISPLAY “WASHOUT” If you leave your Saguaro running unattended, Linux will eventually blank the screen. If left in this state for many hours, a phenomenon called “turbidity” can occur, making the screen appear “washed out.” To fix this, remove resistor R22 on the back of the display. An easi- er solution is to not leave the Saguaro running unattended for many hours, or set the display to never blank the screen.
- Page 58 Page 58 LINUX SETUP SYSTEM CONFIGURATION As with all PC OS’s, there are many configuration settings you can change based on personal preference, such as timezone, date and time, screen saver, etc. These can be changed by clicking the raspberry icon in the upper left corner, and selecting “Preferences”.
- Page 59 Page 59 LINUX SETUP...
- Page 60 Page 60 LINUX SETUP RASPI-CONFIG Another convenient setup tool is “raspi-config”. To run this, bring up a command prompt and type: sudo raspi-config The exact look and feel of this utility changes, so we won’t go into detail here. Please explore what you can do with it, but be careful! It makes important changes to the configuration! AUDIO OUTPUT Your Saguaro uses the headphone jack to feed its audio to the Saguaro...
-
Page 61: Theory/Troubleshooting
Page 61 THEORY OF OPERATION/TROUBLESHOOTING There are five main pieces of AC Supply. hardware in the Saguaro: When properly configured for the 1. Controller board. This is a input voltage based on country DZKit-designed circuit board where it is used, the PEM pro- with an Atmel Mega644P micro- vides AC voltage to the primary processor that reads the front... - Page 62 Page 62 THEORY OF OPERATION/TROUBLESHOOTING circuits. U4 provides 5V to the Raspberry Pi (and SDR via the USB port), and U1 drives the display, fan and 3.3V regulator. Handshake The Raspberry Pi’s GPIO port uses 3.3V logic, so the controller’s processor and related circuits run at 3.3V, provided by regula- tor U2.
- Page 63 Page 63 THEORY OF OPERATION/TROUBLESHOOTING the controller is ready to accept of U6, which is used as an audio data from the Pi, and LDAC indi- mixer to take the right channel cates that data is ready. The da- of audio from the Raspberry Pi ta is simply keyer mode: 0 = Iam- and mix it with the keyer side- bic A, 1 = Iambic B, 2 = Ultimat-...
- Page 64 Page 64 THEORY OF OPERATION/TROUBLESHOOTING If the sidetone is not working, lator code which applies fil- check to make sure U5 is soldered ters of different bandwidths well and that serial control sig- based on operating mode, de- nals SDATA, SCLK and FSYNC are modulates the data, converts active.
-
Page 65: Schematics
Page 65 SCHEMATICS... - Page 66 Page 66 SCHEMATICS...
- Page 67 Page 67 SCHEMATICS...
- Page 68 Page 68 SCHEMATICS...
-
Page 69: Specifications
Page 69 SPECIFICATIONS RF Specs are identical to those of the SDRPlay RSP1A. See https://www.sdrplay.com/wp-content/uploads/2018/01/RSP1A-Technical-Information-R1P1.pdf (also included on the flash drive that accompanies this kit) Receiver type: Software defined radio, 14-bit ADC, controlled by Linux-based PC Operating system: Raspberry Pi OS (Debian Linux, rev 11.0, codenamed “Bullseye”) Frequency Range of SDRPlay RSP1A: 1kHz-2GHz Frequency coverage of Saguaro software: 200kHz-32 MHz (LF, MF and HF in 11 bands) - Page 70 Page 70...
- Page 71 Page 71...
- Page 72 Page 72 DZ COMPANY LOVELAND, COLORADO UNIQUE electronic equipment in kit form...
Need help?
Do you have a question about the DZKit Saguaro and is the answer not in the manual?
Questions and answers