Table of Contents
Advertisement
Quick Links
Advertisement
Table of Contents

Related Manuals for Transcend Tsonic 320 4GB


Summary of Contents for Transcend Tsonic 320 4GB
- Page 1 MP320 User’s Manual...
-
Page 2: Table Of Contents
Introduction︱ ... 5 Package Contents︱ ... 5 Features︱ ... 5 System Requirements︱ ... 6 Safety Precautions︱... 6 General Use ...6 Backing Up Data ...6 Caution: Risk of Deafness...7 Reminders ...7 Player Controls︱ ... 8 Music Playback Screen︱ ... 9 Basic Operation︱... 10 Charging the Battery ...10 Power ON...10 Power OFF ...10... - Page 3 Music Transfer Protocol (MTP) ...27 Player Info...27 Driver Installation︱... 28 Connecting to a Computer︱ ... 29 Transferring Files to the MP320...29 Disconnecting from a Computer ...30 Transcend Digital Music Player Utility Software︱... 31 Installing the Transcend Digital Music Player Utility Program ...31...
- Page 4 PC-Lock ...33 Partition ...35 Log In / Log Out ...36 Changing your Password...37 Forgotten Passwords ...38 Troubleshooting︱... 38 Specifications︱... 41 Ordering Information︱ ... 41 Transcend Limited Warranty︱... 42...
-
Page 5: Introduction
– ideal for learning foreign languages and reviewing an important part of a song or recording. In addition, you can make personal memos and record meetings or class lectures using the advanced digital voice recorder with the built-in microphone. The stylish MP320 from Transcend will change the way you think about digital music forever. -
Page 6: System Requirements
In a closed car that is in direct sunlight Backing Up Data Transcend does NOT take any responsibility for data loss or damage during operation. If you decide to store data on your MP320, we strongly advise that you regularly backup the data to a computer or other storage medium. -
Page 7: Caution: Risk Of Deafness
• To protect your health and your hearing, keep the volume of your MP3 player below 80 decibels and do not use for an extended period of time. Stop use if symptoms like headaches, nausea, or hearing disorders occur. -
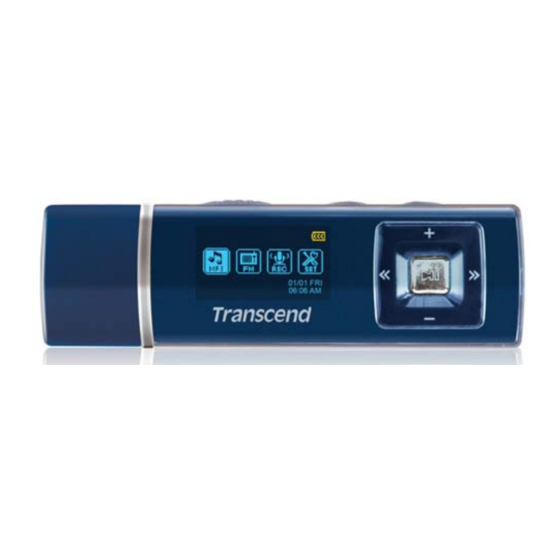
Page 8: Player Controls
Player Controls︱ Figure 1. MP320 Hold Switch A-B Repeat / REC Menu Button Microphone Headphone Jack Lanyard Attachment Loop Volume Up Play / Pause / Power Next / Fast-Forward Volume Down Previous / Rewind Reset Button Hi-Speed USB 2.0 Connector Dual-Color OLED Display... -
Page 9: Music Playback Screen
Music Playback Screen︱ ICON Record Source Record Quality Sleep EQ Mode Repeat Mode Play Speed Graphic EQ Lock Battery Album / Artist / Lyrics Song Title / Lyrics Date Time Track Info Play Status Text Display Mode Figure 2. OLED Display INDICATION Built-in Microphone Indicates Voice Activity Detection is enabled... -
Page 10: Basic Operation
Power ON Press and hold the button to turn on the player. An animated Transcend logo will appear on the screen. After the startup screen disappears, the Main Menu will appear. You can now start using the MP320. The Main Menu will appear. -
Page 11: Play A Song
Play a Song Press to play the currently selected MP3, WMA, or WAV track. Pause a Song Press to pause and un-pause a track during playback. Next Track Press to skip to the next available song. Previous Track Press to go back to the previous song. Fast Forward Press and hold the button to fast-forward. -
Page 12: Hold
2. Press the button again to mark the end of the section you wish to repeat. 3. The marked section of the track will playback the marked A-B section in a continuous loop. 4. Press the button once more to stop the A-B repeat function. Hold When the switch enabled, all of the MP320’s buttons will be disabled, and cannot accidentally be... -
Page 13: Music Mode
MUSIC Mode︱ Before buying DRM (Digital Rights Management) protected music online, please be advised that the MP320 only supports WMA-DRM10 file protection. Playing MP3, WMA, or WMA-DRM10 Music 1. Press and hold the If the MP320 is already on, press the 2. -
Page 14: Adding A Song To My Playlist
2. Select either “My Playlist” or an imported playlist file (if available) and press 3. Use the buttons to move up and down the list of available songs. Press play the highlighted song. When the song ends, the rest of the files in the playlist will then be played. 4. -
Page 15: Deleting Music Files
5. To remove all songs, highlight “My Playlist” and press the button, then select “Yes” to confirm. Deleting Music Files 1. In the MUSIC mode, press and hold to enter the File Navigator. 2. Navigate to the file you want to delete with the buttons. -
Page 16: Radio Mode
RADIO Mode︱ Listening to the Radio 1. Plug in the earphones 2. Press the button to go to the Main Menu. 3. Use the 4. The current FM radio frequency will be displayed. The first time you use the Radio, the MP320 will automatically scan all frequencies and save the 20 strongest stations as channel presets (CH). -
Page 17: Recording The Radio
2. Use the buttons to select the channel you want to listen to. 3. Press to listen to the selected channel. Recording the Radio 1. Select a radio station that you want to record. 2. Press and hold the 3. An automatically generated file name for your recording will appear. FM Recordings are named in this format: “MonthDayF###.WAV”... -
Page 18: Record Mode
RECORD Mode︱ The MP320 can record from 2 different sources: the FM Radio or the built-in microphone. The RECORD mode is for creating voice recordings and playing back both FM and voice recordings. To record from the FM Radio, please see the previous section on “Recording the Radio.” Making Voice Recordings with the Built-In Microphone 1. -
Page 19: Deleting Recorded Files
Use the buttons to move up and down the list. 3. Press to play the selected recording. 4. To switch between the MICIN.DIR and FMIN.DIR folders, press press to go up to the “Root” directory. Voice recordings can be found in the /MICIN.DIR/ folder FM recordings can be found in the /FMIN.DIR/ folder 5. -
Page 20: Settings
Settings︱ The Settings Menu 1. Press the button to enter the Main Menu. 2. Use the Equalizer (EQ) There are seven equalizer modes to choose from: Normal, Pop, Rock, Classical, Jazz, Bass, and User EQ 1. In the SETTINGS menu, use the 2. -
Page 21: Repeat Mode
4. Press to increase or decrease levels in 1.0dB steps (Adjustment range: -7dB to +8dB) 5. Press to save the new User EQ settings and return to the SETTINGS menu. Repeat Mode There are seven Repeat modes to choose from: (plays all music files available one time, in consecutive order) Normal (continuously repeats the current song),... -
Page 22: Record Settings
Record Settings Record Quality The quality of an audio recording can be set to Low (8,000Hz), Medium (16,000Hz), or High (32,000Hz). Higher recording quality settings require more memory space to save the recorded WAV files. 1. In the SETTINGS menu, use 2. -
Page 23: Vad (Voice Activity Detection)
VAD (Voice Activity Detection) VAD allows the MP320 to make gapless voice recordings. This means during voice recording with the internal microphone, the player will only record when it detects voices. If the person(s) pauses or stops speaking, the MP320 will temporarily stop recording until the person(s) starts speaking again. This allows for more concise, easier to understand recordings and smaller recording files. -
Page 24: Lyrics Sync
2. Use to select a Screen Saver delay and press whenever this amount of time passes with no button activity. Available delay timers are: “Disable”, “10 Seconds”, “20 Seconds”, and ”60 Seconds” 3. After you select a Screen Saver time delay, a list of available screen savers will appear. 4. -
Page 25: Date / Time Settings
Date / Time Settings Set Date / Time This setting lets you adjust the time and date, choose between 12Hr or 24Hr format, and set the time zone. 1. In the SETTINGS menu, use 2. Use to select the ”Set Date/Time “ icon 3. -
Page 26: Daylight Saving Time (Dst)
4. Use to select the time zone for your country and press Daylight Saving Time (DST) If your region uses DST, the MP320 can automatically adjust the clock for Summer and Winter time. 1. In the SETTINGS menu, use 2. Use to select the “Daylight Saving”... -
Page 27: Music Transfer Protocol (Mtp)
Music Transfer Protocol (MTP) If you own WMA-DRM10 music files or if you want to use Windows Media Player 10 to synchronize music between your computer and the MP320, the Music Transfer Protocol (MTP) must be enabled. This setting lets you switch between MTP or USB transfer modes. -
Page 28: Driver Installation
Driver Installation︱ Driver Installation for Windows No drivers are required. These Windows your MP320 into an available USB port and Windows with a newly assigned drive letter will appear in the My Computer window. Driver Installation for Mac No drivers are required. Plug your MP320 into an available USB port and your computer will automatically detect it. -
Page 29: Connecting To A Computer
Connecting to a Computer︱ If you are using Windows Media Player 10 and want to play WMA-DRM10 music files, you must set the MP320’s Music Transfer Mode to MTP to transfer and synchronize music files between the computer and your MP320. Transferring Files to the MP320 If you want to use your MP320 to listen to music other than the Radio, you must transfer MP3, WMA, or WMA-DRM10 music files to the player. -
Page 30: Disconnecting From A Computer
Figure 6. The MP320 sh *Note: “(F:)” is an example drive letter – your “My Computer" window may differ 3. To transfer n ormal MP3 and WMA music files to the MP320, the MTP (see Music Transfer Protocol ode in the Settings menu must be set to “USB.” You can transfer music and data files t by simply dragging them onto the 4. -
Page 31: Transcend Digital Music Player Utility Software
The Transcend Digital Music Player Utility is not supported on Mac™, or Linux™ Operating Systems. To use the Transcend Digital Music Player Utility, you must log in to the Windows® OS with Administrator rights. Installing the Transcend Digital Music Player Utility Program 1. - Page 32 Wizard” window will appear. Click the “ Next ” button to continue. The InstallShield Wizard will guide you through the installation process. Figure 11. Transcend Digital Music Player Utility InstallShield Wizard Figure 9. MP320 Auto-Run window Figure 10. Choose a language...
-
Page 33: Pc-Lock
The Transcend Digital Music Player Utility program can be found in: “ Transcend -> Digital Music Player Utility .” PC-Lock With PC-Lock, you can use your MP320 as a key to temporarily lock your computer while you are away. - Page 34 4. You can change the text displayed on the screen while the computer is locked in the “ Screen Saver Message ” field. 5. You can adjust the period of time that your computer will be locked for with the “Enable Timer” option. Set the Unlock Timer in automatically unlock and be available for use.
-
Page 35: Partition
6. Click the “ OK ” button to start the PC-Lock. When PC-Lock is enabled, your computer will be locked when the MP320 is unplugged While your computer is locked, the screen will display the “Screen Saver Message” text To unlock the computer , you must reconnect your MP320 to your computer . The PC-Lock message text will disappear and you will be free to use your computer again. -
Page 36: Log In / Log Out
1. Connect the MP320 to your computer. 2. Start the Transcend Digital Music Player Utility ( Music Player Utility) in the Transcend Digital Music Player Utility window or Task Bar Figure 18. Transcend Digital Music Player Utility – Partition Figure 19. Create a Partition Figure 20. -
Page 37: Changing Your Password
Use the “New Hint” field to give yourself a hint in case you forget your new password. in the Transcend Digital Music Player Utility window or Task Figure 22. Enter your password again to log out. -> Programs -> Transcend -> Digital in the Transcend Digital Music Player Utility window or Task Bar... -
Page 38: Forgotten Passwords
Figure 25. Change Password 4. Click on the “ OK ” button to complete the New Password setup. orgotten Passwords If you forget your password, use the password hint to help you remember your password. If you are still unable remember your passwo rd, you will have to use the Partition function to reset the Public and Private areas. - Page 39 Transcend branch office. We also have FAQ and Support services on our website at ttp://www.transcendusa.com Software CD does not auto-run in Windows o to the Device Manager in the Control P Alternatively, you can manually run the “...
- Page 40 Track playback sounds intermittent Plug the earphones into the earphones jack again to make sure they are properly connected. MP320 Powers OFF au tomatically MP320 features a SLEEP Mode, which acts a OFF automatically after 15, 30, or 60 minutes. Please refer to the “ Sleep Timer ” section of this manual. MP320 just isn’t working properly If your MP 320 ever stops workin...
-
Page 41: Specifications
29g (with Li-ion battery) MP3, WMA and WMA-DRM10 (Subscription music) IMA_ADPCM (WAV) 15 hours (fully charged battery) 32Kbps to 320Kbps Up to 10 years ≥ 100,000 times ≥ 90dB CE, FCC, BSMI 2-years Memory Size Transcend P/N TS2GMP320 TS4GMP320 TS8GMP320... -
Page 42: Transcend Limited Warranty
Transcend MP320 fail under normal use in the recommended environment due to improper workmanship or materials, Transcend will repair the product or replace it with a comparable one. This warranty is subject to the conditions and limitations set forth herein.
Need help?
Do you have a question about the Tsonic 320 4GB and is the answer not in the manual?
Questions and answers