Table of Contents
Advertisement
Quick Links
Advertisement
Table of Contents

Subscribe to Our Youtube Channel
Summary of Contents for Blake UK PROception BLA4GROUTER
- Page 1 BLA4GROUTER 150Mbps Mi-Fi 4G Wireless Router Ver1.12.3_2...
-
Page 2: Table Of Contents
Contents About This Guide…………………………………… Page 3 Getting to Know Your 4G LTE Router Router Layout………………………………………….. Page 6 Back Panel…………………………………………….. Page 7 Connecting Your Devices. Insert SIM card…………………… Page 8 Quick Configuration guide…………………… Page 9-12 Log into Your Router……………………………. Page 9 Setup Internet Data Connection. -
Page 3: About This Guide
About This Guide This guide is both a simple quick installation guide and also includes a more in-depth look at all of the features of the 4G router. The Quick Installation Guide instructs you on quick Internet setup and also provides details of each function and shows you the way to configure the functions appropriate to your needs. - Page 4 Thank you for purchasing the Proception 4G wireless CAT4 DL150Mbps & UL50Mbps Router. For cellular data transmission services, wireless routing and sending and receiving SMS text messages. The router adopts a high-performance processor, which can process large amount of data and provides 802.11b/g/n Wi-Fi access. 4G router with RJ45 Ethernet Port, RJ11 Voice Port , external antennas support and Internal battery (Optional extra)
- Page 5 This router is compatible with our Blake 4G panel antenna, 4GLTE-698-2700-PAN This 4G antenna enables you to receive and transmit mobile phone signal in areas where this may be difficult, such as underground buildings, basements, rural areas or weak signal areas in general. With MIMO technology, (Multiple-Input Multiple-Output), the antenna uses multiple transmitters and receivers to transfer more data at the same time.
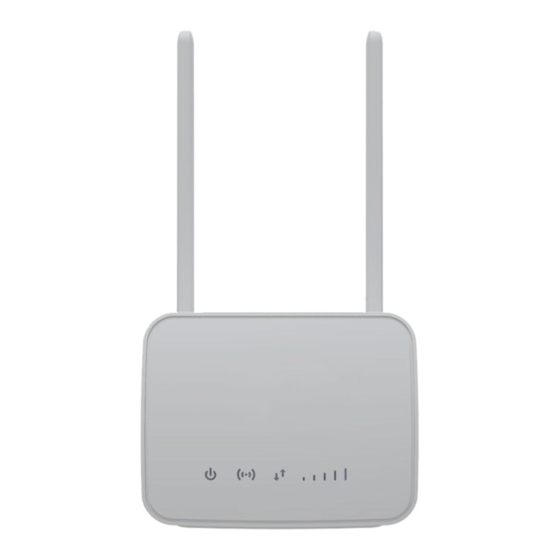
- Page 6 Front: 1 Power LED 2 Wi-Fi on LED 3 LTE on LED 4 Signal Strength LED Rear: 5 USB 6 WIFI on/off 7 WPS activate 8 Ethernet RJ45 port 9 Power button 10 DC Power (adapter supplied) 11 Antenna SMA x 2 Under Cover: 12 Micro SIM slot 13 Factory Reset button...
- Page 7 Rear Connectors On the rear of the unit are several connectors and buttons. Please see below description and use:- SMA: Dual MiMo connectors for external Proception 4G antenna connection Never power the router on without the antenna being connected. USB: For file sharing with other computer on the LAN WPS: Connection of devices using WPS (see page 20) Wi-Fi: Turn Wi-Fi on and off Gray: RJ11: VOIP Telephone connection (Not all SIMS provide this service)
- Page 8 Inserting the SIM Open the rear cover of the router and insert the MICRO SIM into the slot • Make sure you insert the SIM card in the right direction/orientation before • connecting power. Power on, then press the reset button (see below) for 15 seconds Use Proception CAT6 FTP cable if you wish to connect the router to a PC •...
-
Page 9: Quick Configuration Guide
Quick Configuration Guide The router supports RJ45 cables; (we recommend Proception CAT6 FTP shielded leads) or the WLAN wireless mode to connect. Step 1. Connect Antenna & Insert SIM & Power On Follow the above instructions on page 7 in regards to inserting the SIM and the separate instructions for connecting the external antenna BEFORE connecting power. - Page 10 Summary of quick installation Install your chosen SIM Connect the two antenna or a Proception 4G MiMo antenna Plug in the power and switch on at the rear of the router Wait 3 minutes for the router to initialise Connect to the Wi-Fi signal ProWiFi_4G and use password 12345678 In your browser enter 192.168.0.1 in the bar at the top Log in with username admin and password admin In the column labelled Internet click settings...
- Page 11 Look at the top right of the screen and check the SIM is coloured green. You should also see blue arrows on the front. Both should show blue and signal should show a signal level 1-5. If it is then the SIM provider has not been automatically recognised, the SIM is incorrectly inserted or not setup in APN.
- Page 12 One you have selected or manually entered the correct APN for the sim card in use, click apply. To ensure the details are used we suggest you power off and back on. Once the correct APN has been entered and you reboot the device, wait for the red arrows to go blue and the signal level indicators to display.
- Page 13 Quick Settings SSID This section is the wizard for setting up the Wi-Fi section of the router. SSID is the broadcasting name of the Wi-Fi. The name should be less than 32 characters and not include spaces or special characters for maximum compatibility.
-
Page 14: Advanced Section
Advanced section Signal Level Wi-Fi Connections Network ID SIM Condition See Next page Connected Devices Mobile Mobile Network Network Signal Level, Details Band & Cell ID Wi-Fi Details LAN Network Estimate Of Data Used This is the initial screen displaying most of the information available To access some advanced settings, use the Username: root &... -
Page 15: Alignment Of External Antenna
Alignment of the External Antenna There are four indicators to help with alignment of the antenna. These are all found on the main screen. RSRQ (dB) Reference Signals Received Power Indicates the quality of the received reference signal. The RSRQ measurement provides additional information when RSRP is not sufficient to make a reliable cell selection. - Page 16 At the top of the main screen you will sometimes see a string of numbers; this is the HNI Home Network Identity. These numbers are the MCC (Mobile Country Code) 234 or 235 for the UK. This is followed by the MNC (Mobile Network Code) of the SIM operator. From this you can see which SIM you have inserted and which mobile network you are connected to.
-
Page 17: Limiting Connectivity
Limiting Connectivity Things to be mindful of before changing settings... This option is for only permitting certain types of mobile data connections. Select from the dropdown the connection you only wish to receive and click apply. We suggest you leave this set to Automatic (Default) as if your signal is weak you may not be able to use the de- Usual 4G download speeds can be between 4 to 10 megabits a second (Mbit/s) with possible instances of above this. -
Page 18: Wi-Fi Switch
Wi-Fi Switch In this screen you can disable the Wi-Fi. This is useful if you are using the router via a network cable (into the grey socket on the rear of the router). This feature is also useful for maintaining security by removing access to Wi-Fi or for reducing the data usage overnight, by preventing tablets, phones or PCs downloading large updates. - Page 19 Wi-Fi Settings Here you can name your SSID, (the name of your Wi-Fi), to make certain of its compatibility. Ensure that the name is more than eight characters, less than 16 characters and does not include any unusual characters or spaces. Using only letters, numbers, underscores, and dashes is advised.
-
Page 20: Wps Settings
WPS Settings PIN method A PIN provided by the router may be entered into the new device to connect. The device needs to be WPS pin compatible. The PIN that needs to be entered into the connecting device is indicated on this page. You can either enter your own PIN or generate a random PIN then click apply. - Page 21 LAN IP setting and allocations The router will automatically allocate IP address to the devices that connect via Wi-fi or the RJ45 ethernet connection. You can, if required alter the IP allocations and the Subnet mask if you require a specific range. By default DHCP is switched on and unless you are an advanced user please leave this to default.
-
Page 22: Pin Management
PIN Management. PIN Management PIN Management provides PIN security settings to prevent unauthorised use of the SIM, USIM, or UIM card. Turning On or Off PIN Verification If PIN verification is turned on, you need to enter the PIN only when the Mobile Broadband is turned on. -
Page 23: Static Ip Switch
Static IP Switch Static IP Switch is used when you are using DHCP (Automatic IP allocation) but require some devices to always have the same IP. Enter the IP you would like fixed to a device and the device’s MAC address, usually found on a label on the device. -
Page 24: Static Routing
Static Routing Table Manually enter the routes and tell the router, for each IP network, what next hop the traffic should be delivered to. With static routing, you are telling your router to send traffic with a destination IP address to a router with an IP address of x.x.x.x. When a packet comes into the router and is ready to be routed, the destination IP address is looked up in the routing table. - Page 25 Restricting the amount of data used You can limit your data usage according to your monthly allowance of data. Set the data limit in the lower box and press the tick. Enter a percentage in the When reached field to prevent data overuse. Press the tick to set the level and click apply.
-
Page 26: Ddns Set-Up
DDNS Set-up We provide two DDNS update clients within the router. This feature is ideal for use with CCTV, remote management of the router or anything where you would normally need a static WAN IP address. This allows the router to acts as a client to communicate with the dynamic DNS service provider anytime the IP addresses provided by the ISP is changed. -
Page 27: Band Cell Locking
Band Locking You can lock the device to a set of supported frequency bands on LTE, WCDMA, or GSM. Note that this operation will result in no service if you prevent the use of all bands that are available at the current location. Checking all bands is equivalent to no lock applied. -
Page 28: Connected Devices
Connected Devices The connected device’s screen is simply there to tell you what is connected (Both via Wi-Fi and cable) You can however also allocate a specific IP to each device if needed. (If the router is set to DHCP (Default). You can also change the Host name on devices connected within this screen. - Page 29 Wi-Fi Settings Here you can choose which devices can (White list) and cannot (Black list) connect via Wi-Fi to the router. Simply enter the MAC address of the device in either White or Black list and click apply. Due to changes in new Apple products that use random MAC addresses, the ability to restrict these products may not function as expected.
- Page 30 Wi-Fi settings Wi-Fi standard is 802.11 and the b, g, n are different published standards. b was released in 1999, g in 2003 and n in 2009. Leaving the Network mode on 802.11b/g/n, will allow the fastest Wi-Fi connection and backward compatibility between older and newer devices. Setting the Wi-Fi to N only, could prevent some devices from connecting to the Wi-Fi.
- Page 31 SMS Text Messaging You can send text messages from your router. Enter the number you wish to send the SMS to and press enter. Enter more numbers if needed. In the lower box, enter your message and press the send button. You can also received SMS messages.
- Page 32 Firewall Port Filtering After enabling you will see the box below A Firewall sits between you and the internet to protect you from a potential hacker gaining access to your to your computer, files and images. We suggest you leave the Firewall on. If you require to port forward, perhaps for a CCTV system.
-
Page 33: Firewall Port Forwarding
Firewall Port Forward This is a similar in operation to port filtering but you use the same port coming in WAN (Source) as going out Local (Destination). Port Filtering Port Forwarding Local Network: If you are sharing a file from the server to your PC in your office, then your PC’s LAN (local) IP is the source IP and the WAN (Internet) IP is destination IP. -
Page 34: Firewall Url Filtering
Firewall URL Filtering URL filtering restricts what web content users can access. It does this by blocking certain URLs from loading. Implement URL filtering to prevent people from using resources devices, network bandwidth, etc., or can help stop malware and phishing attacks by blocking certain webpages. - Page 35 Firewall Universal Plug and Play UPnP stands for Universal Plug and Play. It’s a protocol that sets you free from manual network configuration and enables you to connect compatible devices to your 4G router. When enabled, UPnP devices directly forward a port on your router and save you from manually forwarding ports.
-
Page 36: Firewall Dmz
Firewall DMZ Settings DMZ sometimes referred to as a “demilitarised zone” can be used in two ways. Either a security method where Hosts in the DMZ have tightly controlled access permissions to other services within the internal network, because the data passed through the DMZ is not as secure. - Page 37 Firewall Rate Limiting Setting Rate limiting also called bandwidth limiting is used to restrict or “throttle” a device on the network. You can limit upload and download speeds. Enter the local LAN IP of the device you wish to restrict. Set the required download and upload speed and enter any comment below, perhaps a re- minder of why you did the restriction or what the device is.
- Page 38 System settings NTP: The Network Time Protocol (NTP) is a networking protocol for clock synchronisation between computer systems. This is used for keeping accurate time within the 4g router. Time is used in logs and within the SMS section of the router to keep an accurate record of when SMS was sent or received.
- Page 39 System settings Ping: This is used to test to see if a networked device or website is reachable. You can also use this as a simple tool to determine if you have internet access. The ping command sends a request over the network to a specific device. A successful ping results in a response (echo) from the computer that was pinged back to the router.
- Page 40 System settings The system update page is used for updating the Firmware (The operating software within the 4G router) to the latest edition. Only install firmware files directly downloaded from our website (Blake-uk.com or Procep- tionwifi.co.uk) When there is an update available, save the update to your desktop, click browse to find the file you downloaded and click update.
- Page 41 System settings On this page you have the option to reboot the device. This is a warm boot and simply restarts the router. To do a full reboot (cold start), please power off the device using the power button on the rear of the 4G router.
- Page 44 PRO4GROUTER 150Mbps Mi-Fi 4G Wireless Router Blake UK Ltd. 177-187 Rutland Rd, Sheffield. S3 9PT Website https://www/blake-uk.com Ver1.12.3_2...
Need help?
Do you have a question about the PROception BLA4GROUTER and is the answer not in the manual?
Questions and answers