Table of Contents
Advertisement
Quick Links
Advertisement
Table of Contents

Summary of Contents for XCVario XCStick
- Page 1 XCStick User Manual Manual edition 1.11 info@xcvario.com Page 1-...
-
Page 2: Table Of Contents
Table of Content 1. Description................................3 2. Features..................................4 3. Overview.................................5 4. XCSoar Keys................................6 5. LK8000 Keys................................7 6. Installation................................9 6.1. Electrical connections............................10 7. SW Update................................11 8. DC Power................................12 9. Technical specifications............................12 10. Maintenance................................13 11. Warranty Policy..............................13 12. Permit..................................14 13. Limitation of Liability............................15 14. -
Page 3: Description
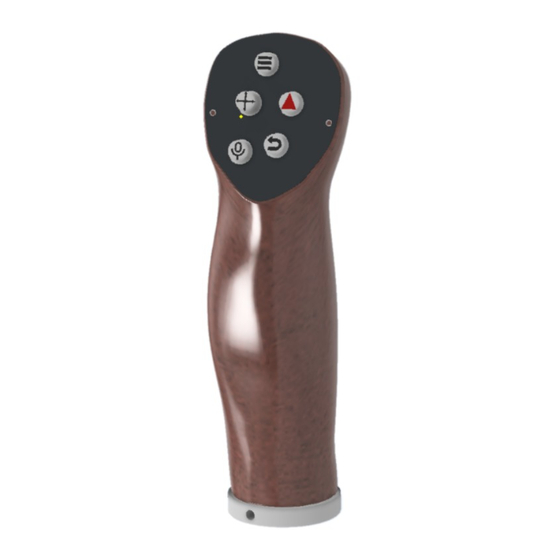
Description The XCStick is an ergonomic Arduino SW based with USB connection and emulates an USB keyboard. It features a wired USB connection for a stable and latency free connection, has a low power consumption, and mostly works by plug and play with optimized default key bindings. Two software loads, one for XCSoar and one for LK8000 are available. -
Page 4: Features
1 meter dual twisted pairs PTFE 28 awg wire • Silicone keypad with silkscreen printed buttons • Works with XCSoar, LK8000 (4 custom programmable key bindings) • Open Source Arduino programmable (https://github.com/iltis42/XCStick/) • OTA upgradable • USB 2.0 Type male Usb Jack with screw Terminal Plug •... -
Page 5: Overview
Overview The following overview shows the embedding of the XCStick in the cockpit environment. The standard case is the connection with XCTouchNav or similar gadget featuring an USB interface. Any of the USB ports types 2.0 or 3.0 are possible. Recommended is to use one of a USB 2.0 e.g. as provided on rear side of the XCTouchNav connector field. -
Page 6: Xcsoar Keys
XCSoar Keys The following table shows the keys that are sent. The JOY_.. keys are originated from the 5 joy-stick way switch in the middle left. The uppermost button opens the Quick Menu to access almost any function that is needed in flight. The red triangle toggles between Alternates and Flarm-Radar screens, as long a GPS signal and Flarm signal is available. -
Page 7: Lk8000 Keys
LK8000 Keys The following table shows the keys that are sent. The JOY_.. keys are originated from the 5 joy-stick way switch in the middle left. The uppermost button shifts the bottom info fields of LK8000. The red triangle toggles between Cruise, APT (airport), COMN (task) and TRF (traffic) screens. - Page 8 The settings for keyboard 'Device model', see also manual here: LK8000 keyboard setup, is to be set to "XCREMOTE" instead of "KeyBoard 1" as shown below for the correct bindings to a remote stick. As shown in the button table on last page, all four key's (except PTT) support longpress, a press longer than 600 milliseconds, that can be mapped to a custom menu.
-
Page 9: Installation
The XCStick can be installed instead of the previous grip onto the naked tube of the stick in the cockpit. On the bottom there is an inbus screw to fasten to lock the XCStick to the metal tube. The allen key to turn this screw is part of the delivery. -
Page 10: Electrical Connections
It is also possible to solder an USB-A male connector from a cut USB cable with the four colors matching to the XCStick cable after laying the cable. For other devices, Type B might be applicable, see the corresponding pinout in the Table below. -
Page 11: Sw Update
Arduino binary export, and press [Update], and after a couple of seconds all is done. The software update is fine and you can power cycle your XCStick with the new software when the... -
Page 12: Dc Power
DC Power The power supply is 5V DC and comes via the USB connector. Technical specifications Operating System ESP32-S2 Arduino Wireless Interfaces WiFi 2.4 GHz USB Interface 1x USB 2.0 male plug Power consumption ~8 mA @ 5V DC equal 0.04 W Dimensions 150x40x40 mm Weight... -
Page 13: Maintenance
11. Warranty Policy For the XCStick, the manufacturer provides a guarantee of two years from the date of purchase with regard to the effort and material costs of the repair. Within this period, components that fail under normal operating conditions will be repaired or replaced free of charge, provided the device was sent to the manufacturer free of charge. -
Page 14: Permit
ETSO or equivalent and is not considered a standard part (e.g. oxygen equipment). The XCStick is considered as a part of a navigation computer and therefore runs as non required equipment. The aircraft can be operated even without a functioning remote control. -
Page 15: Limitation Of Liability
13. Limitation of Liability With the purchase of the device, the customer agrees that no liability for any direct or indirect damage, claims for damages or consequential damages of any kind and on any legal basis arising from the use of the device. This device is a purely extention for cross-country flight tactical navis, it is not part of the required equipment for gliders, and in case of a defect, controlling navigating the aircraft is still possible mechanically. -
Page 16: Ce Declaration Of Conformity
14. CE Declaration of Conformity DECLARATION OF CONFORMITY XCVario, owner Dipl. Ing (FH) Eckhard Völlm, Panoramastr. 86/1, D-71665 Vaihingen/Enz, explains that in the normal configuration the device hardware meets the requirements of the CE. The EMC compatibility corresponds to EN 301 489-3:2002-08 for a Class 3 SRD device (equipment type I).
Need help?
Do you have a question about the XCStick and is the answer not in the manual?
Questions and answers