
Summary of Contents for KNEGT WB-100
- Page 1 Q U A L I T Y E Q U I P M E N T E U R O P E Safety Operators Manual Flail Mowers Model: WB IMPORTANT Read these instructions before installing and using this implement www.knegt-international.com...
-
Page 3: Table Of Contents
CONTENTS CONTENTS PRODUCT SPECIFICATIONS SAFETY INSTRUCTIONS OPERATION SERVICE AND MAINTENANCE PARTS LIST HANMEY IMPLEMENT WARRANTY KNEGT IMPLEMENT WARRANTY... -
Page 4: Product Specifications
PRODUCT SPECIFICATIONS Product No. FINISHING MOWER MODELS FM-100 PTO driven rear or side discharge ~Single high strength cutting blade. ~ 4 independent height adjustable castor wheels. FM-120 PTO driven rear or side discharge models with ~3 high strength cutting blades. ~ 4 independent height adjustable castor wheels. - Page 5 CONGRATULATIONS! On the purchase of your new Hanmey Finishing Mower. This information Knegt is to assist you in preparing, operating and maintaining your mower. Please read and understand the information completely before operating your mower, paying special attention to all the safety details.
-
Page 6: Safety Instructions
SAFETY INSTRUCTIONS 7. Do not stay between the tractor and the Finishing Mower. 8. Do not approach the Finishing mower until all motion has stopped. 9. All rotary blades have the ability to discharge objects at high speeds, which could result in serious injury to bystanders or passers-by, use with extreme caution. - Page 7 SAFETY INSTRUCTIONS 1.4 Storage Safety 1. Store the machine in an area away from human activity. 2. Do not permit children to play on or around the stored machine. 3. Store the machine in a dry, level area. 4. Clean grease and oil as required and protect it from the elements. 1.5 Maintenance Safety Good maintenance is your responsibility.
- Page 8 SAFETY INSTRUCTIONS 1.6 Safety & Model Decal The position of safety decals are shown in the illustrations below. Good safety requires that you familiarize yourself with the various safety signs, and increase your SAFETY AWARENESS.
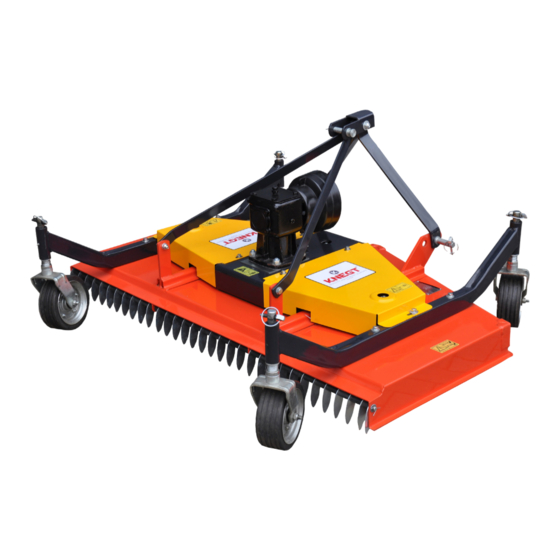
- Page 9 SAFETY INSTRUCTIONS 1. Wheel assembly 2. Wheel bracket 3. Gearbox seat 4. Deck 5. Gearbox 6. Belt pulley 7. Blade spindle 8. Brace 9. A frame 10. Top link Bracket 11. Bottom link Bracket PTO Shaft Safety Guard Universal Joint Grease Nipple...
-
Page 10: Operation
OPERATION 2.1 Checking Before Operating Before operating the machine, the following areas should be checked off: Before starting up the machine, check and Lubricate all grease points -cutter deck, wheels & pto shaft Use only an agricultural tractor of horsepower within limits of the machine specified. Check that the machine is properly attached to the tractor. - Page 11 OPERATION Three Point Linkage: The Finishing mower is equipped with a category 1, three point hitch. Be sure the tractor three point hitch is in the proper configuration. Adjust the linkage sway chains to provide minimal sideway movement. PTO Shaft The tractor must have a 1 3/8 inch 6 spline 540 RPM PTO shaft to fit the driving shaft supplied with the machine.
- Page 12 OPERATION 2.5 Field Operation Lower the implement into its “float” operating mode to allow the machine and the hitch to move up and down. Move the machine into the field and align the machine with the working area. Adjusting the height There are 4 sets of adjusting spacers on the wheel fork, which allow the cutting height range of 30mm-80mm by adjusting spacers to achieve the desired height.
-
Page 13: Service And Maintenance
SERVICE AND MAINTENANCE 3.1 Service 3.1.1 FLUIDS AND LUBRICANTS Grease: Use multi-purpose lithium based grease. Gear Box Oil: Use SAE 90 Gear oil. Storing Lubricants: Your machine can operate at top efficiency only if clean lubricants are used. Use clean containers to handle all lubricants. - Page 14 SERVICE AND MAINTENANCE 3.2.4 PTO SHAFT MAINTENANCE The PTO shaft is designed to telescope to allow for dimensional changes as the machine goes through its operating range. A tubular guard encloses the driving components and is designed to remain stationary on a turning shaft when required. The shaft should telescope easily and the guard turn freely on the shaft at all times.
- Page 15 SERVICE AND MAINTENANCE 3.3 STORAGE After the season’s use, the machine should be thoroughly inspected and prepared for storage. Repair or replace any worn or damaged components to prevent any unnecessary down time at the start of next season. To insure a long, trouble free life, follow the procedure outlined below: Thoroughly wash the machine using a pressure washer to remove all dirt, mud, debris and residue.
- Page 16 SERVICE AND MAINTENANCE Problem & Possible Cause Solution Finishing mower doesn’t turn Repair tractor PTO clutch Tractor clutch Slips. Tighten or replace slip clutch. PTO shaft Slips Poor cutting job slow down. Traveling too fast. Sharpen blades. Blades dull. Bent blade. Straighten or replace blade. Grooves in grass.
-
Page 17: Parts List
PARTS LIST... - Page 18 PARTS LIST Name &Specifications No Part NO. GB 6184-86 Lock nut M18 FM120.00.118 Blade FM150.00.118 Blade FM180.00.118 Blade FM120.00.016 Blade seat GB 1152-89 Grease nipple M6 FM120.00.014 Belt wheel with double groove GB 6184-86 Lock nut M24x1.5 GB 1096-86 Key A8×28 GB 5783-86 Bolt M12x110 GB 97.1-85...
- Page 19 PARTS LIST Name &Specifications No Part NO. FM120.00.110 Rubber cover FM120.00.106 Protecting plate FM150.00.106 Protecting plate FM180.00.106 Protecting plate FM120.00.113 Front link rod FM150.00.113 Front link rod FM180.00.113 Front link rod FM120.00.108 Gasket FM120.00.109 Rear link rod FM150.00.109 Rear link rod FM180.00.109 Rear link rod GB 6178-86...
- Page 20 PARTS LIST Wheel Assembly Name &Specifications No Part NO. 1 FM120.00.161a Steel rim(a) 2 FM120.00.166 Bushing 3 GB 279-88 Bearing160205 4 FM120.00.165 Spacer 5 FM120.00.162 Bushing 6 FM120.00.164 Rubber wheel 7 GB6184-86 Lock nut M8 8 GB 97.1-85 Plain washer 8 9 FM120.00.161 Steel rim 10 GB 5783-86...
- Page 22 Q U A L I T Y E Q U I P M E N T E U R O P E Hoofdkantoor: Knegt International Habraken 2323 L 5507 TK Veldhoven +31 (0) 40 2558416 info@knegttractors.nl www.knegt-international.com...
Need help?
Do you have a question about the WB-100 and is the answer not in the manual?
Questions and answers