Advertisement
Quick Links
Advertisement

Summary of Contents for i360 CP-AVX37
- Page 1 I360 CP-AVX37 Newest version working great with both Blackmagic & vMix...
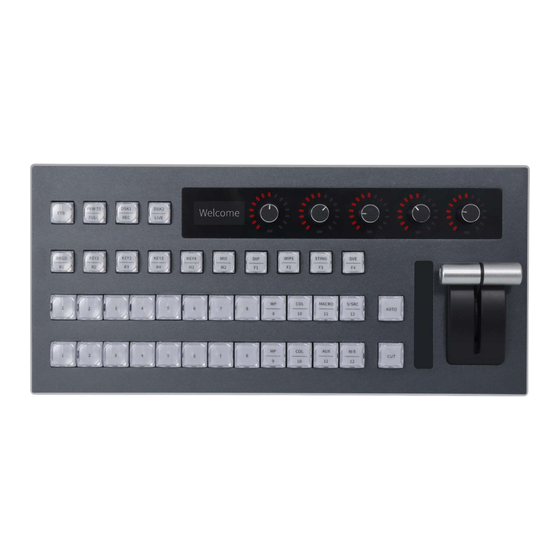
- Page 2 19 buttons Universal keys 4 knobs, 8 buttons Key function can be changed via menu 13 buttons Upper menu for ATEM control; Lower menu for Vmix control;...
- Page 4 2. New added functions • 1. Compatible with Vmix and Atem protocols both How to switch between ATEM and vMix control? 1. Press and hold the 1st knob for about 3 seconds to open CP VAX37’s menu. 2. Click the 1st knob to open the option "1.Protocol“ 3.
- Page 5 2. New added functions • 1.1 When ATEM device is connected, it will show you the ATEM device information and resolution/fps (switched every 3 seconds).
- Page 6 2. New added functions • 1.2 When Vmix is connected, it will show you vMix USB vMix IP.
- Page 7 2. New added functions • 2. Button function customization (Keymap function only available for ATEM) 1. Press and hold the first knob for about 3 seconds to open CP AVX37’s menu. 2. Scroll the 1st knob clockwise and move the cursor to option”...
- Page 8 There are 30 optional functions for knobs 2-5; 10 optional functions for buttons PGM (9-12) and PVM (9-12). Knob2(/3/4/5) Audio In 1 Audio In 2 PGM9(10/11/12), PVM9(10/11/12) … … Input Audio In 20 Color Bars Audio In XLR Color 1 Audio In AES Color 2 Audio In RCA...
- Page 9 3.1 How to connect a ATEM device? • 1. change Protocol to “3.ATEM”. • By menu “1. Protocol” -> “3. ATEM” • 2. Input ATEM device IP address • By menu “2. ATEM Settings” -> “1. ATEM IP” (ATEM device’s IP address is suggested to use a static IP address) •...
- Page 10 3.2 How to set-up keymap function? 1. Press and hold the first knob for about 3 seconds to open CP AVX’s menu. 2. Scroll the 1st knob clockwise and move the cursor to option” 2. ATEM Settings”. Then click the 1st knob to open the option “2.
- Page 11 3.3 How to connect a vMix by IP? • 1. change Protocol to “2. vMix-IP”. • By menu “1. Protocol” -> “2. vMix-IP” • 2. Input the IP address of PC(with vMix installed ) • By menu “3. vMix-IP Settings” -> “1. vMix-IP” (PC’s IP address is suggested to use a static IP address) •...
- Page 12 3.4 How to connect a vMix by USB? • 1. change Protocol to “1. vMix-USB”. • By menu “1. Protocol” -> “1. vMix-USB” • 2. Connect CP AVX’s port DEVICE to PC with a USB cable. • 3. Enable “MIDI function” in vMix Settings.
- Page 13 3.4 How to connect a vMix by USB? • 4. Click button “Import” to import .config file. (Please get the default .config file from tech support team or from salesman) • 5. Click button “OK” to save. • 6. Exit the menu by clicking the 2 knob.
- Page 14 4. Extras • 4.1. How to find present device firmware version? • By Menu “6.About Device“ - “3. FW Ver”...
- Page 15 4. Extras • 4.2. How to change language? • By Menu “5.Language“ • 1. English • 2. 简体中文 • 3. 日本語 • 4. 한국인 • 5. Русский...
- Page 16 4. Extras • 4.3. How to Correct T-Bar? • By Menu “6.About Device“ - “4.Correct T-Bar”...
Need help?
Do you have a question about the CP-AVX37 and is the answer not in the manual?
Questions and answers