Table of Contents
Advertisement
Quick Links
Advertisement
Table of Contents

Related Manuals for QNAP QHora-321


Summary of Contents for QNAP QHora-321
- Page 1 QHora-321 User Guide Document Version: 2 30/08/2022...
-
Page 2: Table Of Contents
Reset Button................................14 4. QuRouter About QuRouter............................... 15 System Requirements............................. 15 Getting Started.................................15 Configuring QuRouter.............................16 Binding the Router with a QNAP ID........................17 Unbinding the Router from a QNAP ID......................18 5. QuRouter Navigation Taskbar..................................19 Dashboard................................20 6. System Configuration System..................................21... - Page 3 9. Troubleshooting Support and Other Resources..........................63 Testing Network Connectivity with the Ping Utility..................... 63 Testing Network Connectivity with the Traceroute Utility.................. 63 Using QNAP Remote Support to Resolve Router Issues..................64 10. Glossary myQNAPcloud................................66 QNAP ID..................................66 Qfinder Pro................................66 QuRouter..................................
- Page 4 QHora-321 User Guide Disclaimer................................. 67 CE Notice...................................67 FCC Notice.................................68 Radio Equipment Directive (RED) 2014/53/EU Article 10..................68 EU RoHS Statement..............................69 ISED Compliance Statement...........................69 Radiation Exposure Statement..........................69 UKCA Notice................................69...
-
Page 5: Product Overview
This chapter provides basic information about the QNAP device. About the QHora-321 The QHora-321 provides wired connectivity with six 2.5 GbE ports that allow you to configure enterprise-level mesh VPN networks. Equip your QNAP device with the router to provide secure data transmission and and reduce the risk of cyber attacks. -
Page 6: Software Specifications
QHora-321 User Guide Software Specifications Specification Description System Status and Management • Connected devices • Device connection status • WAN status • Firmware schedule management Wired Network Management • Physical interface management • WAN interface configuration • WAN ports • VLAN •... -
Page 7: Package Contents
QHora-321 User Guide Specification Description • Remote access support using L2TP, OpenVPN, QBelt (QNAP proprietary VPN), and WireGuard protocols • Client IP pool management • VPN client management • Connection logs • Maximum VPN tunnels: 30 (including QuWAN and QVPN connections) •... -
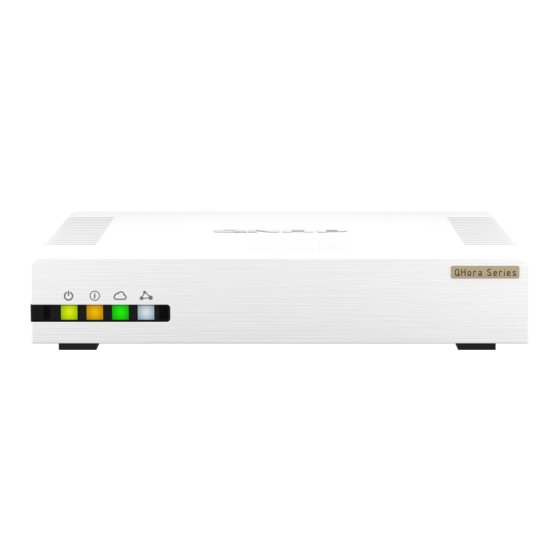
Page 8: Front Panel
QHora-321 User Guide Front Panel Component Component Power LED QuWAN Orchestrator status System status LED Auto-mesh Connection Status Rear Panel Component Component Reset button Power input 2.5 Gigabit Ethernet LED (2.5 Gbps speed) 2.5 Gigabit Ethernet ports (RJ45) Product Overview... -
Page 9: Safety Information
QHora-321 User Guide Component Component 2.5 Gigabit Ethernet LED (1 Gbps or 100 Mbps WAN and LAN LEDs speed) Safety Information The following instructions help ensure personal safety and environmental safety. Read these instructions carefully before performing any operations. General Instructions •... -
Page 10: Installation And Access
5. Verify that the WAN interface LED is orange and the LAN interface LED is green. For details, see LEDs. 6. Log on to QuRouter with the local account credentials or QNAP ID. For details, see Binding the Router with a QNAP Connecting the Router to the Internet 1. - Page 11 4. Verify that the router is recognized by the computer. a. Open Qfinder Pro on the host computer. Note To download Qfinder Pro, go to https://www.qnap.com/utilities. b. Locate the router on the list. 5. Open a web browser on your computer.
-
Page 12: Router Access
QHora-321 User Guide 7. Follow the installation guide to configure the initial settings of the QNAP router. Router Access Method Description Requirements Web browser You can access the router using any • A computer connected to the same computer on the same network if you... -
Page 13: Accessing The Router Using Qfinder Pro
The QuRouter dashboard page appears. Accessing the Router Using Qfinder Pro Qfinder Pro is a desktop utility that enables you to locate and access QNAP devices on a specific network. The utility supports Windows, macOS, Linux, and Chrome OS. 1. Install Qfinder Pro on a computer that is connected to the same network as the router. -
Page 14: Basic Operations
QHora-321 User Guide 3. Basic Operations This chapter describes basic device operations. LEDs LEDs indicate the overall status of the router power, network ports, and system status. Note • Front panel LEDs remain active during the entire reset process. • The default WAN interface designation is assigned to port number 1. -
Page 15: Reset Button
A LAN connection has been established. Ethernet LAN Reset Button QNAP routers can be reset to factory defaults using the reset button located on the rear side of the device. For details on the component placement, see the rear side of the device. Operation... -
Page 16: Qurouter
4. QuRouter About QuRouter QuRouter is a centralized management interface that comes with your QNAP router, accessible by visiting the router's IP address in a web browser. With its intuitive interface, QuRouter makes it easy to set up, secure, and configure the features of your router. -
Page 17: Configuring Qurouter
QHora-321 User Guide Configuring QuRouter This sections explains how to configure the router using the web management interface during the initial setup process. 1. Open a web browser. 2. Enter the default IP address of the network interface in the address bar. -
Page 18: Binding The Router With A Qnap Id
15. Click Login. The Local Account window appears. 16. Optional: You can log in to QuRouter using your QNAP ID and password. For details, see Binding the Router with a QNAP 17. Reenter or modify the local account username and password. -
Page 19: Unbinding The Router From A Qnap Id
1. Log in to QuRouter. 2. Go to System > Access Control > Administrator . Below Unbind QNAP ID, click A confirmation message appears. 4. Click OK. Note The router is unbound from the QNAP ID and you are logged out of QuRouter. QuRouter... -
Page 20: Qurouter Navigation
• About: Displays the following information: • Operating system • Hardware model • Firmware version • QNAP Remote Support: Click to create a support ticket and contact the QNAP Customer Service team. For details, see Using QNAP Remote Support to Resolve Router Issues. -
Page 21: Dashboard
QHora-321 User Guide Dashboard Section Displayed Information User Action Overview • System uptime (number of days, hours, minutes, and seconds) • CPU temperature • Firmware information Device Connection Status • Internet status • Device status • Number of connected clients WAN Overview •... -
Page 22: System Configuration
3. Click I agree. 4. Click OK. QuRouter resets the device to default settings and the router is unbound from QNAP ID. Backing Up System Settings 1. Go to System > System Settings > Restart / Reset / Backup / Restore . - Page 23 QHora-321 User Guide The device exports the system settings as a BIN file and downloads the file to your computer. Restoring System Settings Warning If the selected backup file contains user or user group information that already exists on the device, the system will overwrite the existing information.
-
Page 24: Managing Event Logs
QHora-321 User Guide The administrator account is the default router account. You cannot delete the administrator account. 1. Log in to QuRouter. 2. Go to System > Access Control > Administrator . Under Local Account, click The Local Account window appears. -
Page 25: Firmware
QHora-321 User Guide Firmware QNAP recommends keeping your router firmware up to date. This ensures that your router can benefit from new features, enhancements, and bug fixes. Checking for Live Updates 1. Go to Firmware. 2. Enable Live update. 3. Select one or more of the following options: •... - Page 26 QHora-321 User Guide System Configuration...
-
Page 27: Network Settings Network
QHora-321 User Guide 7. Network Settings Network Configuring Wide Area Network (WAN) Interface Settings 1. Log in to QuRouter 2. Go to Network > Physical Interface Settings > WAN . 3. Identify a WAN interface. Click The port configuration window appears. - Page 28 • Auto: Automatically obtain the IP address using DHCP. • Manually: Manually assign the IP address for the primary and secondary DNS servers. Important QNAP recommends specifying at least one DNS server to allow URL lookups. 8. Configure the IPv6 settings. a. Click Enable IPv6.
-
Page 29: Configuring Local Area Network (Lan) Interface Settings
QHora-321 User Guide Note Prefix delegation is available only for PPPoEv6 and Stateless (SLAAC) options. 9. Click Apply. QuRouter updates the WAN settings. Configuring Local Area Network (LAN) Interface Settings 1. Log in to QuRouter 2. Go to Network > Physical Interface Settings > LAN . - Page 30 • Use the fixed IP address: Select to use the same IP address assigned for the fixed IP address. • Manually: Manually configure the DNS server IP addresses. Note QNAP recommends specifying at least one DNS server to allow URL lookups. Reserved IP Table • Click Add to configure a reserved IP table.
-
Page 31: Locating Other Qnap Devices On The Network
9. Click Apply. QuRouter updates the LAN settings. Locating Other QNAP Devices on the Network Your router can find other QNAP devices connected to the same network subnet. 1. Log in to QuRouter. 2. Go to Connected QNAP Devices. 3. Perform any of the following actions. - Page 32 QHora-321 User Guide 4. Select WAN as the interface. 5. Configure the interface settings. Setting User Action Interface name Specify an interface name between 1 and 64 characters. Description (optional) Enter a description for the interface. Specify an MTU value between 576 and 1500.
- Page 33 • Auto: Automatically obtain the IP address using DHCP. • Manually: Manually assign the IP address for the primary and secondary DNS servers. Important QNAP recommends specifying at least one DNS server to allow URL lookups. 8. Configure the IPv6 settings. a. Click Enable IPv6.
- Page 34 QHora-321 User Guide Note Prefix delegation is available only for PPPoEv6 and Stateless (SLAAC) options. 9. Click Apply. QuRouter adds the WAN VLAN interface. Adding a LAN VLAN Interface 1. Log in to QuRouter 2. Go to Network > VLAN Settings > VLAN Settings .
- Page 35 • Use the fixed IP address: Select to use the same IP address assigned for the fixed IP address. • Manually: Manually configure the DNS server IP addresses. Note QNAP recommends specifying at least one DNS server to allow URL lookups. Reserved IP Table • Click Add to configure a reserved IP table.
- Page 36 QHora-321 User Guide Setting Description IPv6 addressing Select from the following: mode • Stateful: The stateful DHCPv6 or managed mode enables you to manually assign a unique IPv6 address to each client. • Stateless: The stateless DHCPv6 mode enables users to manually enter additional IPv6 information including the lease time, but automatically assigns a unique IPv6 address to each client.
-
Page 37: Configuring The Bridge Connection Settings
QHora-321 User Guide QuRouter deletes the VLAN. Configuring the Bridge Connection Settings Your router can be configured to create a wired bridge to provide a transparent connection to all the devices in the network. Bridge mode allows you to connect two routers without any IP address conflict and extend port availability to several devices. - Page 38 • Use the fixed IP address: Select to use the same IP address assigned for the fixed IP address. • Manually: Manually configure the DNS server IP addresses. Note QNAP recommends specifying at least one DNS server to allow URL lookups. Reserved IP Table • Click Add to configure a reserved IP table.
-
Page 39: Managing Dhcp Ip Address Reservations
QHora-321 User Guide Setting Description IPv6 addressing Select from the following: mode • Stateful: The stateful DHCPv6 or managed mode enables you to manually assign a unique IPv6 address to each client. • Stateless: The stateless DHCPv6 mode enables users to manually enter additional IPv6 information including the lease time, but automatically assigns a unique IPv6 address to each client. - Page 40 QHora-321 User Guide Adding an IPv4 Static Route 1. Log in to QuRouter. 2. Go to Network > Routing > IPv4 / Static Route . 3. Click Add Static Route. The Add Static Route window appears. 4. Configure the settings.
-
Page 41: Clients
QHora-321 User Guide QuRouter creates the IPv6 static route. Configuring a Static Route 1. Log in to QuRouter. 2. Select a static route. • IPv4 static route: Network > Routing > IPv4 / Static Route • IPv6 static route: Network > Routing > IPv6 / Static Route 3. -
Page 42: Adding A Device To The Blocked List
QHora-321 User Guide Adding a Device to the Blocked List 1. Log in to QuRouter. 2. Go to Clients > Blocked List . 3. Click Block client. The Add Device to Blocked List window appears. 4. Configure the settings. Setting... -
Page 43: Sd-Wan
Configuring QuWAN Settings 1. Log in to QuRouter. Note If you are logging in with your QNAP ID for the first time, you are prompted to enter the local account credentials as part of the 2-step verification process. Important After configuring and saving the QuWAN settings, the device restarts to implement the settings and join the QuWAN network. -
Page 44: Accessing Quwan Orchestrator
4. Click Join the Organization and QuWAN. Important • The router is unbound from the QNAP ID once it is part of the QuWAN topology. • A QNAP router can support up to 30 VPN tunnels. A confirmation message appears. -
Page 45: Configuring The Quwan Qbelt Vpn Server Settings
Configuring the QuWAN QBelt VPN Server Settings QNAP allows you to use QuWAN Orchestrator to configure your hub devices as QBelt VPN servers. After setting up a VPN server in the SD-WAN cloud solution, you can add multiple VPN users, and then clients can use the QVPN Device Client to connect to the hub. -
Page 46: Qvpn
QVPN allows you to create and manage VPN servers, add VPN clients, and monitor VPN logs. QVPN Server Settings QuRouter enables you to configure QNAP routers as a VPN server. You can configure multiple virtual servers to host and deliver VPN services to users in an organization. - Page 47 QHora-321 User Guide Setting Description Pre-shared key Specify a pre-shared key (password) to verify connecting VPN clients. Pre-shared key requirements: • Length: 8–16 ASCII characters • Valid characters: A–Z, a–z, 0–9 Specify a DNS server for the QBelt server. Note The DNS server limitation is 1 by default.
- Page 48 QHora-321 User Guide Setting Description Pre-shared key Specify a pre-shared key (password) to verify connecting VPN clients. Pre-shared key requirements: • Length: 8–16 ASCII characters • Valid characters: A–Z, a–z, 0–9 Specify a DNS server for the L2TP server. Note The DNS server limitation is 1 by default.
- Page 49 QHora-321 User Guide Setting Description Encryption Select from the following encryption methods: • Medium (AES 128-bit) • High (AES 256-bit) Specify a DNS server for the OpenVPN server. Note The DNS server limitation is 1 by default. 6. Enable Use this connection as a default gateway for remote devices.
-
Page 50: Qvpn Client Settings
QHora-321 User Guide Setting User Action Listen port Specify a UDP port number between 1 and 65535. Note The default WireGuard port number is 51820. Private key Click Generate Keypairs to automatically populate a unique 32-byte private key. Specify a DNS server for the WireGuard server. - Page 51 QHora-321 User Guide Important • When adding an OpenVPN connection, an OpenVPN configuration file is required to establish the connection. • To enable QVPN client service, ensure that you disable QVPN server service and QuWAN service. Creating an OpenVPN Connection Profile 1.
-
Page 52: Managing Qvpn Logs
QHora-321 User Guide QuRouter enables the QVPN client service. To view the QVPN connection logs, go to QVPN Clients > QVPN Connection Logs . Deleting a QVPN Connection Profile 1. Log in to QuRouter. 2. Go to QVPN Clients > QVPN Connection Profiles . -
Page 53: Deleting A Custom Service Port
Dynamic DNS Service (DDNS) allows internet access to the router using a domain name instead of an IP address. This ensures that the router is accessible even if the client ISP changes the IP assignment. Configuring DDNS (My DDNS) Settings 1. Log in to QuRouter with your QNAP ID and password. 2. Go to DDNS. Network Settings... -
Page 54: Modifying The Ddns Domain Name
QHora-321 User Guide 3. Click DDNS Settings. The DDNS Settings window appears. 4. Select the WAN interface. Setting User Action WAN Interface Select a configured WAN interface. Static IP Manually assign a fixed IP address. Obtain an Automatic DHCP IP... -
Page 55: Security Settings
QHora-321 User Guide 8. Security Settings Firewall Firewall rules allow you to control information flow in individual packets and configure permissions according to a defined criterion. From here you can enable the firewall and manage individual firewall rules. Adding a Firewall Rule 1. -
Page 56: Configuring A Firewall Rule
QHora-321 User Guide Setting User Action Source Specify the connection source for this rule. • Selecting Any applies this rule to all connections. • Selecting Define applies this rule to traffic coming from the sources defined for this rule. • Selecting None allows you to apply the rule to traffic coming from the client operating system. -
Page 57: Deleting A Firewall Rule
QHora-321 User Guide 4. Configure the firewall rule settings. For details, see Adding a Firewall Rule. 5. Click Save. QuRouter updates the firewall rule. Deleting a Firewall Rule 1. Go to NAT/Firewall > Firewall Rule . 2. Identify a firewall rule. -
Page 58: Demilitarized Zone (Dmz)
QHora-321 User Guide Setting User Action WAN service port Select the custom WAN service port from the drop-down menu. WAN interface Select the WAN interface from the drop-down menu. Host IP address Specify the LAN IP address. LAN service port Specify a service port number for the host IP address. -
Page 59: Web Content Filtering
QHora-321 User Guide You can configure DMZ rules only on configured WAN interfaces that are not in use by port forwarding rules. Configuring DMZ Settings 1. Go to NAT/Firewall > NAT > Demilitarized Zone (DMZ). 2. Identify a DMZ rule. -
Page 60: Configuring A Web Content Filtering Role
QHora-321 User Guide Setting User Action Role name Specify a name for the web content filtering role. Enable website filter Select to enable website filtering to prevent users from viewing certain URLs or websites. Domain name filter a. Enter an entire domain name or specific URLs. Separate multiple URLs with commas (,). -
Page 61: Adding A Device To A Web Content Filtering Role
QHora-321 User Guide Click A confirmation message appears. 5. Click Apply. QuRouter deletes the web content filtering role. Adding a Device to a Web Content Filtering Role Note You cannot assign a single device to more than one role at a time. - Page 62 QHora-321 User Guide 2. Go to QuWAN > Quality of Service (QoS) . 3. Click QoS Configuration on QuWAN Orchestrator. 4. Log in to QuWAN Orchestrator. 5. Go to QuWAN Device. 6. Select the region and your device. 7. Click Quality of Service.
- Page 63 QHora-321 User Guide Setting User Action Port Specify the service port number. This field is only available if the TCP or UDP protocol is selected. • Specify a port number between 1 and 65535. • Enter up to 15 ports.
-
Page 64: Troubleshooting
QHora-321 User Guide 9. Troubleshooting This chapter describes basic troubleshooting information. Support and Other Resources QNAP provides the following resources: Resource Documentation https://docs.qnap.com Service Portal https://service.qnap.com Downloads https://download.qnap.com Community Forum https://forum.qnap.com Testing Network Connectivity with the Ping Utility Ping uses Internet Control Message Protocol (ICMP) query messages, ICMP echo messages, and ICMP echo replies to verify device connectivity. -
Page 65: Using Qnap Remote Support To Resolve Router Issues
QuRouter generates the data for the specified diagnostic utility. To clear the generated data from QuRouter, click Clear. Using QNAP Remote Support to Resolve Router Issues Remote Support allows the QNAP Customer Service team to access and assist you with router-related issues. 1. Log in to QuRouter. Click 3. - Page 66 Event logs , and then click Export. g. Confirm your contact information. h. Click Send Message. QNAP Customer Service sends an email to your QNAP ID that includes a support ticket ID. 5. Allow remote connections from the Customer Service team. a. Log in to QuRouter.
-
Page 67: Glossary Myqnapcloud
User account that enables you to use myQNAPcloud remote access and other QNAP services Qfinder Pro QNAP utility that lets you locate and access QNAP devices in your local area network QuRouter The QNAP web management interface that allows you to view and configure QNAP routers... -
Page 68: 11. Notices
No license, express or implied, by estoppels or otherwise, to any intellectual property rights is granted by this document. Except as provided in QNAP's terms and conditions of sale for such products, QNAP assumes no liability whatsoever, and QNAP disclaims any express or implied warranty, relating to sale and/or use of QNAP products including liability or warranties relating to fitness for a particular purpose, merchantability, or infringement of any patent, copyright or other intellectual property right. -
Page 69: Fcc Notice
• Consult the dealer or an experienced radio/television technician for help. Important Any modifications made to this device that are not approved by QNAP Systems, Inc. may void the authority granted to the user by the FCC to operate this equipment. -
Page 70: Eu Rohs Statement
QHora-321 User Guide EU RoHS Statement This equipment complies with the European Union RoHS Directive 2011/65/EU on the restriction of the use of certain hazardous substances in electrical and electronic equipment. The directive applies to the use of lead, mercury, cadmium, hexavalent chromium, polybrominated biphenyls (PBB), and polybrominated diphenyl ethers (PBDE) in electrical and electronic equipment.
Need help?
Do you have a question about the QHora-321 and is the answer not in the manual?
Questions and answers